If your home office sounds like a bathroom stall on video calls, you are not imagining it. Echo is the fastest way to make good mics sound cheap and make you sound far away.
Most people buy acoustic panels for echo in office setups and then stick them where they look nice. That usually helps a little, but it often misses the real reflection paths that create the annoying ring.
The good news is you can fix a lot with a few smart moves, even in a spare bedroom with hard surfaces acoustics working against you. The bad news is some popular panel placements do almost nothing for flutter echo and slapback echo.
Identify the type of echo you’re hearing
Start by naming the problem, because different echoes come from different geometry. If you treat the wrong thing, you will spend money and still hear that same sharp bounce on calls.
Before you buy anything, listen for what happens right after you speak and right after you stop speaking. The timing and texture of that tail tells you which surfaces are talking back.
It also helps to notice whether the echo changes when you turn your head or rotate your chair. If the sound changes a lot with small movements, you are dealing with strong early reflections close to the mic.
Flutter echo is the fast, metallic “zing” that happens between two parallel hard surfaces like bare side walls. You hear it most when you clap or when consonants like “t” and “k” sound spitty.
Flutter echo can be sneaky because it may only show up in certain spots, like the center of the room or right at the desk. If you move two feet and it disappears, that is still a real problem for a fixed mic position.
Rooms with long, uninterrupted walls are the usual culprit, even if you have a bed and a few shelves. The reflections can still bounce above furniture height and create that zipper-like ring.
Slapback echo is a single, distinct repeat, like a quick “pap” coming back at you from a wall behind the mic. It is common when your desk faces a bare wall and the opposite wall is also hard and open.
Slapback is especially obvious when you use an open-back headset mic or a desktop mic that hears the whole room. It can make you sound like you are recording in a hallway even when the room is small.
You can often spot slapback by snapping your fingers and listening for one clean return instead of a shimmer. If the repeat is strong, it usually means one surface is acting like a mirror at speaking height.
There is also general room reverb, which is the smeary tail that makes everything less clear without a clear “repeat.” If your voice sounds like it is in a box, you probably have a mix of reverb plus flutter echo from parallel surfaces.
Room reverb tends to build up when many surfaces are reflective, even if none of them creates a dramatic single echo. It is the cumulative effect of dozens of small bounces that smear syllables together.
If your audio sounds fine when you speak quietly but gets messy when you project, that is often reverb and early reflections stacking up. A louder voice excites the room more, and the mic hears more of the room than you expect.
Do not confuse echo with noise, because they need different fixes. HVAC hiss and computer fan noise call for mic technique and noise control, while echo calls for absorption and placement.
Also pay attention to whether the echo is worse on certain words, because that points to frequency issues. Sharp “s” and “sh” problems usually mean hard, close surfaces, while a boomy room points to bigger treatment needs.
Why bare walls and windows create office echo
Echo is mostly your voice bouncing off nearby boundaries and arriving back at your mic a split second later. In a home office, those boundaries are usually drywall, glass, a hollow core door, and a desk surface.
What makes it annoying is not the existence of reflections, but how soon they arrive. Early reflections within the first 20 milliseconds blur your voice and make it sound like the mic is farther away.
When your mic hears your voice and the reflection at almost the same time, you get comb filtering that changes the tone. That is why you can sound thin on one day and boxy on another just by shifting your chair.
Hard surfaces acoustics are brutal at speech frequencies because they reflect a lot of energy above roughly 500 Hz. That is the range that carries intelligibility, so reflections there make you sound harsh and washed out.
Drywall, glass, and laminated furniture also reflect higher frequencies in a very directional way. That means a single wall can create a strong, focused bounce straight into your mic.
Even if the room feels “furnished,” the reflective parts can still dominate because speech is not that loud. A few strong reflections can outweigh a lot of soft stuff that is not in the reflection path.
Windows are worse than people expect, because glass is rigid and reflective and often sits in a corner where reflections stack up. A big window beside your desk can create a strong early reflection that your mic captures as “room.”
Blinds do not help much unless they are thick and irregular, because they mostly redirect sound instead of absorbing it. You might hear a slightly different echo pattern, but the energy is still in the room.
A window also tends to be near another hard surface like the adjacent wall or the desk, which creates a cluster of reflections. That cluster is why some offices sound “bright” and “clicky” on calls.
Bare drywall is not “soft” just because it is painted, it is still a broad reflective surface. When you have two long, parallel walls, you can get flutter echo even in a room that has carpet and furniture.
Painted walls are especially reflective at the exact frequencies that make speech crisp. That crispness turns into harshness when it arrives twice, once direct and once reflected.
Closets and alcoves can also create weird reflections because they act like little chambers. An open closet door behind you can add a hollow “cupped hands” quality to your voice.
Doors matter too, especially hollow core doors that act like drums. A door behind your mic can reflect highs and also resonate, which makes the room sound more “alive” than it should.
The desk is a huge offender because it sits inches below your mic and your mouth. A flat desktop gives you a strong bounce that arrives so fast it sounds like tone coloration rather than a separate echo.
Monitors can do the same thing, especially dual monitors angled like a shallow V. They can reflect sound right back toward the mic and exaggerate sibilance.
Empty corners amplify the problem because sound piles up there and reflects out in multiple directions. If your desk is jammed into a corner, you may be hearing several early reflections at once.
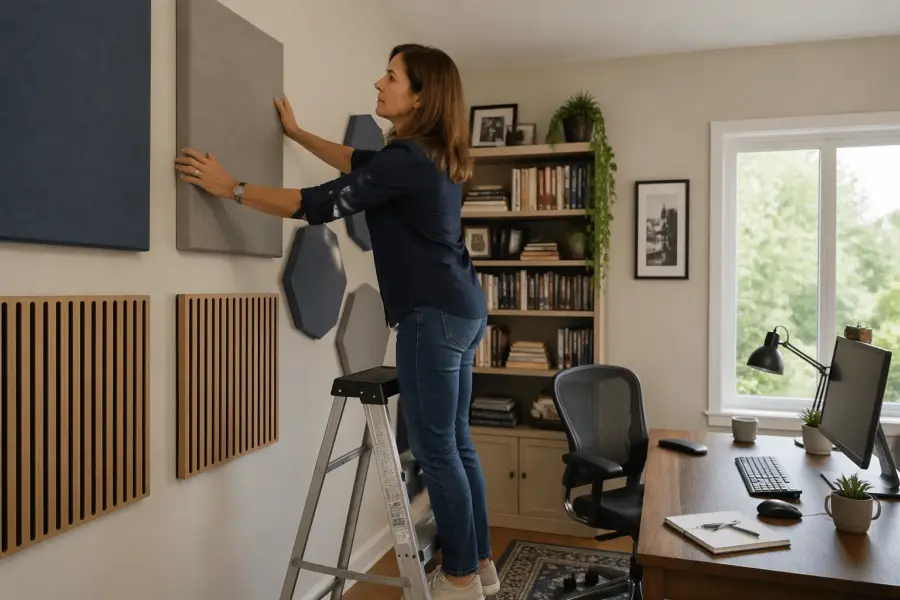
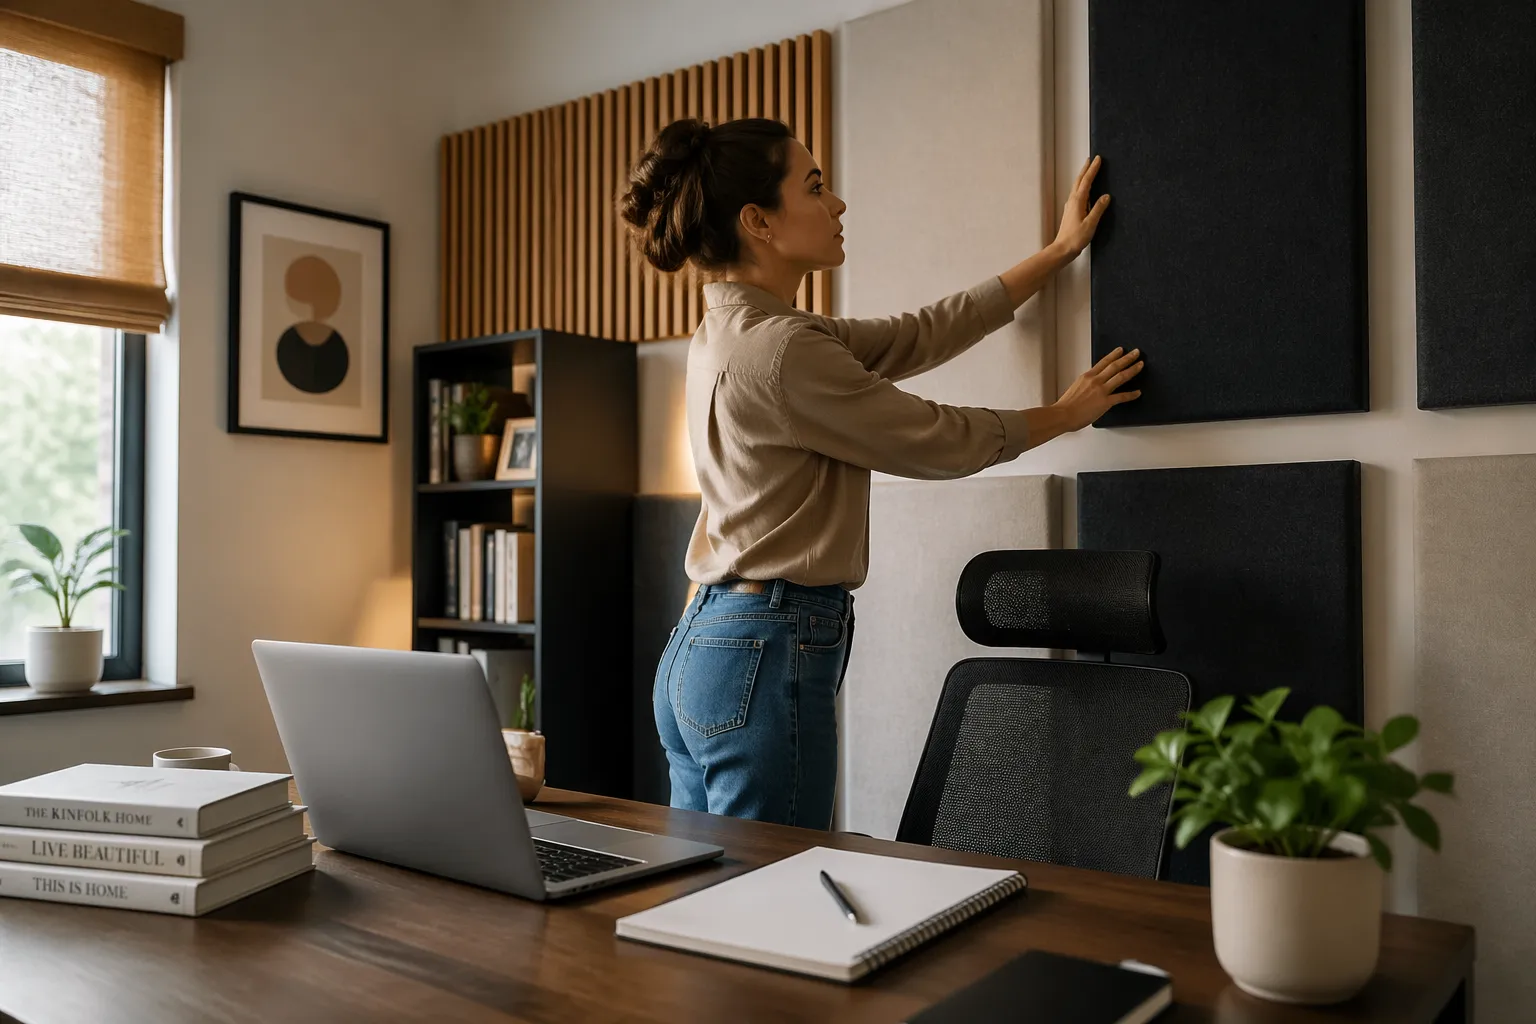
Panel placement that targets echo fast
Good panel placement is about intercepting early reflections, not wallpapering the room. For acoustic panels for echo in office use, you get the biggest change by treating the surfaces closest to your mouth and your mic.
Start with the spots that create the first bounce, because those are the reflections your mic hears the loudest. Late reflections matter less for calls than the early ones that smear consonants.
Think like a flashlight beam coming from your mouth toward nearby walls and flat objects. Wherever that beam hits and can “see” the mic, that is a prime target.
Think in simple paths: your voice goes out, hits a surface, then hits the mic. If you can block the first bounce off the side wall or the wall behind your monitor, clarity improves fast.
One easy trick is to sit in your normal position and have someone slide a mirror along the wall. If you can see the mic in the mirror from your seat, that spot is a first reflection point worth treating.
Side wall panels should usually be at head height, not near the floor and not up by the ceiling for no reason. If your mouth and mic live around 4 to 5 feet off the ground, that is where the panels should work.
The wall behind you is often the biggest “one move” improvement for slapback echo. When that wall is bare, it throws your voice right back into the mic capsule like a ping pong paddle.
The wall in front of you can matter too, especially if you face a hard surface at close distance. If your monitor is a foot from a bare wall, that wall becomes part of the mic’s sound.
If you are using a cardioid mic, remember that it still hears the room, just less from the rear. A strong reflection from the side can still be loud enough to compete with your direct voice.
If you are using an omnidirectional mic, placement becomes even more critical because it hears everything. In that case, you may need more coverage behind and beside you to keep the room from dominating.
Do not ignore the corner behind your monitor if it is a hard 90-degree junction. A panel that bridges that corner can reduce multiple reflection paths at once.
Also consider the “rear wall” from the mic’s point of view, not just your point of view. If the mic faces you and has a wall a few feet behind it, that wall can still feed reflections into the mic pattern.
| Echo symptom | Most likely reflection path | Fastest panel target |
|---|---|---|
| Metallic “zing” after a clap | Parallel side walls | Two panels at ear height on each side wall |
| Distinct repeat of your voice | Wall behind the mic or behind your head | One large panel centered behind you |
| Hollow, boxy call audio | Desk surface plus nearby wall | Panel on front wall plus a desk mat or angled screen |
| Sharp reflections on “s” sounds | Window beside or behind the desk | Panel near the window edge or heavy curtain coverage |
| Echo only when standing and talking | Ceiling and upper wall area | Ceiling cloud above speaking position |
Use the table as a starting map, not a rigid rule, because every room has its own weird angles and openings. The goal is to find the loudest early reflections and take them out of the mic’s path.
If you only have budget for two panels, put them where they break the most obvious reflection pair. In many rooms that means one behind you and one on the nearest side wall.
If you have a little more budget, treat both side walls symmetrically to stop the ping pong effect. Symmetry also keeps your voice from sounding lopsided in tone when you turn your head.
Do not place panels too high just because you do not want them in frame. A panel that is out of frame but out of the reflection path is basically wall art.
If you need panels to look good, choose fabric colors and frames you like, but keep the placement honest. You can make correct placement look intentional with a clean grid or a centered layout.
If your room has a big open doorway, remember that sound can bounce off the hallway wall and come back. A panel near the doorway edge or a thick curtain can reduce that “extra room” effect.
How panel size and coverage affect results
Small panels can work, but they often disappoint because echo problems are usually created by large surfaces. A 12×12 panel looks tidy, yet it only catches a narrow slice of the reflection field.
When people say panels “did nothing,” it is often because the panels were too small, too thin, or too far from the real reflection point. The room is still reflecting, just around the panel.
For speech, you want enough area that you cannot easily miss the target when you shift in your chair. If the panel coverage is tiny, moving your head a few inches can put you back in the reflection line.
For speech, thickness matters as much as area, because thin foam mostly grabs the top end and leaves the upper mids bouncing around. A 2 inch to 4 inch mineral wool or fiberglass panel is a safer bet for slapback echo and flutter echo.
Upper mids are where “nasal,” “boxy,” and “honky” live, and that is where many thin products struggle. That is why a room can sound less bright but still sound like a room.
Thicker panels also tend to sound more natural because they reduce reflections across a wider band. The result is not just less echo, but a more stable vocal tone.
Coverage is about percentage of the problem surface, not percentage of the whole room. If your back wall is the main offender, covering 20 to 30 percent of that wall in the center can beat scattering the same area across random spots.
Center coverage works because the strongest reflection usually comes from the area directly behind your head and shoulders. That is where your voice hits most directly when you speak toward the mic.
Scattering panels can help once the main offenders are handled, but it is a second step. First you want to kill the obvious bounce that makes you sound distant.
Do not expect one panel to “fix” a room that is basically a rectangle with bare walls and a window. Echo tends to come from pairs of surfaces, so treat at least one of each pair to break the ping pong effect.
If you treat only one wall in a flutter pair, you can still get improvement because you break the loop. Treating both walls usually makes the result more consistent across the room.
Panel placement can also change how loud you think you are, because a less reflective room feels quieter. That can be good for calls, but it may make you speak a little louder until you adjust.
Do not confuse absorption with soundproofing, because panels do not stop your voice from leaving the room. They mainly stop your voice from bouncing around inside the room and coming back into the mic.
If you are chasing a broadcast sound, you may eventually add more coverage than you need for basic calls. For normal meetings, the goal is controlled and clear, not dead and unnatural.
It is also normal to need fewer panels if you sit close to the mic and keep gain low. Mic distance and gain are part of the “coverage” equation because they change how much room the mic hears.
If you are stuck with smaller panels, grouping them into a larger block is usually better than spreading them out. A cluster behaves more like one big absorber at the reflection point.
Air gaps can help too, even on walls, because they make the panel act thicker. A panel mounted one to two inches off the wall can absorb a bit lower and feel more effective for speech.
When you need a ceiling panel (and when you don’t)
Ceilings matter when your mic is sensitive and your room is short, because the bounce arrives quickly and sounds like comb filtering. If you sit under an 8 foot ceiling with a condenser mic, the ceiling reflection can be louder than you think.
The ceiling reflection is often overlooked because you do not “see” it the way you see a bare wall. But the mic does not care if the reflection is pretty, it only cares that it arrives fast and strong.
If you have a hard floor and a hard ceiling, you can also get a vertical flutter that adds a subtle ring. It is less obvious than side wall flutter, but it can still make speech feel thin.
You probably do not need a ceiling cloud if your main issue is flutter echo between side walls. In that case, the “zing” is mostly horizontal, and side wall treatment does more than anything overhead.
Another sign you can skip the ceiling at first is when your clap test sounds clean at the desk but messy in the middle of the room. That usually points to wall-to-wall flutter rather than a ceiling bounce at your position.
Ceilings also matter less if your mic is very close and you keep input gain conservative. A close mic captures a higher ratio of direct voice to room reflections, including the ceiling.
A ceiling panel helps most when you hear a papery reflection even after treating side walls, or when you record standing up for presentations. It also helps if your desk is under a hard ceiling fan canopy or a flat drywall lid with no texture.
Standing changes the geometry, because your mouth is closer to the ceiling and the reflection gets stronger. That is why a room can sound fine seated and suddenly echoey when you stand to present.
If you use a shotgun mic above frame, the ceiling becomes even more important because the mic is literally aimed upward. In that setup, a small cloud can be a big upgrade.
Mounting matters, because a small air gap above the panel increases low frequency absorption a bit and improves overall usefulness. If you cannot mount, a thick panel hung with hooks and chain is still better than skipping the ceiling entirely.
Do not overthink the perfect location, because the best spot is usually right above the speaking position. If you cover the area between your mouth and the mic, you usually catch the strongest vertical reflection.
If you rent and cannot drill, you can still do a cloud with removable hooks if the panel is light and properly secured. Another option is a freestanding panel on a tall stand positioned behind the mic to intercept some of that ceiling bounce.
Be careful with tiny ceiling tiles or decorative foam shapes, because they tend to only reduce the very top end. That can make the room less bright while leaving the midrange reflections that hurt intelligibility.
If you add a cloud and the room suddenly feels too dead, you can reduce other absorption before you remove the cloud. Ceiling treatment is often one of the more “invisible” ways to improve sound without changing the look of the walls.
Pairing panels with rugs and curtains without overdoing it
Rugs and curtains are great helpers, but they are not replacements for real panels when you have slapback echo off drywall. They mainly tame the top end, which can leave the room sounding dull but still “roomy.”
The trick is to use soft items to calm the room while letting panels do the heavy lifting at the reflection points. If you rely only on soft decor, you often end up with a weird mix of dead highs and live mids.
Rugs help most when the floor is a major reflector, which is common with hardwood, laminate, and tile. They reduce the floor bounce that can add a subtle phasey sound to your voice.
If you already have carpet, adding another thick rug under the chair usually changes less than people hope. A rug helps more when the floor is wood or tile and your desk is in the middle of the room.
Curtains can be surprisingly effective if they are heavy and pleated, because folds add thickness and surface area. A thin, flat curtain is mostly a visual filter and not much of an acoustic one.
If your window is the main offender, cover more than just the glass area and go wider than the frame. Sound reflects off the wall around the window too, so full-width coverage can reduce edge reflections.
Furniture can act like absorption and diffusion at the same time, especially when it is irregular. A bookshelf with uneven spines does not absorb much bass, but it can break up mid and high reflections that create flutter.
Soft seating in an empty room can make a bigger difference than people expect because it adds real volume of absorption. A single loveseat in the right corner can reduce the “empty bedroom” sound quickly.
Be cautious about overdoing it with too many soft items in random places, because you can make the room feel lifeless while still having one nasty reflection. It is better to solve the main reflection path and then add soft items for comfort and polish.
Desk mats are underrated because the desktop reflection is so close to the mic. A mat will not fix the whole room, but it can reduce that immediate “table bounce” that makes speech sound papery.
Door seals and draft stoppers are not about echo inside the room as much as they are about reducing extra reflections from outside spaces. If your office opens to a hard hallway, the hallway can act like an extension of the room.
If you have a big empty corner, adding anything soft or irregular there can help because corners tend to amplify reflections. A plant, a chair, or a small shelf can keep that corner from acting like a reflector cannon.
- Thick rug under desk on hardwood
- Heavy curtain covering the full window width
- Desk mat to reduce desktop reflections
- Bookshelf with uneven spines on a back wall
- Door seal or draft stopper for hallway reflections
- Soft chair or loveseat in an empty corner
Use the list as a menu, not a checklist, because you do not need all of it in one room. Pick the items that match your actual hard surfaces acoustics problems.
If you add curtains and the room still has a distinct repeat, that is your sign to focus back on panels. Curtains are great for glass, but they rarely solve a strong slapback off drywall by themselves.
If you add a rug and suddenly hear more high-frequency echo, it may be because the rug reduced floor absorption imbalance and made wall reflections more obvious. That is not a failure, it is just revealing what was already there.
Try to keep your changes intentional and reversible so you can learn what each item does. When you add five things at once, it is hard to know what actually helped.
Also remember that a room can sound controlled without being silent. You want a natural voice with less smear, not the vibe of a closet full of blankets.
A simple clap test to track improvement
The clap test is blunt, but it tells you whether flutter echo is still bouncing between surfaces. Clap once, listen for a ring, then move around the room and repeat near the desk and near the center.
Try to clap at about the same loudness each time, because a weak clap can hide problems. A sharp clap excites the room and makes reflections easy to spot.
Do the test with the door open and closed if your office connects to a hallway or another hard room. Sometimes the “echo” is actually the doorway feeding reflections back into your space.
If you hear a fast “zing,” you have flutter echo and you should treat one or both of the parallel walls at about head height. If you hear a single repeat, you have slapback echo and the back wall behind you is usually the first target.
If the zing changes pitch as you move, that is normal and it still counts as flutter. The important part is whether the ring is still present where you actually sit and speak.
If the slapback sounds like it comes from behind you, do not assume it is the wall behind your chair without checking. A bare wall behind the mic or a window off to the side can also create a strong repeat.
Record the test on your phone from the same spot each time, because memory lies about sound. A quick voice memo before and after moving acoustic panels for echo in office setups can show progress even when your ears get used to the change.
Use the same phone position, the same orientation, and the same distance from the wall each time. Small changes in mic placement can make the room sound different even if nothing else changed.
It also helps to record a short spoken phrase with plosives and sibilance, like a sentence with lots of “p,” “t,” and “s.” Those sounds reveal early reflections better than a long, smooth vowel.
Do not chase perfection with the clap test if your main goal is speech clarity. Once the ring and sharp repeats are gone, focus on how your voice sits in a real call, because that is where early reflections are most obvious.
Video calls also add compression and noise reduction that can exaggerate room sound in weird ways. A room that sounds “fine” locally can still sound echoey after conferencing software gets involved.
Do one real-world check by joining a meeting solo and recording yourself, because that is the actual signal chain. If the call recording sounds clear, you are done even if the room is not studio-dead.
If you still hear echo on calls after treatment, lower your mic gain and move the mic closer before buying more panels. A better direct-to-room ratio can be the cheapest improvement you make.
Keep notes on what you changed and what you heard, because it prevents you from undoing a good setup by accident. Acoustic work is easier when you treat it like a simple experiment.
Conclusion
Echo problems in a home office come from geometry first, then from materials, and that is why random foam squares disappoint. Treat the first reflection points, break up parallel walls that cause flutter echo, and hit the back wall if slapback echo shows up.
Most rooms do not need a full studio build to sound professional on calls. They need a few correctly placed absorbers that stop the strongest early reflections from reaching the mic.
Acoustic panels work best when they are thick enough and placed where your voice actually bounces, not where the wall looks empty. Once panels are in the right spots, use rugs and curtains as finishing tools for hard surfaces acoustics, not as the main fix.
If you are unsure where to start, treat the wall behind you and the closest side wall, then reassess. That simple approach fixes a surprising number of home office echo complaints.
Track changes with a quick clap test and a short speaking recording, and you will know when to stop buying stuff. A home office that sounds controlled is not overtreated, it just lets your voice come through without the room arguing back.
Once the echo is under control, your mic choice and EQ settings start to matter more, because the room is no longer sabotaging them. That is when “good mic” finally sounds like a good mic.
If your home office sounds like a bathroom stall on video calls, you are not imagining it. Echo is the fastest way to make good mics sound cheap and make you sound far away.
Most people buy acoustic panels for echo in office setups and then stick them where they look nice. That usually helps a little, but it often misses the real reflection paths that create the annoying ring.
The good news is you can fix a lot with a few smart moves, even in a spare bedroom with hard surfaces acoustics working against you. The bad news is some popular panel placements do almost nothing for flutter echo and slapback echo.
Identify the type of echo you’re hearing
Start by naming the problem, because different echoes come from different geometry. If you treat the wrong thing, you will spend money and still hear that same sharp bounce on calls.
Before you buy anything, listen for what happens right after you speak and right after you stop speaking. The timing and texture of that tail tells you which surfaces are talking back.
It also helps to notice whether the echo changes when you turn your head or rotate your chair. If the sound changes a lot with small movements, you are dealing with strong early reflections close to the mic.
Flutter echo is the fast, metallic “zing” that happens between two parallel hard surfaces like bare side walls. You hear it most when you clap or when consonants like “t” and “k” sound spitty.
Flutter echo can be sneaky because it may only show up in certain spots, like the center of the room or right at the desk. If you move two feet and it disappears, that is still a real problem for a fixed mic position.
Rooms with long, uninterrupted walls are the usual culprit, even if you have a bed and a few shelves. The reflections can still bounce above furniture height and create that zipper-like ring.
Slapback echo is a single, distinct repeat, like a quick “pap” coming back at you from a wall behind the mic. It is common when your desk faces a bare wall and the opposite wall is also hard and open.
Slapback is especially obvious when you use an open-back headset mic or a desktop mic that hears the whole room. It can make you sound like you are recording in a hallway even when the room is small.
You can often spot slapback by snapping your fingers and listening for one clean return instead of a shimmer. If the repeat is strong, it usually means one surface is acting like a mirror at speaking height.
There is also general room reverb, which is the smeary tail that makes everything less clear without a clear “repeat.” If your voice sounds like it is in a box, you probably have a mix of reverb plus flutter echo from parallel surfaces.
Room reverb tends to build up when many surfaces are reflective, even if none of them creates a dramatic single echo. It is the cumulative effect of dozens of small bounces that smear syllables together.
If your audio sounds fine when you speak quietly but gets messy when you project, that is often reverb and early reflections stacking up. A louder voice excites the room more, and the mic hears more of the room than you expect.
Do not confuse echo with noise, because they need different fixes. HVAC hiss and computer fan noise call for mic technique and noise control, while echo calls for absorption and placement.
Also pay attention to whether the echo is worse on certain words, because that points to frequency issues. Sharp “s” and “sh” problems usually mean hard, close surfaces, while a boomy room points to bigger treatment needs.
Why bare walls and windows create office echo
Echo is mostly your voice bouncing off nearby boundaries and arriving back at your mic a split second later. In a home office, those boundaries are usually drywall, glass, a hollow core door, and a desk surface.
What makes it annoying is not the existence of reflections, but how soon they arrive. Early reflections within the first 20 milliseconds blur your voice and make it sound like the mic is farther away.
When your mic hears your voice and the reflection at almost the same time, you get comb filtering that changes the tone. That is why you can sound thin on one day and boxy on another just by shifting your chair.
Hard surfaces acoustics are brutal at speech frequencies because they reflect a lot of energy above roughly 500 Hz. That is the range that carries intelligibility, so reflections there make you sound harsh and washed out.
Drywall, glass, and laminated furniture also reflect higher frequencies in a very directional way. That means a single wall can create a strong, focused bounce straight into your mic.
Even if the room feels “furnished,” the reflective parts can still dominate because speech is not that loud. A few strong reflections can outweigh a lot of soft stuff that is not in the reflection path.
Windows are worse than people expect, because glass is rigid and reflective and often sits in a corner where reflections stack up. A big window beside your desk can create a strong early reflection that your mic captures as “room.”
Blinds do not help much unless they are thick and irregular, because they mostly redirect sound instead of absorbing it. You might hear a slightly different echo pattern, but the energy is still in the room.
A window also tends to be near another hard surface like the adjacent wall or the desk, which creates a cluster of reflections. That cluster is why some offices sound “bright” and “clicky” on calls.
Bare drywall is not “soft” just because it is painted, it is still a broad reflective surface. When you have two long, parallel walls, you can get flutter echo even in a room that has carpet and furniture.
Painted walls are especially reflective at the exact frequencies that make speech crisp. That crispness turns into harshness when it arrives twice, once direct and once reflected.
Closets and alcoves can also create weird reflections because they act like little chambers. An open closet door behind you can add a hollow “cupped hands” quality to your voice.
Doors matter too, especially hollow core doors that act like drums. A door behind your mic can reflect highs and also resonate, which makes the room sound more “alive” than it should.
The desk is a huge offender because it sits inches below your mic and your mouth. A flat desktop gives you a strong bounce that arrives so fast it sounds like tone coloration rather than a separate echo.
Monitors can do the same thing, especially dual monitors angled like a shallow V. They can reflect sound right back toward the mic and exaggerate sibilance.
Empty corners amplify the problem because sound piles up there and reflects out in multiple directions. If your desk is jammed into a corner, you may be hearing several early reflections at once.
Panel placement that targets echo fast
Good panel placement is about intercepting early reflections, not wallpapering the room. For acoustic panels for echo in office use, you get the biggest change by treating the surfaces closest to your mouth and your mic.
Start with the spots that create the first bounce, because those are the reflections your mic hears the loudest. Late reflections matter less for calls than the early ones that smear consonants.
Think like a flashlight beam coming from your mouth toward nearby walls and flat objects. Wherever that beam hits and can “see” the mic, that is a prime target.
Think in simple paths: your voice goes out, hits a surface, then hits the mic. If you can block the first bounce off the side wall or the wall behind your monitor, clarity improves fast.
One easy trick is to sit in your normal position and have someone slide a mirror along the wall. If you can see the mic in the mirror from your seat, that spot is a first reflection point worth treating.
Side wall panels should usually be at head height, not near the floor and not up by the ceiling for no reason. If your mouth and mic live around 4 to 5 feet off the ground, that is where the panels should work.
The wall behind you is often the biggest “one move” improvement for slapback echo. When that wall is bare, it throws your voice right back into the mic capsule like a ping pong paddle.
The wall in front of you can matter too, especially if you face a hard surface at close distance. If your monitor is a foot from a bare wall, that wall becomes part of the mic’s sound.
If you are using a cardioid mic, remember that it still hears the room, just less from the rear. A strong reflection from the side can still be loud enough to compete with your direct voice.
If you are using an omnidirectional mic, placement becomes even more critical because it hears everything. In that case, you may need more coverage behind and beside you to keep the room from dominating.
Do not ignore the corner behind your monitor if it is a hard 90-degree junction. A panel that bridges that corner can reduce multiple reflection paths at once.
Also consider the “rear wall” from the mic’s point of view, not just your point of view. If the mic faces you and has a wall a few feet behind it, that wall can still feed reflections into the mic pattern.
| Echo symptom | Most likely reflection path | Fastest panel target |
|---|---|---|
| Metallic “zing” after a clap | Parallel side walls | Two panels at ear height on each side wall |
| Distinct repeat of your voice | Wall behind the mic or behind your head | One large panel centered behind you |
| Hollow, boxy call audio | Desk surface plus nearby wall | Panel on front wall plus a desk mat or angled screen |
| Sharp reflections on “s” sounds | Window beside or behind the desk | Panel near the window edge or heavy curtain coverage |
| Echo only when standing and talking | Ceiling and upper wall area | Ceiling cloud above speaking position |
Use the table as a starting map, not a rigid rule, because every room has its own weird angles and openings. The goal is to find the loudest early reflections and take them out of the mic’s path.
If you only have budget for two panels, put them where they break the most obvious reflection pair. In many rooms that means one behind you and one on the nearest side wall.
If you have a little more budget, treat both side walls symmetrically to stop the ping pong effect. Symmetry also keeps your voice from sounding lopsided in tone when you turn your head.
Do not place panels too high just because you do not want them in frame. A panel that is out of frame but out of the reflection path is basically wall art.
If you need panels to look good, choose fabric colors and frames you like, but keep the placement honest. You can make correct placement look intentional with a clean grid or a centered layout.
If your room has a big open doorway, remember that sound can bounce off the hallway wall and come back. A panel near the doorway edge or a thick curtain can reduce that “extra room” effect.
How panel size and coverage affect results
Small panels can work, but they often disappoint because echo problems are usually created by large surfaces. A 12×12 panel looks tidy, yet it only catches a narrow slice of the reflection field.
When people say panels “did nothing,” it is often because the panels were too small, too thin, or too far from the real reflection point. The room is still reflecting, just around the panel.
For speech, you want enough area that you cannot easily miss the target when you shift in your chair. If the panel coverage is tiny, moving your head a few inches can put you back in the reflection line.
For speech, thickness matters as much as area, because thin foam mostly grabs the top end and leaves the upper mids bouncing around. A 2 inch to 4 inch mineral wool or fiberglass panel is a safer bet for slapback echo and flutter echo.
Upper mids are where “nasal,” “boxy,” and “honky” live, and that is where many thin products struggle. That is why a room can sound less bright but still sound like a room.
Thicker panels also tend to sound more natural because they reduce reflections across a wider band. The result is not just less echo, but a more stable vocal tone.
Coverage is about percentage of the problem surface, not percentage of the whole room. If your back wall is the main offender, covering 20 to 30 percent of that wall in the center can beat scattering the same area across random spots.
Center coverage works because the strongest reflection usually comes from the area directly behind your head and shoulders. That is where your voice hits most directly when you speak toward the mic.
Scattering panels can help once the main offenders are handled, but it is a second step. First you want to kill the obvious bounce that makes you sound distant.
Do not expect one panel to “fix” a room that is basically a rectangle with bare walls and a window. Echo tends to come from pairs of surfaces, so treat at least one of each pair to break the ping pong effect.
If you treat only one wall in a flutter pair, you can still get improvement because you break the loop. Treating both walls usually makes the result more consistent across the room.
Panel placement can also change how loud you think you are, because a less reflective room feels quieter. That can be good for calls, but it may make you speak a little louder until you adjust.
Do not confuse absorption with soundproofing, because panels do not stop your voice from leaving the room. They mainly stop your voice from bouncing around inside the room and coming back into the mic.
If you are chasing a broadcast sound, you may eventually add more coverage than you need for basic calls. For normal meetings, the goal is controlled and clear, not dead and unnatural.
It is also normal to need fewer panels if you sit close to the mic and keep gain low. Mic distance and gain are part of the “coverage” equation because they change how much room the mic hears.
If you are stuck with smaller panels, grouping them into a larger block is usually better than spreading them out. A cluster behaves more like one big absorber at the reflection point.
Air gaps can help too, even on walls, because they make the panel act thicker. A panel mounted one to two inches off the wall can absorb a bit lower and feel more effective for speech.
When you need a ceiling panel (and when you don’t)
Ceilings matter when your mic is sensitive and your room is short, because the bounce arrives quickly and sounds like comb filtering. If you sit under an 8 foot ceiling with a condenser mic, the ceiling reflection can be louder than you think.
The ceiling reflection is often overlooked because you do not “see” it the way you see a bare wall. But the mic does not care if the reflection is pretty, it only cares that it arrives fast and strong.
If you have a hard floor and a hard ceiling, you can also get a vertical flutter that adds a subtle ring. It is less obvious than side wall flutter, but it can still make speech feel thin.
You probably do not need a ceiling cloud if your main issue is flutter echo between side walls. In that case, the “zing” is mostly horizontal, and side wall treatment does more than anything overhead.
Another sign you can skip the ceiling at first is when your clap test sounds clean at the desk but messy in the middle of the room. That usually points to wall-to-wall flutter rather than a ceiling bounce at your position.
Ceilings also matter less if your mic is very close and you keep input gain conservative. A close mic captures a higher ratio of direct voice to room reflections, including the ceiling.
A ceiling panel helps most when you hear a papery reflection even after treating side walls, or when you record standing up for presentations. It also helps if your desk is under a hard ceiling fan canopy or a flat drywall lid with no texture.
Standing changes the geometry, because your mouth is closer to the ceiling and the reflection gets stronger. That is why a room can sound fine seated and suddenly echoey when you stand to present.
If you use a shotgun mic above frame, the ceiling becomes even more important because the mic is literally aimed upward. In that setup, a small cloud can be a big upgrade.
Mounting matters, because a small air gap above the panel increases low frequency absorption a bit and improves overall usefulness. If you cannot mount, a thick panel hung with hooks and chain is still better than skipping the ceiling entirely.
Do not overthink the perfect location, because the best spot is usually right above the speaking position. If you cover the area between your mouth and the mic, you usually catch the strongest vertical reflection.
If you rent and cannot drill, you can still do a cloud with removable hooks if the panel is light and properly secured. Another option is a freestanding panel on a tall stand positioned behind the mic to intercept some of that ceiling bounce.
Be careful with tiny ceiling tiles or decorative foam shapes, because they tend to only reduce the very top end. That can make the room less bright while leaving the midrange reflections that hurt intelligibility.
If you add a cloud and the room suddenly feels too dead, you can reduce other absorption before you remove the cloud. Ceiling treatment is often one of the more “invisible” ways to improve sound without changing the look of the walls.
Pairing panels with rugs and curtains without overdoing it
Rugs and curtains are great helpers, but they are not replacements for real panels when you have slapback echo off drywall. They mainly tame the top end, which can leave the room sounding dull but still “roomy.”
The trick is to use soft items to calm the room while letting panels do the heavy lifting at the reflection points. If you rely only on soft decor, you often end up with a weird mix of dead highs and live mids.
Rugs help most when the floor is a major reflector, which is common with hardwood, laminate, and tile. They reduce the floor bounce that can add a subtle phasey sound to your voice.
If you already have carpet, adding another thick rug under the chair usually changes less than people hope. A rug helps more when the floor is wood or tile and your desk is in the middle of the room.
Curtains can be surprisingly effective if they are heavy and pleated, because folds add thickness and surface area. A thin, flat curtain is mostly a visual filter and not much of an acoustic one.
If your window is the main offender, cover more than just the glass area and go wider than the frame. Sound reflects off the wall around the window too, so full-width coverage can reduce edge reflections.
Furniture can act like absorption and diffusion at the same time, especially when it is irregular. A bookshelf with uneven spines does not absorb much bass, but it can break up mid and high reflections that create flutter.
Soft seating in an empty room can make a bigger difference than people expect because it adds real volume of absorption. A single loveseat in the right corner can reduce the “empty bedroom” sound quickly.
Be cautious about overdoing it with too many soft items in random places, because you can make the room feel lifeless while still having one nasty reflection. It is better to solve the main reflection path and then add soft items for comfort and polish.
Desk mats are underrated because the desktop reflection is so close to the mic. A mat will not fix the whole room, but it can reduce that immediate “table bounce” that makes speech sound papery.
Door seals and draft stoppers are not about echo inside the room as much as they are about reducing extra reflections from outside spaces. If your office opens to a hard hallway, the hallway can act like an extension of the room.
If you have a big empty corner, adding anything soft or irregular there can help because corners tend to amplify reflections. A plant, a chair, or a small shelf can keep that corner from acting like a reflector cannon.
- Thick rug under desk on hardwood
- Heavy curtain covering the full window width
- Desk mat to reduce desktop reflections
- Bookshelf with uneven spines on a back wall
- Door seal or draft stopper for hallway reflections
- Soft chair or loveseat in an empty corner
Use the list as a menu, not a checklist, because you do not need all of it in one room. Pick the items that match your actual hard surfaces acoustics problems.
If you add curtains and the room still has a distinct repeat, that is your sign to focus back on panels. Curtains are great for glass, but they rarely solve a strong slapback off drywall by themselves.
If you add a rug and suddenly hear more high-frequency echo, it may be because the rug reduced floor absorption imbalance and made wall reflections more obvious. That is not a failure, it is just revealing what was already there.
Try to keep your changes intentional and reversible so you can learn what each item does. When you add five things at once, it is hard to know what actually helped.
Also remember that a room can sound controlled without being silent. You want a natural voice with less smear, not the vibe of a closet full of blankets.
A simple clap test to track improvement
The clap test is blunt, but it tells you whether flutter echo is still bouncing between surfaces. Clap once, listen for a ring, then move around the room and repeat near the desk and near the center.
Try to clap at about the same loudness each time, because a weak clap can hide problems. A sharp clap excites the room and makes reflections easy to spot.
Do the test with the door open and closed if your office connects to a hallway or another hard room. Sometimes the “echo” is actually the doorway feeding reflections back into your space.
If you hear a fast “zing,” you have flutter echo and you should treat one or both of the parallel walls at about head height. If you hear a single repeat, you have slapback echo and the back wall behind you is usually the first target.
If the zing changes pitch as you move, that is normal and it still counts as flutter. The important part is whether the ring is still present where you actually sit and speak.
If the slapback sounds like it comes from behind you, do not assume it is the wall behind your chair without checking. A bare wall behind the mic or a window off to the side can also create a strong repeat.
Record the test on your phone from the same spot each time, because memory lies about sound. A quick voice memo before and after moving acoustic panels for echo in office setups can show progress even when your ears get used to the change.
Use the same phone position, the same orientation, and the same distance from the wall each time. Small changes in mic placement can make the room sound different even if nothing else changed.
It also helps to record a short spoken phrase with plosives and sibilance, like a sentence with lots of “p,” “t,” and “s.” Those sounds reveal early reflections better than a long, smooth vowel.
Do not chase perfection with the clap test if your main goal is speech clarity. Once the ring and sharp repeats are gone, focus on how your voice sits in a real call, because that is where early reflections are most obvious.
Video calls also add compression and noise reduction that can exaggerate room sound in weird ways. A room that sounds “fine” locally can still sound echoey after conferencing software gets involved.
Do one real-world check by joining a meeting solo and recording yourself, because that is the actual signal chain. If the call recording sounds clear, you are done even if the room is not studio-dead.
If you still hear echo on calls after treatment, lower your mic gain and move the mic closer before buying more panels. A better direct-to-room ratio can be the cheapest improvement you make.
Keep notes on what you changed and what you heard, because it prevents you from undoing a good setup by accident. Acoustic work is easier when you treat it like a simple experiment.
Conclusion
Echo problems in a home office come from geometry first, then from materials, and that is why random foam squares disappoint. Treat the first reflection points, break up parallel walls that cause flutter echo, and hit the back wall if slapback echo shows up.
Most rooms do not need a full studio build to sound professional on calls. They need a few correctly placed absorbers that stop the strongest early reflections from reaching the mic.
Acoustic panels work best when they are thick enough and placed where your voice actually bounces, not where the wall looks empty. Once panels are in the right spots, use rugs and curtains as finishing tools for hard surfaces acoustics, not as the main fix.
If you are unsure where to start, treat the wall behind you and the closest side wall, then reassess. That simple approach fixes a surprising number of home office echo complaints.
Track changes with a quick clap test and a short speaking recording, and you will know when to stop buying stuff. A home office that sounds controlled is not overtreated, it just lets your voice come through without the room arguing back.
Once the echo is under control, your mic choice and EQ settings start to matter more, because the room is no longer sabotaging them. That is when “good mic” finally sounds like a good mic.


