Hanging acoustic panels flat on a wall works, but it leaves performance on the table. A simple air gap behind the panel can change what it does, especially in a home office where you sit close to boundaries.
I see people spend good money on panels, then mount them like framed posters and wonder why the room still sounds boxy. If you care about the acoustic panel air gap benefits, the setup details matter as much as the panel itself.
An air gap is exactly what it sounds like, a controlled space between the panel and the wall. You can create it with spacers, mounting cleats, or simple standoffs, and you can keep it consistent across a whole wall.
This article focuses on practical numbers, not myths, so you can pick a panel standoff distance that fits your room. You will also see when the gap helps low frequency absorption and when it mostly just makes mounting harder.
Why an air gap changes how a panel absorbs sound
Porous acoustic panels work by letting air move through fibers, then turning that motion into heat through friction. If the panel is pressed against a hard wall, the air motion right at the wall is limited, so the panel misses some usable energy.
When you add a gap, the panel sits where particle velocity is higher for many frequencies. That is the core of acoustic panel air gap benefits, you are moving the absorber into a spot where the air is actually moving.
The wall is a pressure maximum, and the air velocity at the surface is close to zero for a reflection. A few inches out, velocity rises, and porous material likes velocity more than pressure.
This is why a 2 inch panel with a 2 inch gap often behaves closer to a thicker absorber than its face thickness suggests. You are not magically creating bass traps, but you are nudging the effective absorption downward in frequency.
It helps to think of the wall as the point where the sound wave “turns around,” because the reflection forces the air at the surface to stop moving. A porous absorber wants to sit where the air is moving the most, not where it is pinned in place.
The gap also gives the sound wave a little more distance to interact with the absorber, because it passes through the absorber, hits the wall, and comes back through again. That extra interaction is not a perfect doubling, but it is a real part of why the response shifts lower.
Another way to say it is that the wall makes the panel behave “thinner” than it really is at some frequencies. Pulling the panel off the wall reduces that penalty and lets the material do what it is good at.
The effect is usually most noticeable in the upper bass and lower midrange, where rooms often sound like they have a hollow chesty tone. That is also the range where many people notice that their voice recordings sound less like they were made in a closet.
Not every panel responds the same way, because density and flow resistance change how air moves through the fibers. A very dense panel can start acting more reflective at higher frequencies, so the gap is not a substitute for choosing the right material.
Even with the same material, the frame and backing matter, because a solid backer can block airflow and change the whole mechanism. If your panel has a hard backing, the air gap still helps, but it will not behave like an open-backed absorber.
In a home office, the benefit is amplified because you are often within a few feet of a wall, so the early reflections are strong and fast. A small improvement in absorption at those points can make the room feel calmer and less “in your face.”
People sometimes confuse this with soundproofing, but it is a different problem. An air gap helps absorption inside the room, while isolation depends on mass, sealing, and decoupling.
Choosing an air-gap depth that fits your room and goals
Start with what you are trying to fix, because the best gap for flutter echo is not the best gap for low end ringing. For speech clarity in a home office, a modest gap can be plenty, and you can put effort into coverage and placement.
For typical 2 inch fiberglass or mineral wool panels, a panel standoff distance of 1 to 4 inches is the sweet spot in most small rooms. Past that, you often run into practical issues like panels sticking out into walking space or looking awkward behind a desk.
If you run 4 inch panels, you can still use a gap, but you can treat it as optional rather than mandatory. I would rather see a 4 inch panel with a clean 2 inch gap than a 4 inch panel that is crooked, rattly, and touching the wall in spots.
Room geometry matters more than people admit, because a deep gap on a thin wall can transmit vibration if the mounting is sloppy. In apartments, I usually keep the gap moderate and focus on first reflection points, corners, and the wall behind the microphone.
Before you pick a number, look at the real constraints in your room, like door swing, chair travel, and whether you need to reach shelves. A perfect air gap is useless if you keep bumping the panel with your shoulder every time you stand up.
Think about what you are listening to and making, because music mixing and Zoom calls are not the same target. For mixing, you want predictable early reflection control, while for calls you want less room tone and less slap off nearby walls.
There is also a visual goal, because a home office usually has to look like a normal room. A 2 inch gap tends to read as intentional, while a 6 inch gap can look like the panel is floating for no reason unless you design around it.
If you have limited panel count, prioritize coverage over extreme spacing. Four panels with a sensible gap in the right places usually beat two panels with a huge gap in the wrong places.
When people ask for a single default, I usually point them to “panel thickness equals gap” as a starting point, then adjust for space. It is not a law of physics, but it keeps you in the range where the benefits show up without turning mounting into a project.
Also consider what is behind the wall, because exterior walls, party walls, and lightweight interior walls behave differently. You are not trying to excite the wall like a drum, so your mounting should be firm and your gap should not create a lever that flexes drywall.
If you are treating a wall that already has furniture close to it, you can sometimes hide the gap behind the furniture line. That can make a 3 or 4 inch standoff feel like it takes no usable space at all.
Finally, remember that you can mix gap depths by location, even if you keep the hardware consistent. A smaller gap behind a door and a larger gap behind the desk can be a practical compromise that still gives you clear acoustic panel air gap benefits.
When an air gap helps most (and when it doesn’t)
An air gap helps most when your panels are thin, your room is small, and you need more low frequency absorption without building huge traps. It also helps when you are treating a wall that sits close to your ears, like the wall behind your monitor in a desk setup.
It helps less when you already use thick panels, you already have corner trapping, or your room’s main problem is modal peaks that need much deeper treatment. If you expect a 2 inch panel plus a gap to fix a 60 Hz boom, you will be disappointed.
It also helps a lot when you are trying to get more out of a limited budget, because a gap is cheaper than buying thicker panels. In that sense, the air gap is one of the few “free upgrades” in room treatment that actually has a measurable effect.
If your room is already heavily damped in the highs, the gap can be a way to add more low-mid control without making the room feel dull. Many home offices end up over-treated above 2 kHz and under-treated below 300 Hz, and a gap pushes in the right direction.
On the other hand, if your panels are thin foam, the gap may not deliver the improvement you expect, because the material itself is the limiting factor. Foam can be useful for flutter and brightness, but it usually does not have the depth to take advantage of a larger standoff the way mineral wool does.
A gap can also be less important if your panels are used as a ceiling cloud, because the cloud already sits away from a boundary in most installs. In that case, the bigger win is often coverage area and correct placement above the listening position.
If your room has a lot of irregular surfaces, like open shelving and soft furniture, the audible difference between a small gap and no gap may be subtle. The room might already have broken reflections, so the remaining issues are more about low frequency decay than slap.
Air gaps also do not help much if the panel ends up blocked by a big monitor, a cabinet, or a curtain that sits right in front of it. If air cannot reach the panel face, the gap behind it is not the bottleneck.
Another case where the gap is less critical is when you are using panels mainly as visual dividers or to reduce noise spill between workstations. In those setups, the panel placement and height matter more than the last bit of boundary optimization.
Where the gap really shines is in early reflection control that also feels less “dead” than heavy high-frequency absorption. You can tame the harshness while keeping some life in the room, especially if you balance treatment across multiple surfaces.
| Goal | Panel thickness | Suggested air gap |
|---|---|---|
| Reduce flutter echo and slap | 1 to 2 inches | 0 to 2 inches |
| Improve voice clarity at a desk | 2 inches | 2 to 4 inches |
| Tame early reflections for mixing | 2 to 4 inches | 2 to 4 inches |
| Push absorption lower without big traps | 2 inches | 4 inches, if space allows |
| General broadband control in a tight room | 4 inches | 0 to 2 inches |
Use the table as a starting point, not a strict prescription, because rooms vary a lot more than product pages suggest. If you have to choose between the “ideal” gap and the “ideal” placement, placement usually wins.
Also remember that the goal is usually a balanced decay, not maximum absorption everywhere. A room that is too dry can be fatiguing, and a gap is not an excuse to cover every wall with thin panels.
Easy mounting methods to create a consistent gap
The easiest way to get a repeatable gap is to decide the distance first, then build the mounting around that number. If you pick 2 inches, you can buy 2 inch spacers, cut wood blocks to 2 inches, or stack washers until you hit the same depth every time.
For framed DIY panels, I like simple wood battens on the wall because they also help you hit studs. You can screw two horizontal battens into studs, then hang the panel on top of them so the frame never touches drywall.
For commercial panels with keyholes, standoffs are clean and predictable, but measure carefully so the panel does not rock. A panel that rocks changes the gap, and it can squeak or rattle when bass hits.
If you want the panel to be removable, French cleats are hard to beat, and they can double as the gap creator. Mounting cleats also make it easier to keep a row of panels level, which matters more than people think in a small office where you see everything up close.
Whatever method you choose, the first step is confirming what your wall can hold, because a dense panel is heavier than it looks. If you cannot hit studs, use proper anchors rated for the load and avoid tiny picture hooks that were made for frames.
Rigid spacers are better than soft foam blocks, because foam compresses and gives you a different gap at each corner. If you want a little isolation, use thin felt pads only as anti-buzz insurance, not as the main support.
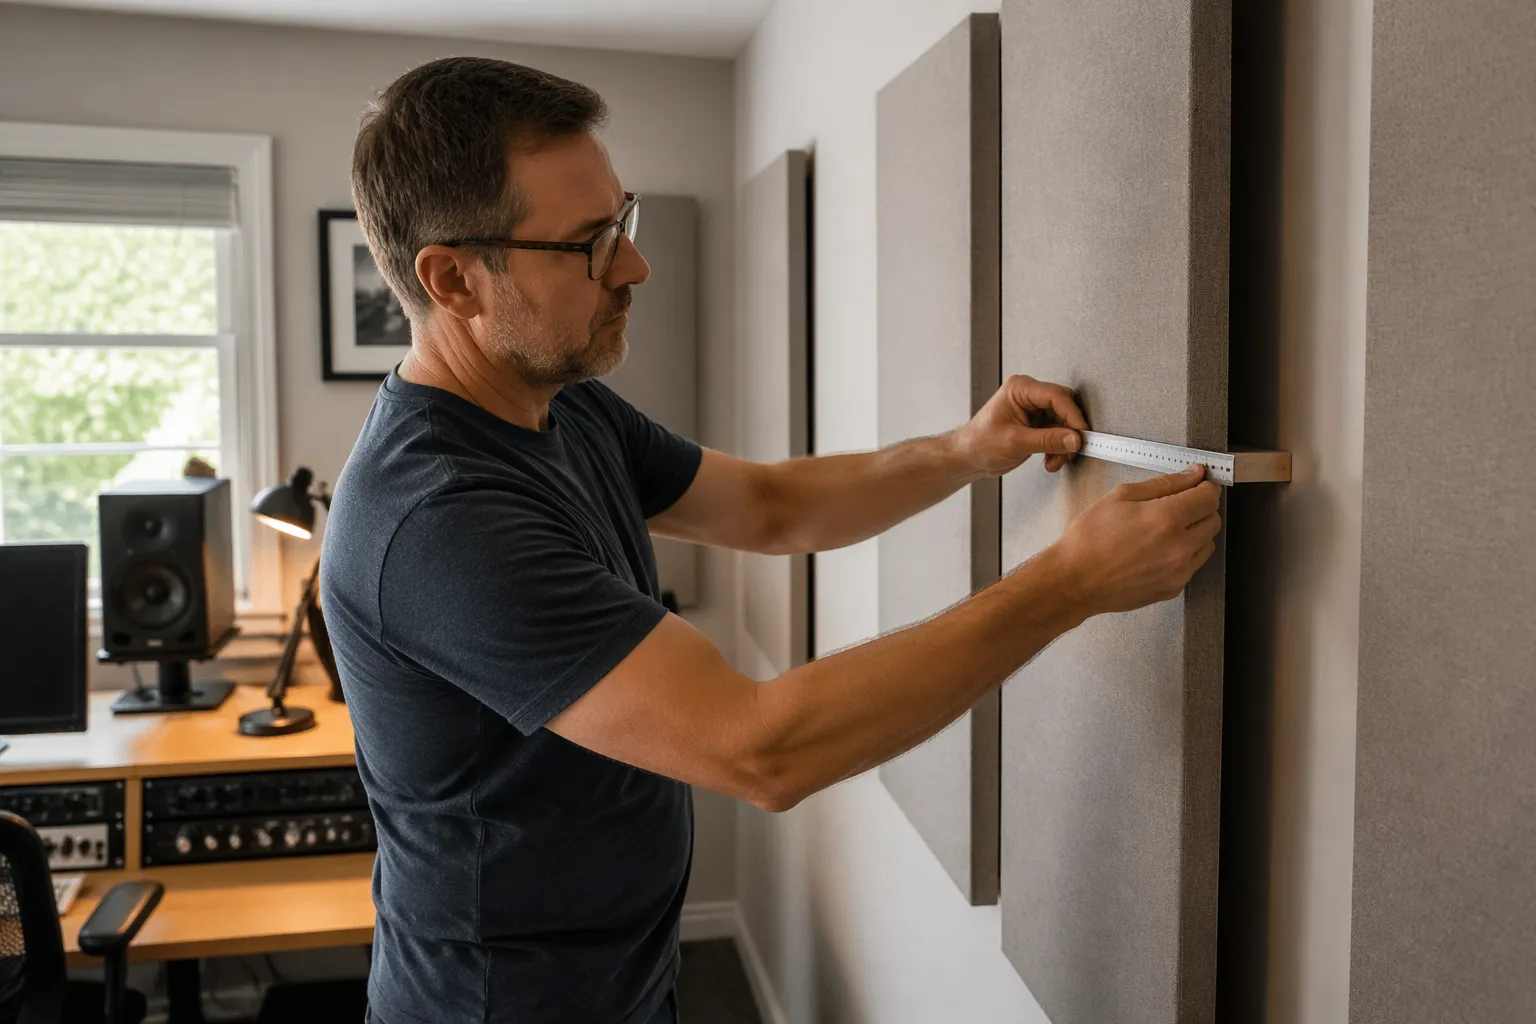
For a clean look, you can use four identical standoff points, one near each corner, so the panel sits like it is floating. That setup also makes it easy to measure the gap with a ruler and confirm you hit the target distance.
If you are mounting multiple panels in a row, snap a level line and mark the hardware positions before you drill anything. The gap is important, but a crooked row will bother you every day, and it can also create inconsistent spacing if you start compensating by eye.
When you use cleats, keep the cleat length long enough to prevent twisting, especially on tall panels. A short cleat can let the panel pivot, which changes the standoff distance at the bottom and invites rattles.
If you want the gap but you do not want to see it, you can add a simple fabric skirt or shadow line detail around the edge of the panel. Just make sure you are not sealing the airflow path so tightly that you reduce the absorber’s ability to breathe.
In rentals, consider mounting methods that minimize wall damage, like cleats anchored into a small number of studs and patched later. A consistent gap is easier to achieve with solid fastening than with removable adhesive strips that can creep over time.
Sizing the gap for low frequency absorption without wasting space
Low frequency absorption is where people chase bigger gaps, and the logic is fair, because moving the absorber off the wall shifts effectiveness downward. The problem is that small rooms run out of depth fast, especially behind a chair or along a hallway wall.
A practical rule is to match the air gap to the panel thickness when you are trying to stretch performance. A 2 inch panel with a 2 inch gap is a strong baseline for acoustic panel air gap benefits without turning your office into a maze.
If you can afford 4 inch panels, do that before you chase an 8 inch gap behind a 2 inch panel. Thick material keeps working even when placement is not perfect, while a deep gap demands clean mounting and consistent spacing to pay off.
Where you place the panels matters as much as the gap, because modes pile up near corners and boundaries. If you want more low end control, put thicker panels in corners or across wall to ceiling junctions, then use gapped 2 inch panels at reflection points.
It also helps to be realistic about what “low frequency” means in a home office, because most of the pain is not sub-bass, it is the 100 to 250 Hz region. That range is where desks, monitors, and nearby walls create a thick muddy sound that makes everything feel cramped.
A moderate gap is often enough to improve that low-mid buildup, especially if you treat the wall behind the speakers and the side wall reflections. You may not see a dramatic change in the deepest bass, but you can still hear a cleaner, less chesty tone.
If you are tempted to use a very large gap, check whether the panel will start acting like a shelf that collects dust and cables behind it. A treatment plan that is annoying to live with is a plan you will eventually undo.
One space-efficient trick is to put deeper gaps only where you already have unused space, like behind a couch, behind a door when it is open, or above a tall cabinet. That way you can chase a bit more low frequency absorption without sacrificing walkways.
Another trick is to use the gap strategically on the back wall, because that surface often produces strong reflections and low-mid buildup at the listening position. A back-wall panel with a sensible standoff distance can reduce the “bounce back” that makes nearfield monitoring feel unstable.
Do not ignore the ceiling, because low-mid reflections from the ceiling can be surprisingly strong in rooms with hard floors and low height. A ceiling cloud with a small air gap can do more for perceived bass tightness than adding more inches behind wall panels.
If you are measuring with software, look at decay time and not just frequency response, because absorption is about time behavior as much as level. A gap often shows up as a smoother decay in the low mids, even if the raw response curve still has peaks and nulls from room modes.
In practical terms, the best gap is the biggest one you can keep consistent, quiet, and out of the way. A smaller gap that you can execute perfectly is usually more valuable than a larger gap that ends up compromised.
Common mistakes: uneven spacing, rattles, and wall contact
The most common mistake is building an air gap on paper, then letting the panel touch the wall in one corner. That contact point can short circuit the gap, and it can also transmit vibration into drywall.
Uneven spacing is usually caused by soft spacers, flimsy hooks, or hanging a heavy panel from a single point. Use two or more mounting points and rigid spacers so the panel standoff distance stays the same at every corner.
Rattles happen when hardware has play, like loose D rings, cheap picture wire, or a keyhole hanger that does not seat firmly. If you can wiggle the panel with one finger, you will probably hear it when a kick drum or loud voice hits the room.
Another quiet problem is sealing the gap by accident with fabric, caulk, or foam tape that closes airflow around the edges. You want the panel to breathe, because porous absorption depends on air movement through the material.
People also mount panels too high because they treat them like art, then wonder why the desk area still sounds harsh. If the panel is not intercepting the reflection path from speaker to ear, the gap behind it is not going to save the result.
A related mistake is treating only one side wall because the other side has a window or a door. Asymmetry can make the stereo image pull to one side, so it is often better to treat both sides with smaller panels than to over-treat just one.
Another common issue is using hardware that is rated for the panel weight but not for the leverage created by the gap. A panel that sits 4 inches off the wall puts more torque on the fasteners than a panel that sits flush.
Some panels sag over time if the frame is not stiff, and the sag changes the gap at the bottom edge. If you notice that happening, add a second support point or a longer cleat so the panel stays square.
Do not forget about cables, because a panel that floats off the wall can become a cable guide that buzzes when something touches it. Keep power strips, HDMI cords, and mic cables from resting on the panel or slipping into the gap.
In humid rooms, wood spacers can swell slightly and change alignment, especially if they are not sealed. It is a small effect, but it can show up as a panel that starts to rock months after you thought the job was done.
Finally, avoid the temptation to “fix” a wobble by stuffing foam behind the panel until it stops moving. That often creates random wall contact and inconsistent spacing, which is exactly what you were trying to avoid.
Easy mounting methods to create a consistent gap
If you want speed and consistency, pick one system and repeat it across the room instead of mixing hooks, wire, and random screws. Consistency keeps the gap uniform, and it keeps your panels aligned so the room looks intentional.
Mounting cleats are my default for home offices because they spread weight and make panels easy to move later. You can also shim behind the cleat to fine tune the panel standoff distance if the wall is not perfectly flat.
- French cleat pair cut from 1×4
- Rigid spacer blocks cut to the target gap
- Rubber or felt pads to stop buzzing
- Two stud screws per cleat for heavy panels
- Level line marked with painter’s tape
- Matching hardware on every panel for repeatability
If you are using spacer blocks, pre-drill them so they do not split when you tighten screws. It is also worth labeling the blocks if you cut a batch, because a “close enough” spacer is how uneven gaps happen.
For panels that need to be frequently removed, like in a multi-use room, cleats make life easier because you can lift the panel off without tools. That convenience matters, because treatment that is easy to live with is treatment that stays installed.
If you prefer standoffs, choose ones with a wide base so the panel does not pivot around a tiny point. A little extra hardware cost is often cheaper than dealing with wall repairs and re-mounting later.
When you mount a row of panels, measure from the floor or ceiling and not from the previous panel. Small errors accumulate, and by the time you reach the last panel the gaps and spacing can drift enough to look sloppy.
It is also smart to keep a consistent edge distance for the hardware on every panel, because it keeps the panel face parallel to the wall. When the face is parallel, the air gap is predictable, and predictable is what you want.
If you have baseboards, plan for them, because the bottom of the panel may hit the trim before the top reaches the wall. You can either mount above the baseboard line or use spacers that clear the trim so the panel stays parallel.
For very large panels, add a third support point or a lower guide so the bottom cannot swing. A swinging panel is not just annoying, it also changes the acoustic behavior because the gap changes as it moves.
Placement tips that make the air gap matter more
A gap helps most when the panel is in a spot that actually receives strong reflections. If your desk faces a wall, panels on that wall and on the side walls at ear height will do more than panels scattered randomly behind bookshelves.
Use the mirror trick for first reflection points, then decide whether you want a gap there or elsewhere. When you sit at your listening spot and see your speakers in a handheld mirror on the wall, that is a good location for a gapped panel.
Behind a microphone is another high payoff area, because early reflections smear speech and make noise reduction work harder. A 2 inch panel with a 2 to 4 inch gap behind your mic position often cleans up the recorded voice more than a fancy plugin.
If you have a hard ceiling and no cloud, do not obsess over wall gaps while the ceiling reflection stays untreated. A ceiling cloud with even a small air gap can be a bigger win than adding extra depth behind wall panels.
Try to keep the panel centered around ear height when seated, because that is where the most important reflections hit for desk work. A panel that is too high can still reduce general reverberation, but it will not do as much for clarity at the listening position.
On side walls, the gap can be especially useful because those reflections are early and strong, and they shape how wide your stereo image feels. When those reflections are controlled, panning decisions and voice placement feel more stable.
If you have speakers close to the front wall, treat that wall first, because the boundary interaction is immediate. A gapped panel behind the speakers can reduce the sense that sound is “sticking” to the wall and bouncing back into your face.
Do not forget the back wall if your chair is close to it, because that reflection can be brutal in small rooms. Even a few panels with a modest standoff distance can reduce the “slap back” that makes the room feel smaller than it is.
If you have a window at a reflection point, you can still treat it with a panel on a stand or a removable mount, and a gap is easy because the panel is already off the surface. In that case, stability matters, because a freestanding panel that wobbles is basically a built-in rattle.
Keep an eye on symmetry around the desk, because uneven treatment can create uneven reflections. If you cannot match the exact layout, match the total absorption and the approximate distance to your ears as closely as you can.
Finally, remember that the gap is not a replacement for coverage, so do not shrink the panel size just to make room for a bigger standoff. A larger panel with a smaller gap often beats a smaller panel with a larger gap in real rooms.
Quick before-and-after checks you can do without special gear
You can get useful feedback with your phone and your ears, as long as you keep the test consistent. Pick one chair position, one speaker volume, and one short script you read out loud every time.
First, do a clap test and listen for a metallic zing or fast flutter between parallel walls. After you add panels with a gap, that flutter should soften and shorten, even if the room still has some low end buildup.
Second, record a voice memo from the same spot, then listen on headphones for the papery room sound on consonants like T and K. If the air gap is working where it matters, those consonants sound less splashy and the voice sits forward.
Third, play pink noise or a familiar podcast and walk slowly around the desk area. You are listening for fewer sharp changes in tone when you lean forward or turn your head, which is a practical sign that early reflections are under control.
To isolate the effect of the gap itself, try the same panel in the same location twice, once flush and once spaced off the wall. If you can, keep everything else the same so you are not confusing placement changes with spacing changes.
You can also do a simple “talk and turn” test, where you speak while slowly rotating your chair left and right. In an untreated room you often hear the tone shift as you face different boundaries, and good treatment reduces that shift.
Listen for the decay after a loud word, not just the loudness of the word itself. A room with better absorption sounds like it stops faster, which is what makes speech feel clearer and less tiring.
If you have a friend, have them stand where you normally sit and read a short paragraph while you stand near the door. You are listening for less “room” around the voice, which is a quick way to judge whether your wall treatment is doing anything meaningful.
For music, pick one track you know well and focus on the center image and the vocal presence. When early reflections are reduced, vocals tend to feel more locked in and less smeared across the desk.
If you hear a new buzz after mounting panels with a gap, do not assume it is the room, because it is often hardware. Tap the panel lightly and listen for a metallic tick, then tighten or pad the contact points until it is silent.
Finally, give your ears a day to adjust, because the first impression can be misleading if you are used to the old room sound. A better-treated room can feel less exciting at first, then you realize you can listen longer with less fatigue.
Conclusion
The acoustic panel air gap benefits are real, but they show up most when you choose a sensible gap and mount it cleanly. A small, consistent panel standoff distance often beats a bigger gap that ends up uneven, rattly, or touching the wall.
If you want a safe default, start with a 2 inch panel and a 2 inch gap at first reflection points, then add thicker treatment in corners for low frequency absorption. Use mounting cleats or rigid standoffs so the gap stays consistent and the panels stay quiet.
Do not treat the gap like a magic trick, because it is just one lever you can pull alongside placement, thickness, and coverage. When you combine a reasonable gap with smart placement, the room usually stops sounding boxy and starts sounding controlled.
Keep the installation practical, because the best acoustic plan is the one you can live with every day in a working office. If you can walk around comfortably, keep the panels stable, and maintain a consistent gap, you will get the benefits without the headaches.


