If your home office doubles as a recording or mixing spot, you have probably noticed how fast a small room tells on you. Clap once and you hear the “zing” off drywall, then the low end hangs around like it refuses to leave.
Acoustic panels for small room studio setups are not a luxury item, they are the difference between guessing and making decisions you can trust. The good news is you do not need a full buildout to get a room under control.
Most people go wrong by buying panels first and asking questions later. A small room rewards a simple plan, a little measurement, and a focus on reflection control where it matters.
This starter plan assumes you are working in a typical spare bedroom with a desk, a computer, and nearfield monitors. It also assumes you want better speech clarity for calls and better translation for mixes, not a showroom.
Set a realistic goal: less reflection, not “perfect silence”
A small home office studio will never be an anechoic chamber, and chasing that idea wastes money and time. Your real target is lower early reflections and shorter mid and high frequency decay so your ears stop fighting the room.
It helps to think in terms of clarity, not deadness, because a room can be quiet and still be inaccurate. You want to hear what is coming out of the speakers, not a second version bouncing off the walls a split second later.
Early reflections are the ones that mess with imaging and tone, because they arrive close enough to the direct sound that your brain blends them together. When those reflections are strong, you end up EQing the room instead of the track.
When people say “my room sounds boxy,” they usually mean midrange reflections are stacking up between parallel walls. When they say “my mixes are thin,” they often have a low frequency problem that thin foam panels cannot touch.
Small rooms also exaggerate certain notes, so a bass line can feel huge on one pitch and disappear on the next. That is not your monitors being random, it is the room reinforcing and canceling different frequencies at your seat.
Good small room acoustics start with controlling the first few bounces off the side walls, ceiling, and front wall near the speakers. That alone can make the stereo image snap into place and make voices on calls sound less harsh.
Once the early reflections calm down, you will notice you can work at a lower volume and still hear details. That matters in a home office, because fatigue often comes from harsh reflections more than from loud monitoring.
Keep “panel coverage percentage” in your head as a budgeting tool, not a religion. In most home offices, you can get a big improvement with modest coverage if you place panels like you mean it.
A realistic win is when you can pan something and it stays put, and when reverbs sound like spaces instead of a splashy haze. Another win is when you can take a call and the room stops making your voice sound bright and brittle.
Do not confuse isolation with treatment, because panels will not stop your neighbor from hearing your kick drum. What they do is clean up what you hear inside the room so your decisions translate outside the room.
Measure your room and identify the most reflective surfaces
Start with a tape measure and write down length, width, and ceiling height in feet and inches. Small changes matter, because a 7 foot 10 inch ceiling does not behave like an 8 foot ceiling at low frequencies.
Write down where the desk sits, where the door swings, and where closets or alcoves break up the shape. A room that is “10×12” on paper can still have weird behavior if one wall is mostly closet doors and the other is bare drywall.
Pay attention to how close your listening position is to the middle of the room, because the exact center often has strong nulls in the low end. In many small rooms, moving the chair forward or back by six inches changes the bass more than a new plugin does.
Next, walk the room and list the hard surfaces that “ring” when you clap, like bare drywall, glass, doors, and a big desktop. Soft stuff like a couch helps, but it is unpredictable, and it rarely sits in the right spot for reflection control.
Hard floors deserve a note too, because a wood or laminate floor can create a strong floor bounce that shows up as a dip in the midrange. A rug helps a little, but the bigger win usually comes from treating the ceiling and side walls where the strongest reflections happen.
Look at the front wall behind your speakers, because that surface can create comb filtering that makes the upper bass and low mids feel lumpy. In a small room, speakers are often close to that wall, so even a couple of panels there can clean up the punch region.
Do a quick mirror check for first reflections on the side walls. Sit at your listening position, have a friend slide a mirror along the wall, and mark where you can see the speaker in the mirror.
Mark both speakers on both side walls, because the reflection points are not always symmetrical if your desk is off-center. If you cannot get symmetry in the room, you can still get symmetry in the reflection control by adjusting panel placement.
Look up too, because the ceiling is often the loudest reflector in a small room studio. If you can see either speaker in a mirror held flat to the ceiling above the desk area, you have a clear target for a cloud panel.
Also look behind you, because the rear wall is usually closer than you think once a chair and desk are in place. If your head is within a couple feet of that wall, you are basically sitting inside the reflection zone.
If you want a quick sanity check, speak out loud while facing different corners and notice where your voice sounds boomy or honky. Those spots often line up with where the room stores energy, and they are the places you will want to tame later with thicker treatment.
Take a few phone photos of the walls and ceiling and sketch where panels could realistically go without blocking doors or shelves. Planning around real life is what keeps the project from stalling after you buy the first set of panels.
A starter panel plan for 8×10 and 10×12 rooms
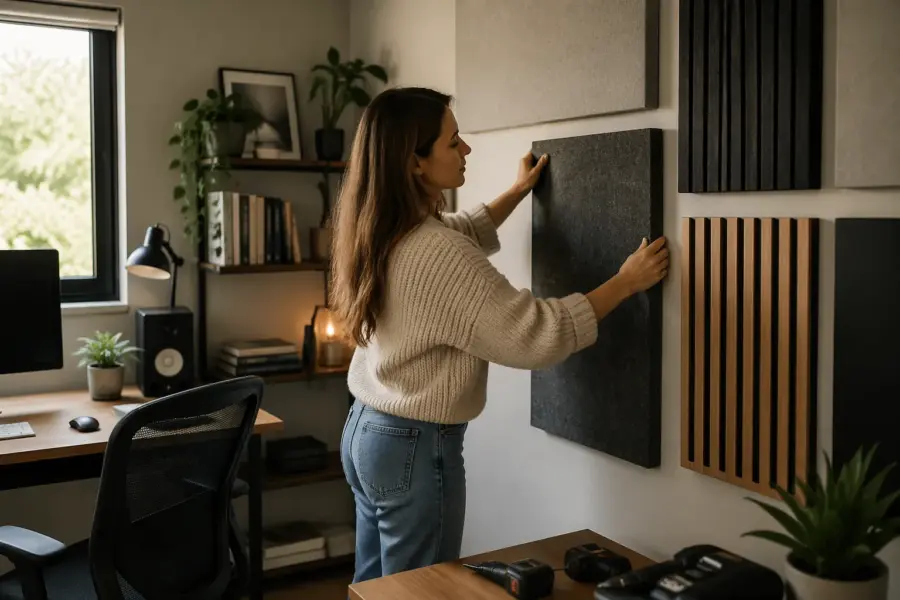
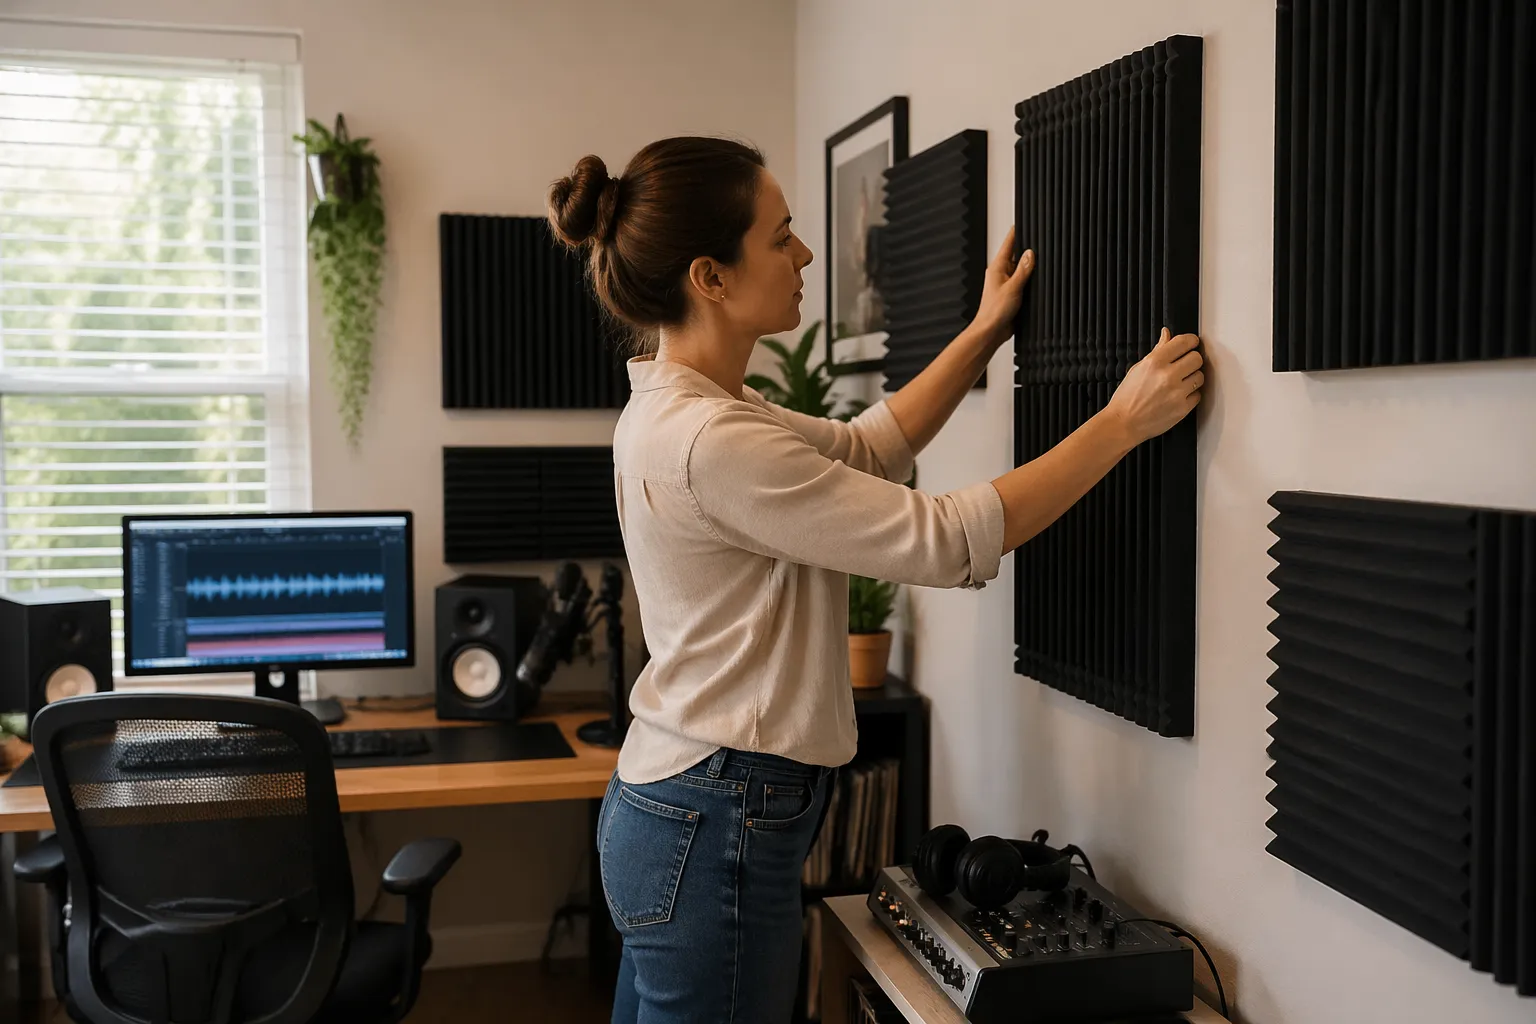
For acoustic panels for small room studio use, I like starting with 2 inch or 4 inch thick broadband panels, not thin foam tiles. In a small room, thickness buys you smoother upper bass and less “spitty” midrange, which is what you notice first.
If you are choosing between more thin panels and fewer thick panels, fewer thick panels usually wins for a starter setup. Thin foam can reduce flutter echo, but it often leaves the room sounding dull on top while the low mids stay messy.
Broadband panels made from rigid fiberglass or mineral wool tend to be the most predictable choice because they absorb across a wider range. That predictability matters when you are trying to fix a problem with placement, not guess what the material is doing.
The plan below assumes you place your desk on the short wall and fire down the long dimension, which usually behaves better. If your layout forces the opposite, you can still use the same coverage, but placement becomes more sensitive.
Try to keep the speakers the same distance from the side walls, even if that means the desk is not perfectly centered on a window. Symmetry is not about aesthetics, it is about making the left and right reflections match so the stereo field stays stable.
Nearfield monitors help in small rooms because they reduce how much room sound you hear compared to direct sound, but they do not eliminate the room. Panels make nearfields act like nearfields, instead of like speakers fighting a glass box.
If you are using a single microphone for voice or vocals, the same panels that help mixing will also help recording. A couple of panels placed near the mic position can reduce that papery room tone that makes even a good mic sound cheap.
| Room size | Starter panel set | Placement priority |
|---|---|---|
| 8×10 ft | 6 panels, 2×4 ft, 4 inch thick | 2 side first reflections, 2 ceiling cloud, 2 front wall |
| 8×10 ft | 8 panels, 2×4 ft, 4 inch thick | Add 2 rear wall behind chair, centered |
| 10×12 ft | 8 panels, 2×4 ft, 4 inch thick | 2 side first reflections, 2 ceiling cloud, 2 front wall, 2 rear wall |
| 10×12 ft | 10 panels, 2×4 ft, 4 inch thick | Add 2 corner straddles at front corners |
| Either size | Optional, 2 panels, 2×4 ft, 2 inch thick | Door or closet wall flutter echo control |
The reason the table leans on 4 inch panels is that they are forgiving when you cannot place everything perfectly. In small rooms, you rarely get perfect placement because doors, closets, and furniture force compromises.
For the ceiling cloud, two 2×4 panels placed side by side usually covers the reflection zone above a typical desk. If you can leave a small air gap above the cloud, it will act thicker and help the low mids more than you expect.
Front wall panels are underrated because people assume the sound only goes forward from the speakers. In reality, energy hits the wall behind the speakers and comes right back into the listening area, especially in the 100 to 400 Hz region.
Rear wall panels are the comfort upgrade, because they reduce that sense of the room pushing back at you. When the rear wall is controlled, you can hear reverb tails and delays without the room adding its own fake ambience.
If you are working in an 8×10, keep expectations realistic on sub-bass, because the room is simply too small to behave nicely down low. The goal is not to make 30 Hz perfect, it is to make the low end consistent enough that your decisions hold up.
Prioritizing first reflections vs random coverage
Random coverage looks busy on Instagram, but it usually leaves the worst reflection points untouched. If you can only treat a few areas, treat the spots that send sound straight back to your ears within the first 20 milliseconds.
Those first bounces smear the direct sound and create comb filtering, which is why cymbals can sound phasey and vocals can feel hollow. You can spend hours trying to fix that with EQ, but the problem is happening in the air before it hits your ears.
First reflections are the side walls next to your speakers, the ceiling above the desk, and often the desk surface itself. Fix those and you will hear tighter phantom center, cleaner reverbs, and less fatigue at the same volume.
The desk reflection is tricky because you cannot exactly remove the desk, but you can reduce the worst of it. A smaller desk, a monitor stand that lifts speakers off the surface, or even pulling the speakers forward can reduce that bounce.
Panel coverage percentage is a blunt tool here, because 15 percent coverage in the right places beats 35 percent in the wrong places. In small room acoustics, placement is the cheat code, because early reflections dominate what you perceive.
If you treat random spots, you can end up with a room that feels dull but still images poorly. That is the worst outcome because you lose some liveliness while keeping the problems that actually mess with decision-making.
Side wall panels should be at ear height when you are seated, not high up near the ceiling just because it looks neat. A panel that misses the reflection point by a foot can still help a little, but it will not give you that immediate “oh, there it is” improvement.
Ceiling treatment matters because the ceiling reflection is usually a clean, strong bounce with no furniture to break it up. When that reflection is controlled, the top end often sounds smoother without you touching a single EQ knob.
Rear wall treatment matters more than people admit, especially if your chair is close to the back wall. A single 2×4 panel behind your head can remove that “slap” that makes vocals sound like they are inside a closet.
If you have a closet door or a bare door near the listening position, that surface can create a narrow, annoying flutter that shows up on claps and snare hits. One panel on that door area can do more than two panels placed randomly on the opposite wall.
When you treat first reflections, you are also making your room more consistent for other tasks like editing and mastering. Consistency is what lets you build trust, because you stop wondering whether a harsh sound is in the track or in the room.
How many panels do you really need in a small room?
People love a single number, but the room decides, not a blog post. Still, for acoustic panels for small room studio use, I usually see a clear improvement once you reach roughly 15 to 25 percent panel coverage percentage on the major reflective surfaces.
That range is not magic, it is just where the room stops shouting back at you. Below that, you often fix one problem and reveal another, because the untreated surfaces are still strong enough to dominate what you hear.
In an 8×10 room with an 8 foot ceiling, that might mean six to eight 2×4 panels plus a thick rug if the floor is bare. In a 10×12 room, eight to ten panels often gets you to a place where you can work without second guessing every EQ move.
If your room is mostly empty, you may need a bit more absorption because there is nothing else to break up reflections. If your room already has a bed, a couch, and a packed bookshelf, you might need fewer panels to get to the same clarity.
Ceiling height changes the math because a low ceiling increases the strength of the ceiling bounce. A seven foot ceiling can feel harsh and cramped until you add a cloud, even if the walls have some panels already.
Do not treat every wall evenly just to hit a coverage target. If your left wall is a window and your right wall is drywall, you may need heavier treatment on the window side or a thick curtain plus a panel to keep the stereo balance honest.
Also consider what you do in the room, because a voiceover setup cares a lot about midrange reflections near the mic. A mixing setup cares about symmetry and imaging first, then about smoothing the low mids so balances translate.
If you are recording vocals in the same room, you do not need to cover every inch behind the singer. You just need to stop the closest hard surfaces from firing reflections straight into the mic capsule.
Also, do not ignore the ceiling because it is inconvenient, since the ceiling reflection is often the strongest one in a desk setup. A two panel cloud placed a few inches off the ceiling can outperform two extra panels scattered around the room.
If you are tempted to buy a huge pack of small foam squares, remember that quantity is not the same as effectiveness. A few well-placed 4 inch panels often beats a wall of thin foam when it comes to actual mix translation.
When you reach the point where panning, reverb, and vocal levels feel obvious, you are probably in the right panel count range. If you still feel like the room is changing the tone every time you move your head, you likely need better placement or more low frequency control, not more random panels.
How to add panels without making the room feel tight
A home office has to stay usable, and wall to wall absorption can make it feel like you are working inside a coat closet. You can keep the room comfortable by concentrating panels around the listening position and leaving some surfaces visually open.
It also helps to keep some natural reflectivity in the room so it does not feel weird for normal conversation. The goal is controlled, not suffocated, especially if you spend hours a day in the space.
Mount panels with a small air gap, because a 2 to 4 inch gap makes a panel act thicker at lower frequencies. That means you can use fewer panels for the same reflection control, which keeps the room from looking like a padded cell.
Air gaps are a practical win because they cost nothing and they make your existing panels work harder. If you are renting and cannot do deep builds, this is one of the easiest ways to get more performance without more materials.
Choose panel fabric and frames that match the room so they read like decor instead of gear. A neutral fabric and clean edges can make a treated room feel intentional, not temporary.
Think in zones: the listening zone gets most of the absorption, and the rest of the room gets just enough to stop obvious flutter. That approach keeps the room functional for work, storage, and normal life.
- Mount panels 2 to 4 inches off the wall
- Use a two panel ceiling cloud above the desk
- Straddle front corners with thick panels when possible
- Place one panel centered on the rear wall behind your chair
- Use a heavy curtain for glass before adding more wall panels
- Keep at least one wall mostly clear for visual space
If you are worried about holes in walls, look into picture rail hooks, French cleats, or removable mounting strips rated for the panel weight. A panel that is easy to mount is a panel that actually gets installed instead of leaning in a corner.
Ceiling clouds can be mounted with simple hooks and light chain, and they do not have to hang low to work. Even a small gap and a stable mount can give you a big reduction in harshness without changing the feel of the room.
Use furniture to your advantage, because a bookshelf with uneven depths can help break up reflections on a wall you do not want to cover. Pairing a bookshelf with one or two panels can be more comfortable than turning the whole wall into absorption.
Leave pathways clear and avoid placing thick panels where they snag chairs or block closet access. The best acoustic plan is the one you can live with every day, not the one that looks perfect on a diagram.
If the room starts to feel too dry, pull back on random high-frequency absorption and focus on thicker broadband pieces. A room can feel natural while still being accurate if you treat the right spots with the right thickness.
Upgrading over time: what to add next
After the starter plan, the next upgrade is almost always bass control, because small rooms store low end energy. If kick drums and male vocals change a lot when you lean forward, you are hearing room modes, not your speakers.
Room modes are why you can have a bass note that feels huge at the desk and almost gone two feet behind you. Panels aimed at mid and high reflections will not fix that, because the wavelengths are too long and the energy piles up in corners and boundaries.
Corner bass traps work best when they are thick and cover a lot of corner height. If you cannot commit to full height traps, start with two thick panels straddling the front corners where the speakers are, because that area tends to load the room the most.
Straddling a corner with an air gap behind the panel is one of the simplest ways to get more low frequency absorption without building a giant wedge. It is not magic, but it is a real step toward making the low end less jumpy.
If you use a subwoofer, bass trapping becomes even more important because you are adding more energy into the room. A sub can work in a small room, but only if you are willing to treat and place it carefully.
Once bass is less wild, add rear wall thickness if your chair is within two or three feet of that wall. A 4 inch panel with a 4 inch air gap, or a thicker trap, can take the edge off that back wall bounce that muddies the low mids.
Low mids are where “mud” lives, and that region is heavily influenced by boundary reflections from the front and rear walls. Thick treatment there can make guitars, pianos, and vocals separate more clearly without you carving them up with EQ.
If you are doing voice work, consider adding a couple of movable panels or a gobo you can place behind and to the sides of the mic. That lets you create a tighter recording zone without permanently covering more walls.
If your room already has decent absorption, consider diffusion only after you have reflection control handled. In a very small room, big diffusers can be impractical, and a thick absorber often wins on pure usefulness.
Diffusion can also be misunderstood, because it does not remove energy so much as scatter it. In a small room where the problem is too much energy arriving too soon, absorption is usually the more direct fix.
Over time, you can also upgrade by improving symmetry and ergonomics, like getting speaker stands and decoupling pads. Those are not acoustic panels, but they help you keep the monitoring position consistent so the treatment you add actually pays off.
If you want to be methodical, upgrade in cycles: add two pieces, listen for a week, then decide what is still bothering you. Small rooms change fast, and a slow approach keeps you from overspending on the wrong fix.
Simple listening checks to guide your next step
You do not need lab gear to hear whether your panel placement is working. Play a dry vocal track you know well and listen for a papery “halo” around the voice, which often points to untreated early reflections.
Try the same vocal in mono, because mono makes reflection problems easier to hear. If the vocal seems to change tone when you move your head slightly, you are hearing comb filtering from nearby surfaces.
For monitors, use pink noise and move your head slowly left to right by a foot or two. If the tone changes a lot, your small room acoustics are uneven, and you should focus on symmetry and first reflection points before buying more panels.
Do the same movement forward and back a foot, because that is where low end nulls often show up. If the bass disappears when you lean back, you are sitting in a cancellation zone and may need to adjust seat position and add bass trapping.
Clap tests are crude but useful for flutter echo between parallel walls. If you hear a fast “zing zing” after a clap, treat one of those two walls with a panel at ear height, or break it up with a bookshelf and a panel combo.
Snap your fingers near the side walls and listen for a sharp, metallic slap, because that can reveal a reflection point you missed. The goal is not to remove all snap, it is to remove the obvious ringing and rapid repeats.
Use a reference track with a stable center vocal and wide panned elements, and listen for whether the center image stays locked. If the center feels smeared or shifts with pitch, your side wall reflections are probably still too strong or uneven.
Check sibilance on a known vocal recording at a comfortable level, because harshness often comes from early reflections adding energy in the upper mids. If sibilance calms down after treatment without sounding dull, you are moving in the right direction.
Finally, check your mixes in headphones after you treat the room, because you will often notice you are using less extreme EQ. When your room stops lying, you stop overcorrecting, and that is the whole point of acoustic panels for small room studio work.
Also check your mixes on a small speaker or at low volume, because that is where midrange balance shows up. A treated room makes it easier to set vocal level and snare level without chasing them across every playback system.
If you want one simple habit, listen to the same two reference tracks every time you change the room. When those tracks start sounding consistent day to day, you are building a monitoring environment you can trust.
Conclusion
A practical starter plan is simple: treat first reflections, add a ceiling cloud, and put something substantial on the rear wall. That small amount of reflection control usually beats a larger pile of randomly placed panels.
The best part is that you do not need to guess, because the mirror trick and a few listening checks will tell you where the room is misbehaving. Once you hear the difference from correct placement, the whole process becomes more obvious.
Use panel coverage percentage as a budgeting guide, then let your ears and a few basic checks steer placement. If you upgrade later, put your next dollars into thicker corner treatment and rear wall depth, because that is where small rooms stay stubborn.
Keep it simple, keep it symmetrical where you can, and make changes you can live with in a real home office. Acoustic panels for small room studio work are not about perfection, they are about making your room honest enough to trust.


