If you rent, you already know the wall rules are vague until the day you move out and someone starts squinting at paint. Acoustic treatment should not be the thing that costs you a deposit.
The good news is that acoustic panels for renters home office setups can work really well without screws, anchors, or a weekend of patching. You just have to choose mounts and layouts that respect drywall, paint, and the way sound bounces in small rooms.
I am picky about this stuff because a panel that “kind of” sticks is worse than no panel at all. A fallen panel can rip paint, dent a desk, and make you hate your whole setup.
What “renter-friendly” really means for mounting and removal
“Renter-friendly” means you can install, live with, and remove panels without leaving marks that require spackle, sanding, and touch up paint. It also means you can do it without violating a lease clause about “no holes” or “no alterations.”
It is not enough that the product claims “removable” on the package. You need a method that comes off cleanly on your wall type, with your paint type, after months of heat cycles and humidity.
Drywall with flat builder paint is the easiest to damage because the paint layer can peel before the adhesive lets go. Gloss or semi gloss paint usually releases better, but it can still tear if the adhesive is too aggressive or removed the wrong way.
Renter-friendly also means the setup is reversible when you change rooms or move to a new place. If your system depends on perfect stud spacing or permanent cleats, you will end up abandoning panels in a closet.
It also means you can do the work with basic tools and without making a mess that lingers for days. If your plan involves sawdust, wet paint, or drilling “just one small hole,” it is probably not renter-friendly.
Another part people forget is that renter-friendly should be quiet and stable during daily use. A panel that shifts when you close the door or buzzes when you talk loudly is not a win, even if it comes off cleanly later.
Think about the full life cycle: install, adjustments, cleaning, and removal. If you cannot imagine doing each step calmly on a weeknight, you should simplify the design.
Walls also age, and rental walls are not always in great shape to begin with. Old paint, previous patch jobs, and cheap primer can make even “damage-free” adhesives behave unpredictably.
Humidity matters more than people expect, especially in small apartments with a bathroom fan that barely works. An adhesive that is fine in a dry climate can creep and slide in a humid room over a few months.
Renter-friendly should also consider what happens if you need to take panels down for a landlord inspection or a showing. If you can remove a panel in two minutes and put it back without drama, you will actually use the system long term.
There is also a difference between “no holes” and “no marks,” and leases often do not define it clearly. If you can, take a quick photo of the wall before you start so you have a reference for what “normal wear” looked like.
Best removable mounting options and when to use each
Start with the lightest, least sticky solution that still holds securely, then step up only if you need more grip. Most acoustic panels for renters home office use are light enough that you can avoid heavy duty adhesives entirely.
Removable mounting strips work best when the panel has a rigid backer like thin plywood, MDF, or a plastic frame. They struggle on raw fabric or squishy foam because the strip can peel the surface instead of releasing from the wall.
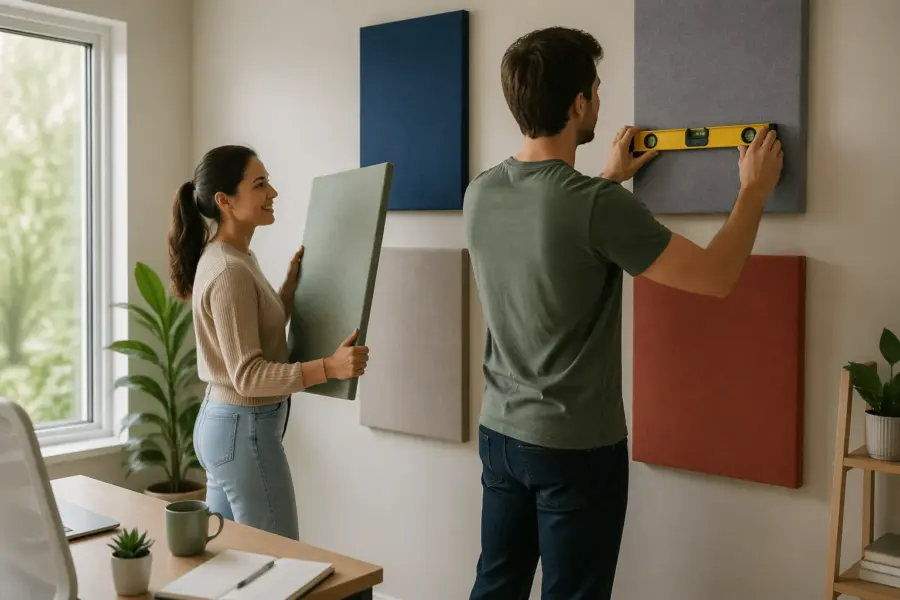
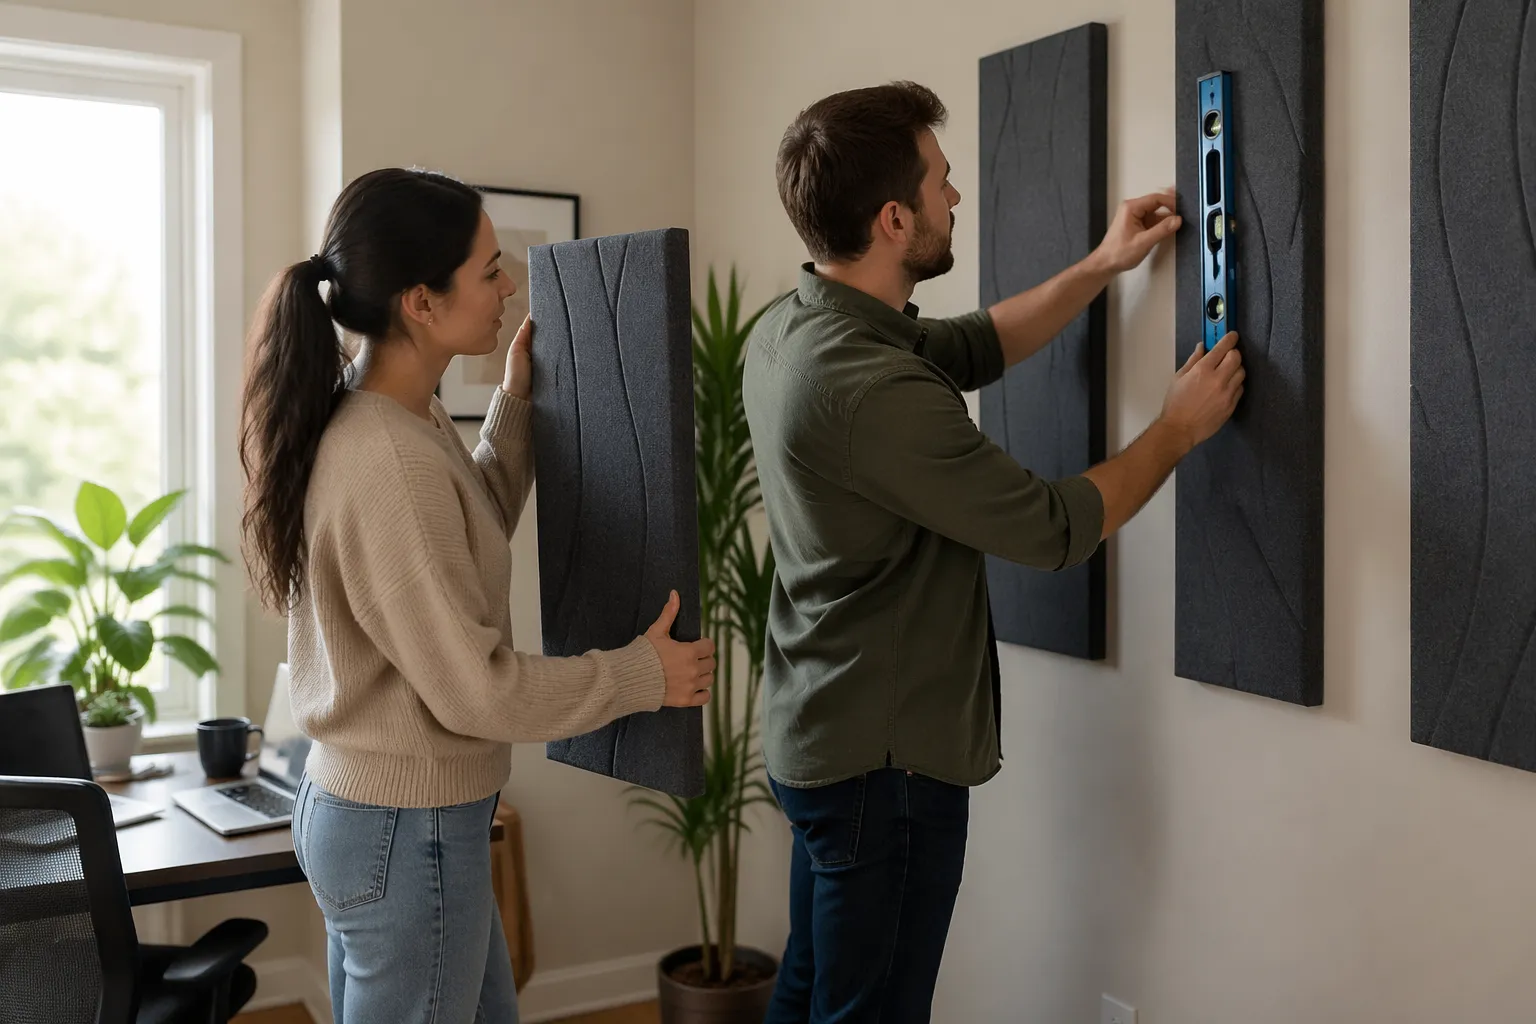
Damage-free hooks are great when you can hang panels like picture frames, especially if you build panels with D-rings or sawtooth hangers. This method keeps adhesive off the panel face and makes leveling easier with a small bubble level.
Painter’s tape plus hook-and-loop can work for very light panels, but I only trust it for temporary tests and not for a long term install. If you want a set-and-forget setup, use products rated for the real weight and add a safety margin.
For rigid panels, I like using multiple smaller strips instead of one big one because it spreads the load and reduces peel stress. It also gives you a little redundancy if one strip starts to fail.
For foam tiles, I would rather mount the foam to a thin backer first than stick foam directly to the wall. That one extra step is what keeps you from peeling paint when you try to remove a squishy adhesive pad later.
If you are using hooks, treat the panel like a lightweight picture and give it real hardware. A pair of D-rings and a short wire makes it easier to hang straight and easier to lift off when you want to reposition.
Some people use removable putty, but it is best for small, light objects and not for larger panels that can sag over time. Putty can also leave oily marks on matte paint, which is a weird problem to discover at move-out.
Magnetic mounting is underrated if you have any metal surfaces in your office zone. A filing cabinet side panel can hold a surprising amount of absorption without touching your walls at all.
If your desk is against a wall you do not trust, consider using a shelf or bookcase as the mounting surface instead. A panel mounted to the back of a bookcase with strips is still doing acoustic work, and it keeps risk off the wall.
Whatever you choose, do not ignore the manufacturer’s surface prep instructions, because that is where most “it fell off” stories start. The rating on the box assumes a clean surface, correct pressure, and the full cure time.
Best removable mounting options and when to use each
If you want the cleanest walls, treat the wall like it is a finished surface you are borrowing, not owning. That mindset pushes you toward removable mounting strips, damage-free hooks, and panel designs that hang like art.
Also think about how often you will reposition panels as you tune the room. If you plan to experiment, hooks and hanging hardware are less annoying than peeling and re-sticking strips every time.
The other reason to think in terms of “hang like art” is that it makes the room feel less like a studio project. A neat grid of panels that looks intentional is easier to live with in a bedroom office.
If you share the space with a partner or roommate, aesthetics can be the difference between “sure” and “absolutely not.” Framed panels and clean alignment read as decor, not as clutter.
When you use strips, apply them to the panel first and press hard for the full recommended time. Then press the panel to the wall and hold again, because that second step is what sets the adhesive into the paint texture.
When you use hooks, do not rush the cure time, even if the hook feels solid immediately. The adhesive needs time to bond, and the first few hours are when it is easiest to pull paint if it shifts.
For magnetic hangers, test the magnet strength with a gentle tug before you trust it over a desk. A magnet that slides slowly down a cabinet is still a magnet that will eventually end up on the floor.
Ceiling solutions are great in theory, but renters should be careful because ceilings often have different paint and different rules. If you are in a building with drop ceiling tiles, clips can be perfect, but most apartments will not have that option.
Tension poles are worth considering if you want corner treatment without touching the walls. They also let you create a little “panel tree” behind your chair, which is surprisingly effective for voice calls.
One more option is to mount panels to a thin board and lean it against the wall like a headboard. It is not as tidy as a true mount, but it is completely reversible and can still cut flutter echo.
| Mounting option | Best use case | Watch-outs |
|---|---|---|
| Removable mounting strips | Rigid-backed panels on painted drywall | Can pull flat paint if removed too fast |
| Damage-free hooks | Frame-style panels with wire or D-rings | Hook rating assumes clean wall and correct cure time |
| Magnetic hangers on metal surfaces | Filing cabinets, metal shelving, steel doors | Not reliable on hollow doors with weak skins |
| Ceiling grid clips or T-bar hooks | Drop ceilings in office buildings or basements | Not common in apartments, check building rules |
| Tension pole with crossbar | Corner bass trap support or panel “tree” | Can slip on smooth floors without rubber feet |
Freestanding and desk-adjacent panel solutions
Freestanding panel stands are the renter’s cheat code because they avoid walls completely. They also let you treat the exact zone that matters most, which is the space around your mic and monitors.
If you do video calls or record voice, put one panel behind the monitor and one panel behind your chair, then listen for the “papery” echo to drop. You can do this with two panels on simple feet, or with a folding gobo style screen.
Desk-adjacent panels work well when the desk is against a wall and you cannot mount anything above it. A thin panel can sit on the desk behind the monitors, or clamp to a shelf with a small stand-off so it does not rattle.
I like freestanding panels for renters because you can move them as your room changes, like when you add a rug or rotate the desk. The downside is that cheap stands can wobble, so buy stands with wide feet or add sandbags on the base.
A simple trick is to use panels as room dividers, especially in a studio apartment where your desk is in the same space as your bed. Even a partial divider can reduce the sense of “everything is echoing everywhere.”
If you have a bookcase, you can place a panel on top and angle it slightly toward the listening position. That angle can help catch reflections that would otherwise bounce off the bare wall behind your monitors.
For voice work, a panel just off to the side of the mic can be more helpful than one far away on the wall. The goal is to reduce early reflections that hit the mic a split second after your voice.
If you use nearfield monitors, a panel behind each speaker can help calm down the wall bounce, even if the panels are not mounted. You can lean them against the wall on the desk and still get a noticeable tightening of the image.
Do not ignore the floor, because the floor reflection is often loud in small rooms with hard surfaces. A thick rug under the chair and desk area is basically a “freestanding panel” that nobody argues about.
Closet doors are another sneaky spot for freestanding treatment, because they are often a big flat reflector. A panel on a stand near the closet can reduce that pingy slap you hear when you clap.
If you want something cleaner, look for stands that let panels sit in a channel rather than being held by tiny clips. The more surface contact and the lower the center of gravity, the less likely you are to bump it and start a chain reaction.
How to prevent panels from falling, shifting, or buzzing
Most panel failures come from bad prep, not bad products. Clean the wall with a dry microfiber cloth first, then wipe lightly with isopropyl alcohol and let it dry before you apply any adhesive.
Follow the cure time on removable mounting strips and hooks, because adhesives grab harder after they set. If you hang a panel immediately, it may hold for a day and then slide off at 2 a.m.
Buzzing usually comes from a panel touching something that vibrates, like a loose picture frame, a hollow desk hutch, or a thin door. Add small felt pads at contact points, or leave a finger-width gap so the panel cannot tap the surface.
For freestanding panel stands, stop lateral drift with rubber feet or a grippy yoga mat cut into squares under the base. If the panel still rocks, add weight low on the stand, not high on the panel, because top-heavy stands tip easier.
Check the panel itself for loose parts, especially if it is a DIY frame with staples and fabric. A single loose staple or a slack fabric edge can buzz like crazy at certain frequencies.
If you are mounting multiple panels in a grid, leave a small consistent gap between them. Panels that touch can transmit vibration to each other and create a weird sympathetic rattle.
Temperature swings can cause adhesives to creep, which is why panels sometimes slowly drift down a wall over weeks. If your office gets direct sun, choose a mounting method that is less dependent on adhesive shear strength.
Pressurize your plan with a safety margin, because real life includes bumps, vacuuming, and moving chairs. If a strip is rated for five pounds, do not hang a five pound panel and call it good.
For hooks, make sure the release tab is accessible after the panel is installed. If you cover the tab with the panel, you will end up yanking the whole pad off later, which defeats the point.
For desk-adjacent panels, watch out for cable contact, because cables can transmit vibration and create a faint buzz you cannot locate. A little cable slack and a few Velcro ties can solve what feels like a panel problem.
If you hear buzzing only at certain notes or certain voices, do not assume the panel is the only culprit. Sometimes the real offender is a vent cover, a lamp shade, or a loose monitor stand that the new acoustics made more obvious.
Do a quick monthly check where you gently press on each panel corner and listen for movement. It is easier to fix a loosening mount early than to repair a wall after a fall.
A simple layout plan you can take with you to the next place
You do not need a perfect room to get a big improvement, you need a repeatable plan that respects first reflections. In most home offices, that means treating the wall behind your monitors, the side walls near ear height, and something behind you.
Start with four panels and place them where you will hear the change immediately, then expand if you still hear slap echo. Acoustic panels for renters home office setups work best when you focus on the listening and speaking zone first, not random empty wall space.
If you have studio monitors, do the mirror trick on each side wall, then place a panel where you can see the speaker in the mirror from your seat. If you do mostly voice, put the first panel behind the mic position and the second behind your head.
Keep the layout modular so it survives a move, like two identical panels for side reflections and two identical panels for front and rear. When you land in a new room, you can repeat the same placements and then fine tune with small shifts.
In a small room, the ceiling reflection can be just as annoying as the side walls, even if you do not notice it at first. If you cannot mount a ceiling cloud, a tall freestanding panel placed slightly behind you can still reduce some of that energy bouncing around.
Try to keep your desk position consistent relative to the room, because that makes your panel placement more predictable. If you constantly move the desk, you will constantly chase reflections and never feel finished.
When you are deciding between treating the front wall or the rear wall first, prioritize what you hear at your seat. A single panel behind your head can make calls sound less boxy even before you touch the front wall.
Corner bass traps are great, but renters often cannot commit to big corner builds. A practical compromise is to place thicker panels in the front corners on stands, then move them if the room layout changes.
Do not overthink perfect symmetry if the room is not symmetrical, because many rentals have doors, closets, and windows in awkward places. Aim for functional symmetry around your listening position, even if the walls are not mirror images.
It helps to label the back of each panel with a simple code like “Left Side,” “Right Side,” “Front,” and “Rear.” That way, when you move, you can rebuild the same baseline without guessing.
If your room is very live, add absorption in stages and listen each time so you do not accidentally make it dull. The goal is clarity and control, not turning your office into a closet.
Once the panels are up, record a quick voice memo and keep it as a before-and-after reference. It is easier to judge progress with a consistent sample than with memory and vibes.
Removal and wall cleanup tips to avoid paint damage
Removal is where renters get burned, because impatience turns a clean install into a peeled wall. Pull removable mounting strips slowly, straight down, and keep the strip close to the wall so it stretches instead of snapping.
If a strip feels stuck, warm it gently with a hair dryer on low for 20 to 30 seconds, then try again. Heat softens the adhesive and lowers the force on the paint layer.
For damage-free hooks, remove the hanging load first and then pull the release tab in the direction the manufacturer shows, usually straight down. If the tab tore off, slide dental floss behind the adhesive pad and saw slowly until it releases.
After removal, wipe any residue with a small amount of isopropyl alcohol on a soft cloth, then wipe with water and let the wall dry. Do a spot test in a hidden area first, because some cheap paint softens with solvents.
Plan your removal day like a slow, boring project, not like a speed run. The fastest way to damage paint is to get frustrated and start pulling at angles.
If you used multiple strips per panel, remove the panel and then remove each strip one at a time. Trying to rip everything off as a single unit is how you end up with a paint chip the size of a coaster.
When you warm adhesive, keep the heat moving and do not cook the wall. You want slightly warm and flexible, not hot and soft enough to smear.
If you find a spot where paint is already lifting, stop and change tactics instead of forcing it. A little floss, a little heat, and a slower pull can often save a wall that is about to peel.
For residue that will not come off, try rolling it gently with your finger to lift it rather than scrubbing. Scrubbing is what turns a small adhesive mark into a shiny burnished patch on flat paint.
Once the wall is clean, let it rest and dry before you decide if there is any visible change. Freshly cleaned paint can look different for an hour, especially if you used any alcohol or water.
If you are nervous, practice on a low-visibility area first, like behind a curtain or behind a bookcase. That test tells you how your specific paint reacts, which is more useful than any label claim.
Finally, save the backing cards and instructions for your mounting products. If you ever need to show a landlord that you used damage-free methods, it helps to have the receipts and the product names.
Quick shopping checklist for renter-safe installs
If you buy panels first and mounting later, you often end up forcing a mount that does not match the panel back. It is smarter to decide whether you will use removable mounting strips, damage-free hooks, or freestanding panel stands before you check out.
Pay attention to weight ratings, but also to surface ratings, because “painted drywall” is not the same as “flat paint on old drywall.” A cheap scale and a quick wall inspection save you from guessing and re-buying supplies.
Think about thickness and density, because very thin foam does less than people expect in a normal room. A few thicker panels in the right spots usually beat a wall full of thin tiles.
Check the back of the panels before you buy, because that determines how easy it is to mount cleanly. A rigid backer is not just convenient, it is what makes removable strips behave like they are supposed to.
If you are building DIY panels, budget for hardware like D-rings, wire, and corner braces. Those small parts are what turn a soft rectangle into something you can hang and level without drama.
Buy extra strips or hooks so you are not forced to reuse old adhesive. Reusing adhesive is one of those “it worked last time” choices that fails at the worst possible moment.
Also consider storage and transport, because renter-friendly includes moving day. Panels that stack neatly and do not shed fibers are easier to keep in good shape between places.
- Rigid backer on each panel, even thin plywood
- Weight per panel written on a label
- Removable mounting strips rated above the real load
- Damage-free hooks plus D-rings for framed panels
- Freestanding panel stands with wide feet
- Felt pads or rubber bumpers for rattle control
- Isopropyl alcohol and microfiber cloth for wall prep
If you can, add a small level or a phone level app to your kit so panels do not look crooked. Crooked panels make a clean install feel messy even if the acoustics are working.
Keep a roll of painter’s tape around for layout marking, not for permanent mounting. Tape is great for planning a grid on the wall before you commit to adhesive.
Do not forget about cable management supplies if you are doing desk-adjacent panels. A quiet room makes cable buzz and desk rattles more noticeable, so it is smart to handle both together.
Lastly, consider buying panels in matching sizes so you can swap positions without leaving weird gaps. Uniform panels make modular layouts easier and make the room look intentional.
Conclusion
Renter-friendly acoustic treatment is mostly about being honest with the wall, the panel weight, and your patience during removal. If you build around removable mounting strips, freestanding panel stands, and damage-free hooks, you can get real results without turning move-out day into a repair project.
The best part is portability, because a good acoustic panels for renters home office layout can move with you and still make the next room easier to work in. Treat the setup like furniture, keep it modular, and your walls stay clean.
If you do this right, your panels become part of your workflow instead of a fragile experiment you are afraid to touch. That is the real win for renters: better sound now, and no penalties later.
Start small, prove the improvement to yourself, and then expand only where it matters. A calm, repeatable setup is what makes acoustic treatment feel renter-safe in real life.


