
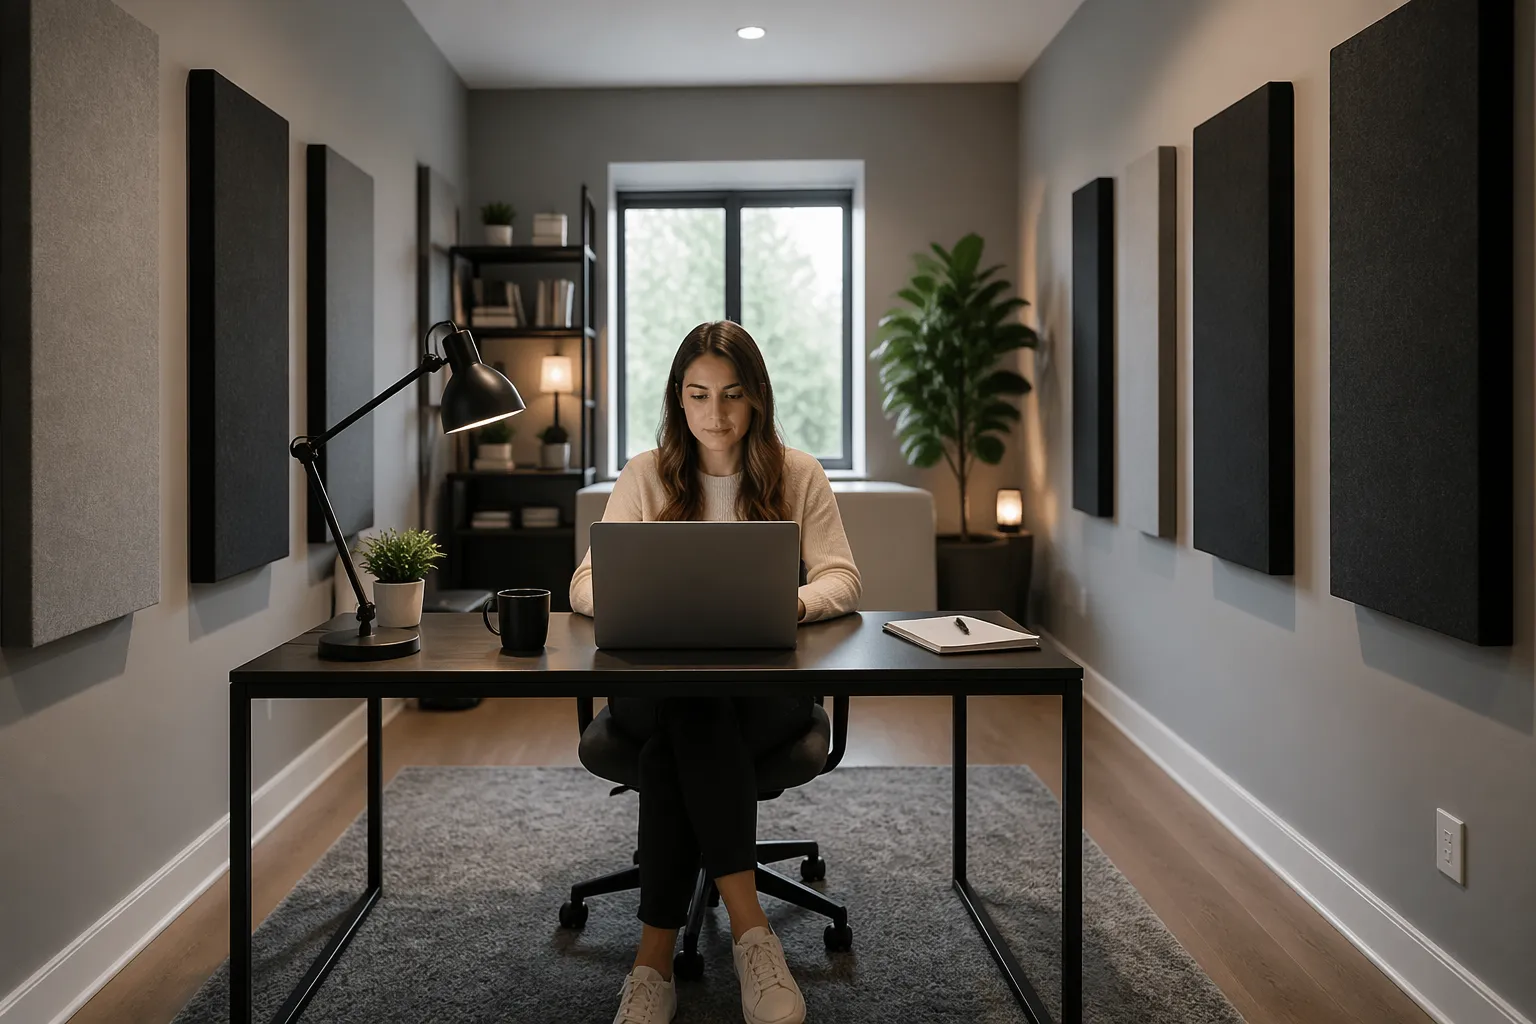
A home office studio setup in a long narrow room can work, but the room will fight you if you ignore geometry. The trick is to use the room’s shape to control what you hear at the desk instead of trying to fix everything with gear.
Long rooms tend to stack bass problems front to back, while narrow rooms make early reflections hit you fast and hard. If your mixes keep coming out boomy or the stereo image feels smeared, the room is usually the reason.
I like to treat layout as the first “acoustic panel” because it costs nothing and it changes everything. Once the listening position and speaker placement make sense, narrow room acoustics become much easier to tame with targeted treatment.
Most people start by buying monitors, then wonder why the same speakers sound different in every room. In a long narrow space, the room is effectively another piece of equipment, and it has a very strong opinion about your low end.
The good news is that narrow rooms can be predictable once you respect symmetry and timing. When you make the first reflections quieter and later, your brain stops guessing and your decisions speed up.
You do not need perfection to make good work, but you do need consistency. A stable listening position that translates is more valuable than a fancy plugin chain you do not trust.
Why long, narrow rooms exaggerate certain problems
A long, narrow room tends to produce strong axial modes along the length, so bass notes pile up in some spots and disappear in others. You can measure it, but you can also hear it when a kick drum seems to change level as you lean forward.
The narrow width adds its own set of modes and pushes the first sidewall reflections closer in time. That combo makes the midrange sound “phasey” and can make panning decisions feel less obvious than they should.
Flutter echo is another classic narrow-room problem, especially if the side walls are bare drywall. Clap in the room and you may hear a quick metallic ring, which is the room telling you it has parallel surfaces with nothing to break them up.
Rear wall distance matters a lot in these spaces because the back wall is often closer than you think once you add shelves, a chair, or a couch. When that boundary sits too close behind your head, it can cause a harsh “slap” and weird low end that no EQ can fix.
Long rooms also exaggerate the feeling that bass is “slow” because energy hangs around longer in certain bands. You might think your monitors are muddy, but it is often the room ringing after the sound stops.
In a narrow room, the side-to-side reflections can be so early that they compete with the direct sound almost immediately. That makes transients feel softer and can make reverbs feel louder than they really are.
Ceiling height plays a role too, because a low ceiling adds another strong set of modes and a very fast reflection path. If the ceiling is hard and flat, the vertical bounce can blur vocals and snares in a way that is easy to misdiagnose.
Even small asymmetries become audible in narrow rooms, like a door on one side and a solid wall on the other. The room then produces different reflection patterns left and right, and the phantom center stops feeling locked.
Another issue is boundary interference from nearby surfaces, especially when speakers are close to walls. The resulting dips can make you boost bass or low mids, which sounds fine in the room but falls apart in a car or on earbuds.
None of this means the room is unusable, but it does mean you cannot ignore it. The goal is to reduce the most damaging interactions so your monitoring becomes predictable instead of surprising.
Orientation and listening position for narrow spaces
For a home office studio setup in a long narrow room, face the short wall and fire sound down the long dimension whenever you can. This gives you more front-to-back distance for bass to develop and makes the early reflection timing easier to manage.
Put the desk on the centerline left-to-right so both speakers “see” the same boundaries. If you sit off-center, the stereo image pulls to one side because one speaker’s reflections arrive earlier and louder.
A good starting point is to place your ears about 38 percent of the room length from the front wall, measured from the wall behind the speakers. It is not magic, but it often lands you away from the worst length-mode peaks and nulls.
Keep the listening position flexible by moving the chair and desk in small steps, then checking bass-heavy references you know well. When the low end stops “wobbling” between notes, you are close to a workable spot.
Try not to sit exactly halfway between the front and rear wall, because that is a common null location for the length mode. If you are forced into the middle by furniture, even a small shift can change what you hear in the low end.
Keep the speakers and your head forming a stable triangle, and avoid rotating the desk slightly just to fit a chair or a cabinet. A tiny angle can create unequal path lengths that make one side feel louder even when your levels match.
When you face the short wall, you also get more usable space behind you for absorption or storage that doubles as scattering. That rear area becomes your buffer zone, and in narrow rooms a buffer zone is basically a cheat code.
If the room has a closet or alcove, treat it like a variable you can use rather than a flaw you must hide. Sometimes opening a closet door during mixing changes the low end in a helpful way by acting like a crude bass trap.
Pay attention to how close your head is to the side walls when you sit down, because narrow rooms can tempt you to hug one side for comfort. Your ears want equal distances to both sides so the reflection timing stays balanced.
If you must share the room with an office workflow, mark a repeatable listening position on the floor with discreet tape. Consistency matters, because a few inches can be the difference between a bass peak and a bass hole.
Once you have a position that feels stable, do not keep second-guessing it every day. Make a decision, learn the room, and let your references teach you what “correct” sounds like in that spot.
Speaker spacing when the room is tight side-to-side
Speaker spacing is where narrow rooms force compromises, because you cannot always get a wide triangle without putting speakers too close to side walls. I would rather run a slightly narrower stereo triangle than accept strong, early sidewall reflections that smear detail.
Start with an equilateral triangle between the two speakers and your head, then narrow it only as much as the room demands. Keep tweeters at ear height and toe the speakers in so the axes cross just behind your head for a tight center image.
When the speakers are close together, the stereo stage can feel smaller, but the center tends to become more reliable. In a cramped room, a reliable center vocal is usually more valuable than a dramatic wide image that collapses elsewhere.
Do not assume that pushing speakers wider always improves imaging, because sidewall proximity can erase the benefit. If widening the speakers makes cymbals feel splashy or makes the phantom center drift, you went too far for the room.
Distance from the front wall matters as much as side spacing, because boundary interference can create a dip in the low mids. Pulling the speakers forward a few inches can sometimes fix a weird 100 to 200 Hz problem more effectively than any EQ.
Keep both speakers the same distance from the front wall, even if one side has a door or a window. If one speaker is closer, the low end will not match and you will chase a phantom imbalance in every mix.
Stands help because they let you position speakers where they need to be instead of where the desk allows. They also reduce the amount of energy that couples into the desk surface, which can add a boxy coloration.
If you are using rear-ported monitors, give them enough breathing room so the port is not firing straight into a wall at close range. If you cannot, consider plugging the ports or using boundary EQ switches as a temporary compromise.
Toe-in is your friend in narrow rooms because it reduces how much high-frequency energy hits the side walls. A little more toe-in can make the sweet spot smaller, but it often makes that sweet spot far more accurate.
It also helps to keep the speakers slightly ahead of the desk edge so the first bounce off the desktop is reduced. That one reflection can blur the upper mids and make you over-brighten vocals and guitars.
| Room width (approx.) | Practical speaker spacing | What to prioritize |
|---|---|---|
| 7 to 8 ft | 3.5 to 4.5 ft between tweeters | Strong toe-in, thick sidewall absorption |
| 9 to 10 ft | 4.5 to 5.5 ft between tweeters | Near-equilateral triangle, keep symmetry |
| 11 to 12 ft | 5.5 to 6.5 ft between tweeters | Wider stage, maintain first-reflection control |
| 13 to 14 ft | 6.5 to 7.5 ft between tweeters | More spacing, watch desk reflections |
These numbers are not rules, but they are realistic starting points for rooms that are actually lived in. The main idea is to keep the speakers far enough apart to image well while staying far enough from side walls to avoid instant reflection chaos.
If you have to choose between perfect spacing and perfect symmetry, pick symmetry. A symmetrical setup with slightly compromised spacing usually translates better than an asymmetrical setup with a wider triangle.
After you set spacing, level-match the speakers carefully and verify the phantom center with mono material. If mono sounds like it is coming from the left speaker, the room and placement are telling you something important.
Finally, do not forget that your chair position is part of spacing, because moving your head forward changes the triangle. In a narrow room, the sweet spot can be small, so treat your posture like part of the calibration.
Managing strong sidewall reflections with layout choices
Narrow room acoustics often sound “bright but blurry,” and sidewall reflections are a big reason. When reflections arrive within the first few milliseconds, your brain blends them with the direct sound and the stereo picture loses focus.
Layout can reduce the problem before you hang a single panel. Pull the speakers a bit forward from the front wall and keep them away from the side walls as much as the room allows, even if it means a smaller desk.
If one side wall is a window and the other is a bookshelf, the room will never behave the same left and right. You can still get good results, but you need to add symmetry with matching treatment or matching “stuff” like thick curtains and a filled bookcase on the opposite side.
Use the mirror trick to find first reflection points, then decide whether the better fix is moving the desk or treating the wall. In a tight room, shifting the desk a few inches can change the reflection angle enough to make treatment more effective.
Sidewall reflections are not just a high-frequency issue, because the reflection contains midrange energy that affects vocal placement. When the side bounce is strong, you may keep turning vocals up because they never feel fully centered.
Try to keep the speakers the same distance from each side wall, even if the room is not perfectly rectangular. If one speaker is closer to a side wall, the early reflection timing differs and the image tilts.
Angling the desk slightly is tempting in a narrow office, but it often makes the first reflection points uneven. A straight, centered setup is boring, but boring is exactly what you want from a monitoring environment.
Soft furnishings can help more than people expect, especially in the mid and high frequencies where the ear is most sensitive to imaging cues. A thick curtain over a window can be the difference between a sharp center and a smeared one.
Rugs are useful, but do not rely on a thin rug to fix a bright room by itself. Floor reflections are only one path, and in narrow rooms the side walls are usually the bigger problem.
If you have a door near a first reflection point, it can behave like a giant reflector when closed and a partial absorber when open. Decide on a consistent door position when you mix, because changing it changes the room.
It also helps to keep clutter away from the immediate sidewall reflection zones, because random objects can create uneven scattering. You want controlled behavior, not a different sound every time you move a box.
Once the layout is set, sidewall absorption becomes a precision tool rather than a desperate blanket. When you treat the correct spots, you can often use fewer panels and get a cleaner result.
If you are unsure, prioritize the sidewall points closest to the speakers first. Those reflections are typically the earliest and most damaging to imaging, especially in narrow rooms where the path is short.
Handling the rear wall: distance, diffusion, and absorption zones
Rear wall distance is the make-or-break detail in a long narrow room because the back wall tends to be a strong reflector. If your chair is close to it, you get comb filtering in the mids and a bass buildup that makes you under-mix low end.
If you can, keep at least 3 to 5 feet between your head and the rear wall, and more is better. Even a small move forward can reduce the strength of that reflection and make the room easier to trust.
Diffusion on the rear wall can work if you have enough distance, because the scattered energy needs space to spread out before it reaches you. In many home offices the distance is too short, so thick absorption often beats a diffuser that looks cool but does little.
A practical approach is to build a rear “zone” with a mix of deep absorption at ear height and storage that breaks up flat surfaces. A packed bookcase with uneven depths can help, but it does not replace a real absorber when the rear wall is close.
Think of the rear wall as a secondary source that is trying to talk over your speakers. Your goal is to either quiet it down with absorption or make it less coherent with scattering, depending on how much distance you have.
If your chair is within a couple of feet of the rear wall, diffusion is usually the wrong move because the scattered sound still arrives quickly. In that case, a thick absorber is more likely to reduce the slap and the comb filtering.
Thickness matters because low frequencies need depth to be absorbed effectively. A thin foam panel on the rear wall might reduce a little high-frequency splash, but it will not fix the low end that is causing translation problems.
If you have room for it, a deep absorber with an air gap behind it can be a strong upgrade. The air gap effectively increases low-frequency performance without making the panel physically thicker.
Rear corners are also part of the rear wall story, because bass piles up where boundaries meet. If you can add bass trapping in the rear corners, you often get a tighter low end at the listening position.
A couch behind the chair can be surprisingly helpful if it is dense and thick, because it acts as a broadband absorber in the mids and highs. It will not replace real bass trapping, but it can reduce the harshness of rear reflections.
Try not to leave the rear wall completely bare, because that is when you get the most obvious slap. Even temporary solutions like a thick moving blanket can teach you what the room sounds like when that reflection is controlled.
If you do use a bookcase, avoid making it a perfectly flat plane of identical spines. Uneven depths, mixed object sizes, and a little randomness help break up the reflection in a way your ears interpret as less intrusive.
The best rear wall setup is the one that makes you stop thinking about the rear wall. When the back of the room stops calling attention to itself, your monitoring becomes less fatiguing and more honest.
Practical furniture placement that supports the geometry
Furniture placement can either support your geometry or ruin it, and most desks are bigger than they need to be for audio work. A shallow desk reduces early reflections off the desktop, which helps clarity and makes EQ decisions less twitchy.
Try to keep tall furniture out of the front half of the room near the speakers, because it creates asymmetrical reflections and weird shadowing. Put filing cabinets, wardrobes, and tall shelves behind the listening position if you need them in the room at all.
If you use dual monitors for work, place them so they do not block the direct path from the speakers to your ears. A screen centered between the speakers can cause reflections and diffraction, especially if it is large and close to the tweeters.
Monitor arms can help because they let you lower the profile of the desk area and keep screens slightly back. Even a few inches of extra clearance can reduce the feeling that the top end is “spitty” or edgy.
Keep the area between the speakers as clear as possible, because objects there can interfere with the center image. A tall desk lamp or a stack of notebooks can be enough to create subtle but annoying imaging issues.
Chair choice matters more than people think, because a high-backed chair can reflect sound right back into your ears. If your chair has a tall hard back, consider mixing with a throw blanket over it or choosing a lower profile option.
If you have a rolling chair, make sure it does not force you into a different spot every time you sit down. A stable position helps you learn the room, and learning the room is what makes mixes translate.
Printers, scanners, and other office gear tend to end up near the desk, but they often create asymmetry. If you can, keep them behind you or off to the side in a way that does not change the reflection pattern between left and right.
Cables and power strips are not an acoustic issue, but they influence where you can place stands and treatment. Planning cable runs early makes it easier to keep the speakers in the right spot instead of the convenient spot.
If you add a small couch or chair for breaks, place it behind the listening position rather than beside the desk. That keeps the front half of the room cleaner and can make the rear wall behavior a little friendlier.
Plants can be useful as visual comfort and minor scattering, but do not treat them like acoustic treatment. A plant is a nice accessory, not a bass trap, and it should not be placed where it breaks symmetry near the speakers.
When storage is unavoidable, try to distribute weight and mass evenly left and right. Two similar shelves on both sides usually beat one big shelf on one side and nothing on the other.
- Use a shallow desk, 24 inches deep if possible
- Center the desk on the room’s width
- Place monitors on stands, not on the desktop
- Keep side furniture below speaker height near the front
- Put storage and books behind the chair when space is limited
- Leave a clear path behind the listening position for rear wall distance
These choices are not about making the room look like a commercial studio, because most home offices have to stay functional. They are about keeping the acoustic picture stable so your ears can focus on music instead of the room.
If you change furniture, re-check your listening position and speaker distances, because a new desk can shift everything. In narrow rooms, small changes can be audible, so treat rearranging as part of your calibration routine.
When in doubt, simplify the front half of the room and push complexity behind you. The cleaner the space around the speakers, the easier it is to control reflections with a few well-placed panels.
Conclusion
A home office studio setup in a long narrow room gets easier when you treat geometry as the foundation, then add treatment where it counts. Face the short wall, keep symmetry, and respect rear wall distance before you spend money chasing problems.
Once the layout is right, narrow room acoustics stop being mysterious and start being manageable with focused absorption and a few smart compromises on speaker spacing. You will still hear the room, but you will finally hear your speakers first.
Use reference tracks you know well and listen for consistency rather than perfection. If the bass balance and center image stay stable across a few listening sessions, you have built a monitoring position you can learn.
The best sign you are on the right path is that you stop fighting the same mix problems over and over. When the room is under control, your decisions become smaller, faster, and easier to repeat.
After geometry, add treatment in the obvious places: first reflections, corners, and the rear wall zone. You do not need to cover every surface, but you do need to control the surfaces that dominate what you hear.
Finally, keep the setup consistent and resist the urge to constantly move things around. A long narrow room can absolutely produce professional results, but only if you give your ears a stable environment to work in.


