Open plan home offices look great in listing photos, but they can sound rough once you start taking calls all day. When your desk sits in a corner of a larger room, every hard surface around you becomes a little speaker that throws your voice back at the mic.
The goal with acoustic panels for open plan office corner setups is not to make the room silent. The goal is to make your voice sound close, dry, and consistent, so you stop fighting echo and you stop turning your headset up.
I like corner workstations because they keep cables and clutter contained, but they also concentrate reflections from two walls and the ceiling. With the right placement, you can keep the open feel of the room while carving out a small zone that behaves like a treated studio.
This article focuses on practical moves you can make without remodeling, including room divider acoustic panels and freestanding panels that move when the space needs to function as a living area again. If you have a desk corner setup in a shared room, these are the placements that make the biggest difference per dollar and per square foot.
The Acoustic Challenges of Open-Plan Spaces
Open plan rooms have long reflection paths, so sound keeps bouncing long after you stop talking. That tail shows up as a hollow, roomy tone on meetings, and it gets worse when the mic gain rises to pick you up.
In a smaller office, the reflections die faster because there is less distance for sound to travel. In an open plan space, the same voice energy can hit three or four surfaces before it finally loses steam.
Kitchen tile, wood floors, and big windows are common in open layouts, and all of them reflect mid and high frequencies hard. Those are the frequencies that carry consonants, so the room makes your speech less clear even if the volume is fine.
Even “soft” items like a couch can be deceptive because they absorb some highs but leave the midrange and low mids bouncing around. That is why you can feel like the room is comfortable, yet your recording still sounds like you are in a hallway.
Noise is the other half of the problem, because open plan spaces rarely have a door between you and life happening. A panel setup will not block a blender or a TV, but it can cut the slap echo that makes everything sound louder and more chaotic.
When the room is reflective, noise feels closer because it keeps reappearing as it bounces around. Reducing reflections does not remove the noise source, but it does reduce the “wash” that makes it feel like the whole room is participating.
Corners add their own weirdness, because two boundaries meet and the energy stacks up. You may notice your voice sounds boxier at the desk than it does when you stand in the center of the room, and that is the corner working against you.
That boxy quality is usually a mix of early reflections and low-mid buildup that hangs around your head. The mic does not know which part is your voice and which part is the room, so it captures both and calls it “tone.”
Another open plan issue is that you rarely have symmetry, so one side of the desk might face a wall while the other faces the entire living space. That imbalance can make your voice shift in tone when you turn your head, which is distracting on long calls.
Hard parallel surfaces can also create flutter echo, which is that quick, papery “zing” you hear when you clap. You might not clap during meetings, but that same flutter can smear the crispness of your speech in a way that makes you sound tired.
Finally, open plan rooms encourage higher mic gain because the speaker is farther from the mic than they think. The farther the mic is from your mouth, the more room you capture, so the room problems multiply fast.
Create a “Sound Zone” Around Your Desk
Think of your desk area as a small booth that you build with absorption, not walls. You only need to control the first reflections that hit your microphone, and that means treating the surfaces closest to your head and monitor.
This is why random panels across the room can feel like they do nothing, even if you spent real money on them. If the first reflection points are still bare, the mic still hears the same early slap that defines the “roomy” sound.
Start with what your mic hears, which is usually the wall behind your monitor, the wall to your side, and the ceiling above the desk. If you handle those three directions well, the rest of the open plan room matters a lot less for call quality.
I also pay attention to what is behind the mic, because many desktop mics and webcams sit in front of you and point back toward your face. If the mic is aimed at you but also “sees” a hard wall behind you, that rear reflection can sneak into the pickup pattern.
Panel thickness matters more than people want to admit, because thin foam mainly fixes hissy flutter and leaves the midrange mess. For voice, I prefer 2 to 4 inch mineral wool or fiberglass panels, and I like an air gap behind them when possible.
A 4 inch panel is not automatically “better” everywhere, but it is more forgiving when placement is not perfect. In open plan spaces where you cannot treat every surface, a little extra thickness buys you more audible improvement per panel.
Place panels where a mirror would show your mouth or your speakers from your mic position, because that is where early reflections come from. This simple trick keeps you focused on the desk corner setup instead of randomly decorating the room with panels.
If you are not using speakers, do the mirror test with your mouth and your microphone, because the voice path is what matters. The goal is to stop your voice from hitting a nearby wall and returning to the mic a split second later.
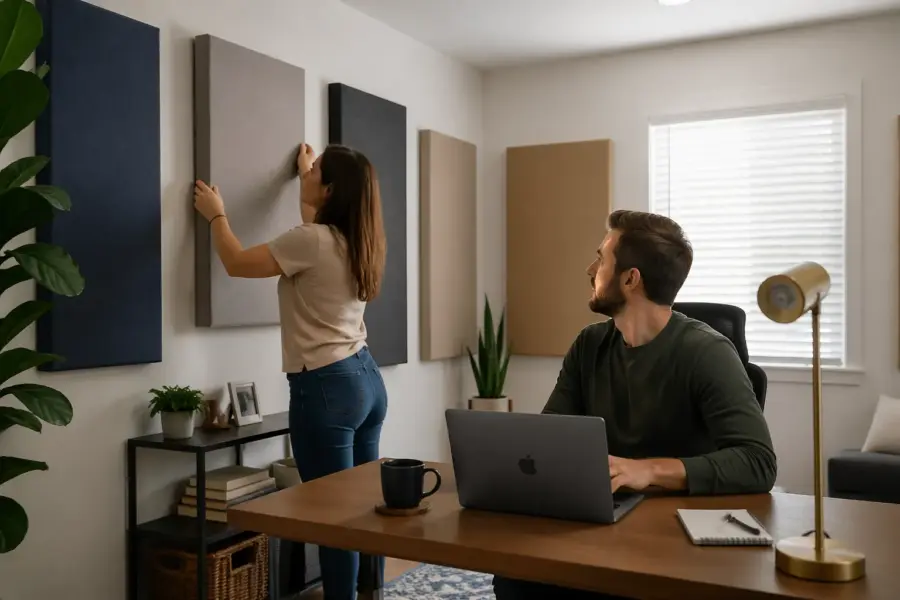
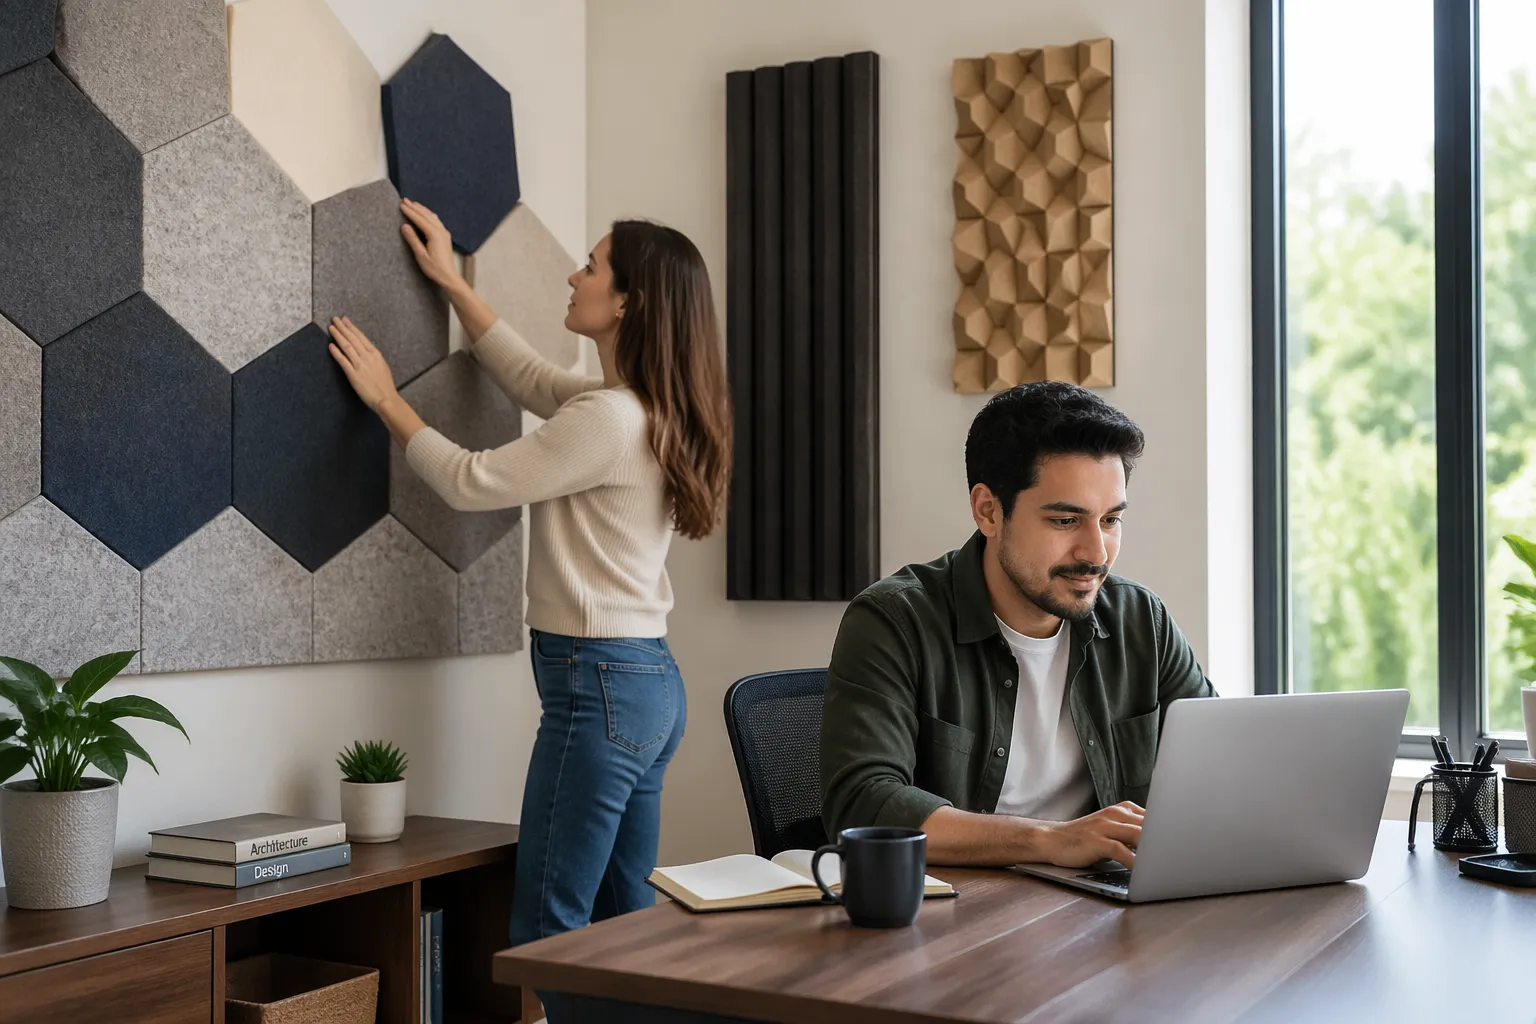
In practice, that often means one panel directly in front of you behind the monitor, and one panel on the closest side wall at about head height. If you can only afford two panels, those are usually the first two I would buy for a corner workstation.
Try to keep the panels centered around where your head actually is during calls, not where you wish you sat. If you lean back or perch forward, move the treatment to match your real posture so the sound zone stays consistent.
Desk surfaces can also reflect, especially glossy desktops or glass tops. A desk mat or a large mouse pad will not “treat” the room, but it can reduce that sharp bounce that makes keyboard clicks and tapping sound extra bright.
Once the sound zone is in place, you can test it quickly by recording a voice memo and listening for the tail after each sentence. You want the end of your phrases to stop cleanly instead of blooming into a soft echo.
Using Freestanding Panels as a Mini Back Wall
If your desk floats in an open room corner with no solid wall behind you, your mic hears the entire space. A pair of freestanding panels behind your chair can act like a portable back wall and instantly reduce the roomy sound.
This is especially helpful when your “behind you” area is a hallway, kitchen, or stairwell, because those spaces act like echo chambers. A portable back wall gives the mic something absorbent to look at instead of a long reflective path.
The best placement is close enough to matter but far enough that you can move your chair, usually 12 to 24 inches behind your seated position. When you push them too far back, they turn into general room treatment and you lose that tight, controlled voice zone.
When you bring them too close, you can start to feel boxed in and you might bump them when you stand up. I aim for “close enough to hear, far enough to forget,” because comfort is part of what makes a setup sustainable.
Height matters with freestanding panels because your voice is not coming from your knees. A panel that reaches above your head while seated will catch more of the energy that would have sailed over a shorter divider.
If you only have shorter panels, you can stack the effect by angling them so they face your mouth more directly. That angle increases the chance the first reflection hits absorption instead of slipping past the top edge.
I also like freestanding panels because they double as a visual boundary, which can help other people in the room remember you are on a call. That little bit of “studio etiquette” can reduce interruptions more than you expect.
For a cleaner look, match the panel fabric to your furniture or wall paint and keep the stands minimal. A neutral panel behind you can disappear on camera while still doing real acoustic work.
If you have a cardioid mic and you speak into the front, placing absorption behind you still helps because reflections wrap around and re-enter from the sides. The room does not respect pickup pattern diagrams, so controlling the environment is still worth it.
When you use two panels in a shallow V, you are creating a little pocket that reduces side spill and makes your voice feel closer. That shape also helps if the open plan room is on one side and a wall is on the other, because it balances what the mic hears.
| Freestanding panel option | Best placement behind the chair | What it improves most |
|---|---|---|
| Single 24x48x4 inch panel on a stand | Centered behind head, 12 to 18 inches back | Reduces rear wall slap into the mic |
| Two panels in a shallow V shape | Edges slightly forward of shoulders | Tightens voice and lowers room tone |
| Gobo style panel with feet, 6 to 7 feet tall | Directly behind chair, 18 to 24 inches back | Adds privacy and cuts side spill |
| Panel plus bookshelf combo | Panel behind head, shelf offset to one side | Balances absorption with a natural sound |
If you already own a folding screen, you can sometimes retrofit it by attaching absorber panels to the back side. It is not as pretty as a purpose-built gobo, but it can be a fast upgrade that keeps the room flexible.
Be careful with lightweight “acoustic” dividers that are mostly hollow, because they can reflect more than they absorb. If you tap it and it sounds like a drum, it is probably not doing much for your voice.
In a shared space, freestanding panels also give you a predictable background for video calls. That consistency helps you look more professional, and it keeps the camera from showing the entire living room behind you.
If you want a more natural sound, combine one absorber with something irregular like a bookshelf or a plant stand off to the side. The mix keeps the voice from feeling too dead while still reducing the obvious echo.
Side Treatment Without Blocking Walkways
Side reflections are brutal in a corner desk because the nearest wall is usually within a couple feet of your mic. Treating that side wall often does more for clarity than adding panels across the whole room.
The side wall reflection is usually the one that arrives fast enough to sound like part of your voice rather than a separate echo. That is why it makes your tone sound phasey or comb-filtered, especially on brighter microphones.
If you cannot mount anything, use room divider acoustic panels that sit parallel to the desk edge and leave a walking lane behind them. I like a divider that reaches at least a foot above your head when seated, because short dividers mainly fix keyboard clatter and miss the voice path.
A divider does not need to seal the space to be useful, because you are not trying to block sound like a wall. You are just trying to intercept the first bounce that would have hit the wall and returned to the mic.
When the walkway is tight, angle a freestanding panel so it faces you rather than running flat like a fence. That angle preserves traffic flow and still catches the first reflection that would have hit the bare wall.
Angling also reduces the chance that sound will bounce between the panel and the wall like a ping-pong match. You want absorption to be a dead end for reflections, not a new parallel surface that creates its own flutter.
Do not place a divider so close that it bumps your elbow or forces you to sit crooked, because you will hate it and stop using it. A setup that you tolerate every day beats a perfect diagram that makes the room annoying.
If you need the side treatment to be almost invisible, a single panel mounted higher on the wall can sometimes replace a floor divider. The mic cares about the reflection point, not whether the absorber touches the floor.
For renters, removable picture-hanging strips can work for lighter panels, but heavy panels need real anchors or a freestanding solution. If you are unsure, go freestanding first and treat mounting as a later upgrade.
Also look at what is already on that side wall, because a big framed print under glass is basically a reflector. Swapping a glass frame for a fabric wall hanging can be a sneaky improvement that does not scream “acoustic treatment.”
If your corner desk is near a window, consider thick curtains on the side as part of the plan. Curtains will not replace a real panel, but they can reduce the sharpest reflections and make the panel count feel more effective.
Finally, do not ignore the opposite side if it is wide open to the room, because that open side is where the room tone lives. A single room divider acoustic panel on the open side can make your voice sound like it belongs to you again.
Ceiling Options When You Can’t Treat Every Wall
Ceilings are the forgotten reflector in open plan rooms, and they are often a big flat sheet of drywall. If your voice sounds splashy even after wall panels, the ceiling is usually why.
The ceiling reflection is sneaky because you do not see it while you work, so your brain does not blame it. The mic hears it clearly, though, especially when the ceiling is low or the desk is directly under a flat section.
A small cloud above the desk, even a 2×4 foot panel, can knock down the top reflection that makes speech sound distant. Hang it with a few inches of air gap if you can, because the gap helps lower frequencies and makes a thin cloud act thicker.
Center the cloud where your mouth actually is during calls, not where the desk is centered in the room. If your mic is on a boom arm and you sit slightly to one side, shift the cloud so it covers that real speaking position.
If you rent or you cannot drill, use a ceiling track with removable hooks, or try a tension pole frame that holds a lightweight absorber above the desk. I have also seen people mount a panel to a tall wardrobe and cantilever it over the desk, which looks odd but works.
Another renter-friendly option is a freestanding frame made from light wood or aluminum that sits behind the desk and extends overhead. It is basically a portable ceiling, and it can be disassembled when you move.
Skip tiny stick on foam squares on the ceiling, because they mainly change the look and do little for the voice range. One decent cloud placed over your desk corner setup beats a hundred little tiles scattered like confetti.
If you are trying to keep the room looking normal, wrap the cloud in a fabric that matches the ceiling color. A white or off-white fabric makes the panel read like a design element instead of a recording gadget.
Ceiling fans can complicate things because they limit where you can hang a cloud and they create a little mechanical noise. If you have a fan, keep the cloud safely away from the blades and focus on placing it directly above the mic path.
In rooms with vaulted ceilings, you might think you are safe, but the slope can still throw reflections back toward the desk. A cloud can still help, and it often helps more than adding another panel far away on a distant wall.
If you can only treat one surface in the whole setup, I would still choose the nearest wall first, but the ceiling is a close second. That one move can be the difference between “podcast voice” and “speakerphone in a kitchen.”
Layout Examples for Corner Desks and Floating Desks
A true corner desk that touches two walls is the simplest case, because you already have boundaries you can treat. Put a panel behind the monitor, another on the side wall at head height, and a small cloud above, then you will hear the change right away.
In that true corner setup, your biggest enemy is the short bounce between the two walls and your face. Two well-placed panels can stop that ping-pong effect and make the corner feel less like a megaphone.
If the desk is jammed into the corner and you cannot fit a panel behind the monitor, mount panels higher and let them cover the reflection zone above the screen. You can also use a panel that spans both walls like an L shape if you want a cleaner look.
A floating desk in a corner area, where the desk sits a foot or two off the walls, needs a different approach because the mic hears around the desk. Use freestanding panels to create a partial U shape, with one behind you and one on the open side that faces the room.
The partial U shape works because it reduces the amount of “room” the mic can see without making you feel trapped. You are basically shrinking the acoustic footprint of your workstation while keeping the physical footprint reasonable.
If the open side faces a kitchen, put the divider slightly forward so it blocks the strongest reflection path from that direction. You are not blocking the kitchen noise itself, but you are reducing the way your voice bounces into that hard area and returns.
If the open side faces a couch and soft furnishings, you may not need as much treatment there. In that case, spend the budget on the wall behind the monitor and the ceiling cloud, because those are still the first reflection hotspots.
For L-shaped desks, treat the wall that faces your mic position, not the wall that just happens to be behind the extra desktop. The mic does not care about the desk shape, so your panel placement should follow the microphone, not the furniture catalog photo.
If you switch between standing and sitting, you may need panels that cover a taller vertical area. A taller side panel or a higher-mounted wall panel can keep the sound consistent when your head position changes.
When you are unsure, record from your normal seat, then record again while standing in the same spot, and listen for what changes. The differences will tell you whether you need more ceiling control, more side control, or more behind-you control.
- Panel behind monitor at seated head height
- Side wall panel at first reflection point
- Two freestanding panels behind chair in a shallow V
- Room divider acoustic panels on the open side of the desk
- Ceiling cloud centered over keyboard and mic
- Rug under chair to tame floor bounce
The rug is not a magic fix, but it helps if you have hard floors and a rolling chair that clicks and rattles. It also reduces the floor reflection that can brighten your voice in an unpleasant way when the mic is low on the desk.
If you cannot use a rug, a chair mat with a slightly textured surface can still reduce some of the sharpness compared to bare hardwood. It is not absorption, but it can reduce that glassy “snap” that makes rooms sound cheap on recordings.
For webcam placement, try to keep the camera between you and the treated wall behind the monitor, because it encourages you to face the absorption. If you turn the whole setup sideways, you can accidentally aim your voice straight at a bare wall again.
If you use speakers for occasional playback, keep them close to the treated wall and avoid firing them into the open plan space. The more you excite the room with speakers, the more you will hear the room even when you go back to voice calls.
How to Keep the Space Bright and Not Boxed-In
People avoid acoustic panels because they picture a dark studio cave, and that is fair. You can keep the room light by choosing fabric colors that match the walls, then using wood frames or thin trims to make them look like decor.
If you want the panels to disappear, go tone-on-tone and keep the edges clean. If you want them to look intentional, pick one accent color and repeat it in a lamp shade, a chair cushion, or a piece of art.
Leave sight lines open at standing height, especially toward windows and doorways, and put absorption lower where it matters for the mic. A panel that sits behind a monitor or behind a chair does not visually shrink the space the way a full height divider does.
I also like to keep the top third of the room visually quiet, because that is where your eyes go when you walk in. You can do a lot of acoustic work at head height while still keeping the upper walls and ceiling looking clean.
If you need room divider acoustic panels for separation, pick ones with a slight gap at the bottom and a slim profile. Heavy, opaque dividers can make an open plan room feel like a maze, and that gets old fast.
A divider with some design detail, like a simple frame or a subtle texture, reads like furniture instead of equipment. That matters in a living room office where you do not want the space to feel like it is permanently under construction.
Mix absorption with normal furniture so the corner setup looks intentional, not like a lab experiment. A plant, a floor lamp, and a clean cable run can do as much for perceived comfort as another panel.
Plants do not replace acoustic panels, but they do break up visual harshness and can slightly scatter high frequencies. More importantly, they make the space feel like a place you want to sit, which helps you actually use the setup consistently.
Lighting is a big part of the “boxed-in” feeling, so keep at least one light source behind or beside the camera. If the panels darken a corner, a warm floor lamp can bring the space back to life without changing the acoustics.
If you are on video calls, consider what the panels look like on camera, not just in person. A panel that looks fine in the room can look like a dark void on camera if it is underlit, so test your setup with your usual meeting app.
Try not to over-treat the exact spot behind your head if you want a natural, airy vibe. A little absorption plus a little texture, like a bookshelf off to the side, can keep your voice controlled without making the room feel acoustically suffocated.
Finally, keep the system modular so you can open the space back up when you are done working. If the panels fold, roll, or slide out of the way, you will be more willing to use them every day.
Conclusion
The best acoustic panels for open plan office corner setups focus on the first reflections around your mic, not the whole room. Treat the wall in front of you, the closest side, and the ceiling, then use freestanding panels to control what happens behind you.
If you do those basics, you will usually hear an immediate drop in echo and a big jump in clarity. Your voice will sound more like it does in your head, which is the whole point of this kind of setup.
Room divider acoustic panels are worth it when you need separation without remodeling, but placement matters more than buying bigger panels. If you keep walkways clear and the space bright, your desk corner setup can sound professional without looking like a recording booth.
The best part is that you can build this in stages, starting with two panels and adding pieces as you learn what your room is doing. Once you get the sound zone right, the open plan layout stops being a liability and starts feeling like a flexible, comfortable workspace.


