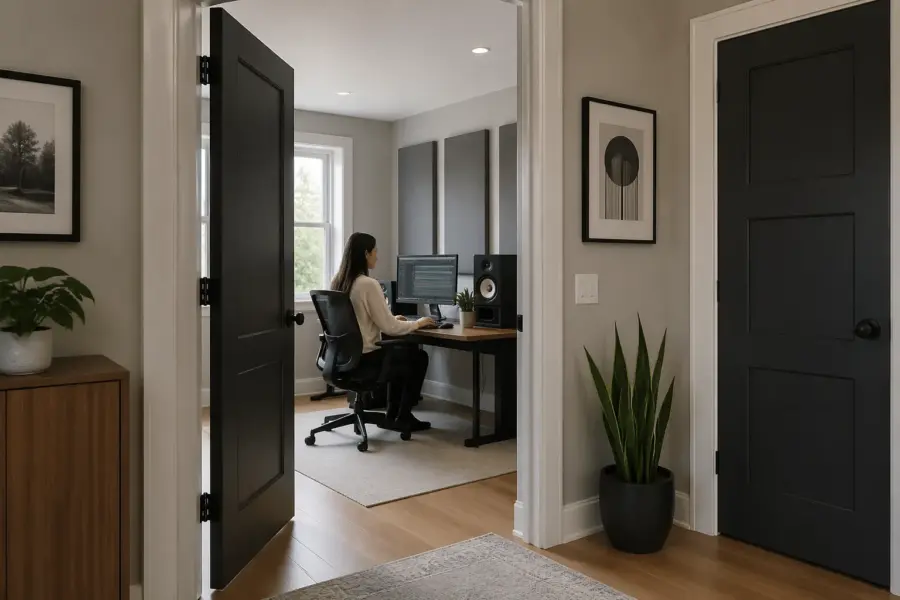
Two doors in a small room can wreck your symmetry fast, and symmetry is the whole game when you want speakers to image well. If you are wrestling with studio desk placement with two doors, you are already doing studio design on hard mode.
The mistake I see most is treating doors like they are just “openings” you can ignore until you buy panels. Doors change where you can sit, where you can mount treatment, and how sound bounces off side boundaries.
A good plan starts with geometry and ends with treatment, not the other way around. Once you lock a sensible layout planning decision, the acoustic fixes become straightforward and cheaper.
This article focuses on desk and speaker geometry first, then uses doors and daily use to pick the least bad compromise. You will also build a traffic path that keeps the room usable without shoving the desk into an acoustic corner.
The geometry problem two doors create (and how to define your usable room)
Two doors usually mean you lose at least one clean wall, and often you lose a corner too. That matters because corners and uninterrupted walls are where bass builds and where treatment mounts cleanly.
When one door swings into the room, it steals floor area and forces the desk to creep away from the ideal front wall. When a door is behind you, it can also steal the best rear wall spot for thick absorption.
Doors also create moving boundaries, which is a fancy way of saying the room sounds different depending on whether they are open or closed. That variability is brutal when you are trying to learn your monitors and trust your low end decisions.
Even if you never touch the doors, the door slabs are different materials than drywall, and they reflect differently. A hollow core door can ring and slap back energy in the upper mids in a way a heavier wall does not.
Start by marking the “no furniture” arcs for both door swings, including the doorknob clearance. Then mark a 24 to 36 inch strip in front of each door that you want to keep clear for daily use.
If one door is a closet, include the space you need to actually open it and reach inside without turning sideways. If one door is an entry door, include the area where you naturally stand to take shoes off or set something down.
What is left is your usable room, and you should treat that leftover shape as the real studio. If the remaining area is an L shape, accept that your speakers cannot reference that whole outline evenly.
Think of it like you are carving a smaller, more predictable room out of the bigger one. You are not shrinking your life, you are shrinking the acoustic problem into something you can actually control.
In practical terms, your listening setup needs a stable left and right boundary near the speakers, even if the far corners are messy. So you care more about the first 6 to 10 feet around the front wall and side walls than the closet nook behind the chair.
This is why people can get decent mixes in imperfect bedrooms but struggle in a “bigger” room with random openings. The early reflection zone is the part that decides imaging, and doors tend to live right in that zone.
Take a minute to note any other geometry traps that pair with doors, like a window on one side or a radiator that forces the desk to shift. The goal is not to panic, it is to list the constraints so you stop fighting them blindly.
If you can, sketch the room to scale on paper or in a simple app and draw the door swings accurately. A rough sketch is fine, but the door arcs need to be right because they are what will keep ruining your “perfect” placement later.
Draw a clean “acoustic rectangle” inside the real room
I like to draw an imaginary rectangle that ignores door recesses, closets, and weird jogs in drywall. This “acoustic rectangle” is the zone where speaker symmetry and early reflection control can behave predictably.
The rectangle is not a fantasy, it is a decision about what surfaces you are going to treat as your reference boundaries. Once you decide, you can stop letting every little architectural detail veto your setup.
Pick the rectangle so its front edge is the wall you plan to face, and its sides are the closest continuous left and right boundaries you can get. If one side is broken by a door opening, shift the rectangle inward until both sides are solid for at least the speaker-to-listener distance.
That “at least the speaker-to-listener distance” part matters because reflections that arrive early are the ones that mess with the direct sound. If the boundary disappears right next to one speaker but not the other, the stereo image will lean and the center will feel unstable.
Measure the rectangle width at speaker height, not at baseboard height, because openings sometimes change with trim and casing. Then measure the rectangle length from the front wall to the first major break behind you, such as a door plane or hallway opening.
If the back of the rectangle lands on a door, treat that door plane as the back boundary for planning purposes. You may later choose to add absorption there, but the important part is that you have a consistent “rear wall” concept.
This rectangle becomes the reference for everything, including where you place side wall reflection panels and where you aim bass trapping. You can still use the rest of the room for shelves or a printer, but you stop pretending it is acoustically symmetrical.
It also becomes the reference for your listening position, because the 38 percent rule and similar starting points assume a simple length. If you try to apply those rules to an L-shaped leftover, you will chase your tail.
People worry this wastes space, but it usually saves space because it stops the endless micro-adjusting. You are choosing one coherent setup and building the room around it.
It saves time too, because every time you move the desk you are changing the room’s response at your ears. Consistency is what lets you learn what “too much 80 Hz” sounds like in your specific room.
When the rectangle is tight, you might feel like the speakers are “too close” to you compared to what you see in studio photos. Nearfield monitoring is your friend in small rooms, and a smaller rectangle often improves clarity by reducing room influence.
If the rectangle is wide enough, you can still keep speakers off the side walls and leave room for treatment without feeling cramped. The point is not to maximize distance, it is to maximize predictability.
Once you have the rectangle, label the front wall, side walls, and rear boundary in your sketch even if the “rear wall” is partly a door. This makes it easier to think in terms of acoustics instead of architecture.
Choose the wall to face when doors compete for symmetry
When two doors compete, your best wall is often the one that gives you the most equal left and right distances near the front half of the room. That might be the wall you least expected, especially if the “obvious” wall has a door close to one speaker position.
It is tempting to face the wall that looks nicest or has the least clutter, but acoustics do not care about vibes. You want the wall that gives both speakers the same environment for the first few milliseconds after the direct sound.
Face the wall that lets you keep both speakers the same distance from their nearest side boundaries, even if the rear of the room is uneven. If you can only get symmetry by facing a shorter wall, that is usually still the right call for imaging and side wall reflections.
A shorter wall can also reduce the temptation to sit too far back, which is where small rooms get weird and bass modes stack up. If you can keep the listening position forward and centered, you usually get a smoother response with less effort.
Look at where the doors are relative to where the speakers would land, not relative to where the desk would land. A door that is “near the desk” might be harmless, while a door that is “near one speaker” can ruin symmetry immediately.
Also think about what the doors open into, because an open door might expose a hallway, a closet full of clothes, or a hard tiled corridor. Each of those behaves differently, and your left and right sides should not behave like different rooms.
If one wall option gives you clean symmetry but forces you to sit with your back close to a door, that is still workable if you can treat behind you. If the other option gives you a clean rear wall but messy side boundaries, the side boundary mess usually hurts more.
| Decision factor | What to measure | What usually wins |
|---|---|---|
| Front-half symmetry | Left and right boundary distance within first 8 feet | Wall with the most balanced near-field side spacing |
| Door interference | Speaker and desk clearance from door swing and door trim | Wall that keeps doors out of the speaker triangle |
| Rear-wall treatment options | Available flat area for 4 to 8 inch absorption | Wall that leaves room behind the chair for thick panels |
| Daily usability | Traffic path from each door to chair and storage | Layout that avoids walking between speakers and desk |
When you are stuck between two “okay” walls, choose the one that keeps the speaker triangle away from door trim and hinges. Trim and hinge recesses create little reflective edges that can add tiny comb filtering artifacts you will never fix with EQ.
If you have a door on the front wall itself, you can still face it if the door is centered and you can keep the speakers symmetrical around it. The problem is not the door existing, it is the door existing on only one side of the setup.
Try to avoid facing a wall where one speaker would fire across a door opening and the other would fire into a solid wall. That difference in boundary conditions is the kind of thing that makes you pan vocals left or right just to “fix” the room.
Once you pick the wall, commit for a week before you judge it. Your ears need time to adjust, and you need time to test with reference tracks and a few quick measurements instead of making a snap decision after ten minutes.
Keep speaker distances consistent with uneven side boundaries
Once you commit to a wall, treat the speaker triangle like a precision layout, because small changes are audible. Set your listening position first, then place speakers so the tweeters and your head form an equilateral triangle or a slightly wider one.
Use a tape measure and measure from tweeter to tweeter and from each tweeter to your listening position, not from the speaker cabinet corners. If you eyeball it, you will end up compensating with balance knobs and you will still feel like the center image is drifting.
Now deal with the uneven side boundaries by matching the distance from each speaker to its nearest side wall plane, not to the “average” wall line. If the left side has a door recess, reference the solid portion that actually reflects sound at speaker height.
In other words, you are matching what the speaker “sees” acoustically, not what the floor plan looks like. The reflection that matters is the one that bounces off a real surface and reaches your ears early.
Side wall reflections are the early reflections that mess with stereo width and center image, and doors make them unpredictable. If one side has a door opening, that side may act partly absorptive when open and reflective when closed, so you want your reflection control to be robust.
Robust usually means thicker absorption, larger coverage, and fewer “perfectly placed” tiny panels. You are trying to reduce the sensitivity of the setup to door position, not tune the room for one magical door angle.
Use the mirror trick for first reflection points, but do it with the doors in their most common position. If a door stays open all day, treat the wall you actually see when it is open, which might be the hallway wall across the opening.
If the door sometimes changes position, pick the position you will use while working and enforce it with a door stop. The mirror trick works best when the geometry is stable, and doors are the most common reason it is not.
When one side boundary is effectively farther away, you can fake symmetry by adding absorption to the closer side rather than trying to “add a wall” to the open side. Thick broadband panels at the first reflection point usually beat thin foam every time.
Another way to fake symmetry is to bring the speakers slightly closer together so both are farther from their nearest side boundaries. This is not always possible with a big desk, but it can reduce the left-right difference when one side has a door opening.
Keep the speakers the same distance from the front wall as each other, and keep toe-in the same on both sides. Toe-in differences often happen when someone tries to “aim away” from a door, and it usually makes the phantom center worse.
Try to keep the tweeters at ear height and keep both speakers on equally stable supports. If one speaker is on a stand and the other is on the desk because a door stole floor space, you have created a new asymmetry that will show up as tonal imbalance.
If you can measure, do a quick left-only and right-only sweep at the listening position and compare them. You are not chasing a perfect graph, you are looking for obvious differences caused by the door side behaving unlike the other side.
Desk placement rules that still work when doors steal corners
Your desk should not be shoved into a corner just because the doors leave an awkward open patch, and I will die on that hill. Corner loading boosts low end unevenly, and it tempts you to put one speaker closer to a side wall than the other.
Corner placement also tends to put you too close to one side boundary, which makes early reflections stronger on that side. You might not notice it immediately, but you will start making panning and reverb decisions that do not translate.
Start with the desk centered on the acoustic rectangle, then slide it forward or back to manage bass response rather than to dodge door trim. A common starting point is placing your ears about 38 percent of the rectangle length from the front wall, then adjusting by ear and measurement.
If 38 percent lands you in a door swing zone, do not force it and do not panic. Slide in small increments and listen for changes in kick and bass notes, because a few inches can move you out of a null.
Keep the desk surface as low and uncluttered as you can because it creates its own reflections. If you must use a big monitor, push it back and raise it so the speaker-to-ear line clears the top edge.
If you have dual displays, try to keep them symmetrical and avoid one screen angled toward one speaker. Asymmetrical desk clutter becomes an acoustic difference, and doors already gave you enough of those.
Pull the desk a little away from the front wall if you can, because it gives you space for front wall absorption and reduces strong boundary effects. Even 4 to 8 inches of breathing room can make cable management easier and reduce rattles.
Doors also steal the best spots for corner bass traps, so you need to get creative with thickness and placement. If a door blocks a front corner, put a thick panel on the wall just beside the corner and add a ceiling corner trap above the door line.
You can also use freestanding traps that sit just inside the corner and move when you need full door access. A trap on a simple stand is not as pretty as a built-in, but it is often the only way to keep the acoustics sane in a multipurpose room.
If you have one usable front corner and one blocked front corner, treat the usable one heavily and then add extra low frequency control elsewhere to balance the room. That might mean thicker panels on the front wall behind the speakers, or more absorption on the rear wall.
If you are doing studio desk placement with two doors, accept that the “perfect” desk depth might be wrong for your room. A slightly smaller desk that lets you keep symmetry can outperform a huge desk that forces one speaker into a bad spot.
Desk depth also affects how far forward your speakers sit, and that affects boundary interference from the front wall. If a shallow desk lets you pull the speakers off the wall and keep them symmetrical, it can be a bigger upgrade than any plugin.
Try to keep the desk centered even if the rest of the furniture is not, because the desk defines your monitoring axis. You can put shelves and storage off to the side, but your ears need a balanced left-right picture at the listening position.
If a door forces you to rotate the desk slightly, treat that as a last resort and keep the rotation tiny. A rotated desk usually means rotated speakers, and rotated speakers often means you are no longer hearing the same response from both channels.
Plan a traffic path that doesn’t force bad placement
A home office studio has to function when you are not mixing, and doors define that reality. If your traffic path cuts through the speaker triangle, you will keep moving the chair and desk, and your monitoring will never stay consistent.
Traffic is also noise, and noise changes how you work, especially if you are recording vocals or acoustic instruments. A layout that keeps people from brushing past mic stands and cables is a layout you will actually keep.
Pick one door as the “studio door” you use most, then route walking behind the chair whenever possible. If you must cross the front half of the room, do it along the front wall, not between you and the speakers.
When you route behind the chair, leave enough clearance so you do not have to squeeze past the back wall treatment. If you bump panels and stands every day, they will slowly drift and you will lose the consistency you worked for.
Think about where you will put a guitar case, a backpack, or a small cart, because those objects always end up somewhere. If the only “somewhere” is in front of one speaker, you have built a daily asymmetry into the room.
If one door is used rarely, you can treat it like an emergency exit and allow it to be partially blocked by a movable trap or a light shelf. Just make sure you can still open it fully when you need to, and do not create a safety issue.
- Mark door swing arcs with painter’s tape
- Reserve a 30 inch clear strip to each handle side
- Route walking behind the chair, not through the speaker triangle
- Keep the rack or printer on the far side of the listening position
- Place storage on the door wall, not the speaker wall
- Use a door stop so the door position stays consistent
Once you have a traffic path, test it by actually walking it with the chair pulled out like it would be during a session. If you have to move the chair to get to a door, you will move the chair during real life too.
Try to keep cables and power strips out of the traffic path, because a door-focused room often forces you to run cables along odd edges. A clean path is not just convenience, it is also fewer accidental changes to your setup.
If you have clients or collaborators, plan where they will stand or sit so they are not blocking one speaker. A second chair placed in the wrong spot can turn into a permanent acoustic obstruction on one side.
When the room is really tight, consider a chair that rolls and returns to a taped position on the floor. It sounds silly, but a repeatable chair position helps you keep your monitoring reference stable even if the room has to transform between work modes.
Door behavior changes the room, so decide “open” or “closed”
A door that stays open turns part of your side wall into an opening, and that changes the balance between left and right. A door that stays closed acts like a hard reflector, especially if it is hollow core.
That means you are not just choosing convenience, you are choosing a different acoustic system. The same mix can feel wider, narrower, brighter, or duller depending on that door position.
Pick a default and stick to it during work sessions, because consistency matters more than theoretical perfection. If you share the house and the door must stay closed, plan for that and treat the door like a reflective panel you cannot remove.
If you can choose, closed doors are often easier to manage because you can treat them like walls. Open doors can be great for reducing pressure buildup in some cases, but they introduce asymmetry and unpredictable reflections from adjacent spaces.
For a closed door, a simple win is adding a thick absorber on the door itself using removable hooks or an over-the-door hanger. That can tame mid and high frequency slap that otherwise bounces straight into your listening position.
If you add a panel to a door, make sure it does not rattle when the door moves or when bass hits. A little felt padding at contact points can save you from chasing mysterious buzzes that only happen on certain notes.
For an open door, you may need absorption on the wall across the hallway or on the inside face of the open door if it sits near a reflection point. This sounds fussy, but it is cheaper than buying new monitors and still hearing a smeared phantom center.
If the open door reveals a closet full of clothes, that side might actually become more absorptive than the other side. That can be helpful, but it can also make the stereo image feel like it pulls toward the more reflective side.
If one door is behind you, treat it like part of the rear wall and prioritize thickness over coverage. A 6 inch panel with an air gap behind it can do more for the room than a wide but thin panel that only handles treble.
Rear wall control is especially important in small rooms because the rear reflection arrives quickly. If that reflection is strong and uneven because of a door panel, you will hear it as a kind of phasey haze on transients.
Do not confuse door treatment with soundproofing, because they are different goals. A panel on a door helps reflections inside the room, but it will not stop the door from leaking sound to the rest of the house.
If you need to reduce leakage, start with seals and a door sweep, then come back to internal treatment. Sealing helps isolation and also reduces whistling gaps that can make the door behave strangely at certain frequencies.
Example layouts for doors on adjacent walls vs opposite walls
Adjacent-wall doors usually create an L-shaped usable area, and that is where the acoustic rectangle trick pays off. You often end up facing the wall that is not touched by either door, so the speakers see two clean side boundaries.
In these rooms, the corner where the two door walls meet is often a dead zone for placing anything important. Let that corner be awkward, and stop trying to force the desk into it just because it looks like “unused space.”
In an adjacent-door room, place the desk on the clean wall and keep the listening position centered in the rectangle, even if the chair ends up closer to one physical corner. Then build your traffic path along the door walls, staying behind the chair and out of the reflection zone.
If one of the adjacent doors is a closet, you can often keep it closed and treat it like a normal wall most of the time. If it must open frequently, consider using a freestanding panel that rolls out of the way when you need access.
Opposite-wall doors create a “hallway through the studio” problem if you let them. The fix is to keep the desk and speakers on one long wall axis, then route the traffic path along one side boundary like a narrow aisle.
The aisle idea works best when you keep it consistent and do not store random stuff in it. If the aisle becomes a pile of boxes, you will start cutting through the speaker triangle again and the room will slowly fall apart.
With opposite doors, avoid placing the listening position exactly centered between them because the rear door can act like a reflective target behind your head. Shift the setup so you have enough rear wall area for absorption, even if that means one door is slightly closer to the chair.
If one opposite door is much heavier than the other, remember that the rear boundary will not be acoustically uniform. You can balance that by adding absorption to the heavier door side or by treating the rear wall area around the lighter door more aggressively.
In both cases, layout planning comes down to protecting symmetry near the speakers, not making the floor plan look balanced on paper. If you can keep equal speaker-to-side distances and control side wall reflections, the rest of the room can be imperfect and still work.
It also helps to think in layers: first the speaker triangle, then the early reflection control, then the bass control, then the convenience stuff. Doors tend to make people start with convenience, and that is how you end up with a desk that “fits” but never sounds right.
If you are unsure, mock up both layouts with temporary positions and listen to a few reference tracks you know well. The better layout usually reveals itself quickly as the one where vocals lock to the center without effort.
Do not underestimate how much door position affects your perception of reverb tails and stereo effects. A layout that keeps the left and right reflection patterns similar will make spatial decisions feel obvious instead of confusing.
Conclusion
Two doors do not ruin a home office studio, but they force you to choose what stays consistent. If you handle studio desk placement with two doors by defining a usable zone, you can keep your monitoring reliable day to day.
Build an acoustic rectangle, pick the wall that protects near-field symmetry, and match speaker distances to real reflecting surfaces. Then lock in a traffic path that keeps you from constantly nudging the desk into worse geometry.
Decide whether the doors are open or closed during sessions and make that the rule, not the suggestion. A consistent room beats a theoretically better room that changes every time someone walks by.
After that, treatment decisions get simpler because you are treating a known layout, not a moving target. You will still compromise somewhere, but you will compromise on convenience, not on imaging and translation.


