
A radiator on one wall sounds like a small annoyance, until you try to set up monitors and realize the room is already making decisions for you. Heat, clearance, and weird wall bumps can push your desk into the worst possible spot if you do not plan it.
The good news is that you can still get a solid home office studio layout with radiator constraints, even in a tight bedroom or boxy spare room. You just have to treat the radiator like a physical boundary, not like furniture you can ignore.
I have seen people melt foam, warp cheap vinyl desk mats, and cook a small interface because they parked gear too close to a hot panel. A clean layout starts with heat-safe placement and ends with a listening position that stays symmetrical enough to mix without second guessing.
This article focuses on room geometry choices that matter when one wall is partly unusable. You will also see practical speaker clearance targets and ways to keep side wall symmetry when one side has a radiator, pipe chase, or window ledge.
What a radiator changes in a small room layout
A radiator steals more than floor space, it steals predictable acoustics right where you often want a speaker stand or bass trap. The metal surface reflects midrange, the cavity behind it can act like a little resonator, and the heat changes what materials you can safely mount nearby.
Most home office studio layout with radiator problems show up as forced asymmetry. One speaker ends up closer to a side wall, closer to a corner, or higher because the stand has to straddle pipes.
Heat also changes your cable and power strip choices because warm plastic gets soft and brittle over time. If you have to run a power strip near the radiator wall, route it high and away from the hottest airflow, not tucked behind the fins.
The radiator wall often has other geometry quirks like a window sill, trim, or a bulging cover that sticks out a few inches. Those inches matter because your speaker clearance and your listening triangle depend on predictable distances, not “close enough.”
Measure the radiator zone and define no-go distances
Start with a tape measure and treat the radiator like a hazard zone you draw on the floor with painter’s tape. Mark the radiator width, how far it protrudes, and where the valve and pipes force you to keep furniture legs from landing.
Then measure how hot it gets in real use, because “warm” and “too hot to touch” lead to different heat-safe placement rules. If you rent, do not assume the building’s system is gentle, since some steam radiators run surprisingly hot in winter.
For most setups, I like a conservative buffer of 12 to 18 inches from the radiator face to anything that can warp or trap heat, like acoustic foam, vinyl, or a closed-back cabinet. If the radiator is covered and the cover vents upward, increase that buffer above the cover because the hottest air rises and lingers.
Also plan for airflow because blocking heat can create noise issues like creaks, ticking, and expansion pops that land right in your mic. A layout that lets the radiator breathe usually sounds better and feels better, even if it costs you a few inches of desk depth.
Decide whether the radiator wall should be in front of you or behind you
When you choose desk orientation, you are really choosing which wall handles first reflections and which wall handles the back wall bounce. With a radiator, that choice also decides whether your ears sit in the heat plume or safely away from it.
Facing the radiator wall can work if the radiator is low under a window and you can keep monitors above it with safe speaker clearance. The risk is that one speaker may end up too close to the window jamb or the radiator cover edge, which can pull your stereo image sideways.
Putting the radiator behind you often feels nicer for comfort, but it can create a hard, reflective back wall area if you cannot treat that wall evenly. If you sit too close to the radiator wall behind you, you can also get low frequency buildup and a weird “pressure” sensation at the listening position.
I usually pick the orientation that gives the cleanest left-right symmetry at the front half of the room, even if it means the radiator ends up behind the chair. Mixing accuracy depends more on side wall symmetry and consistent early reflections than on whether the radiator is in your line of sight.
| Radiator position | Desk faces radiator wall | Desk faces away from radiator wall |
|---|---|---|
| Low under a window | Often workable if monitors clear the sill and you keep a heat buffer | Good comfort, but treat the window wall behind speakers carefully |
| Mid-wall panel radiator | Risky for speaker stands and cable routing near heat | Usually easier to keep speakers symmetrical on a clean front wall |
| Corner-adjacent radiator | Often forces one speaker into a corner, which skews bass | Better chance to keep the listening triangle centered |
| Radiator with tall cover | Watch upward heat venting near monitor stands | Keep chair and fabric panels out of the hot airflow path |
Keep speaker placement consistent when one side has an obstacle
Your monitors should “see” the room the same way on the left and right, or your mixes will lean without you noticing. A radiator on one side wall is a classic reason people lose side wall symmetry and then blame the speakers.
Start by locking the listening position on the room centerline, then place the speakers so the tweeters are the same distance to your ears and the same distance to the front wall. Do not let the radiator side force one speaker closer to the front wall because that changes boundary reinforcement and shifts low end.
If the radiator blocks a stand, use a wall bracket or a short stand on a platform so the speaker ends up in the same coordinates as the other side. This is where speaker clearance matters, because a speaker jammed into a nook beside a radiator cover can get boomy and harsh at the same time.
When you cannot match physical boundaries, match the reflection behavior with treatment, not with guesswork. A thick panel on the opposite side wall can balance a reflective radiator surface, but keep that panel far enough away that heat-safe placement is not a constant worry.
Work around uneven wall surfaces without skewing your listening triangle
Radiator walls are rarely flat, because you have pipes, valves, trim, and sometimes a window ledge that sticks out. If you measure speaker distances from the wrong reference point, your listening triangle can look right but sound wrong.
Pick a consistent reference plane, usually the drywall plane, and measure speaker-to-front-wall distance from that plane, not from the radiator cover edge. The same goes for side wall measurements, because a three inch bump can change first reflection timing enough to smear imaging.
Do not angle one speaker differently just to “aim around” a cover or pipe, because toe-in changes high frequency balance and phantom center stability. Keep toe-in matched, then solve the obstruction by moving the whole speaker forward or using a different stand footprint.
If you need a temporary workaround, a rigid board on spacers can create a flat mounting surface for a panel without touching the radiator or trapping heat. It looks a bit improvised, but it keeps geometry honest and avoids cooking adhesives.
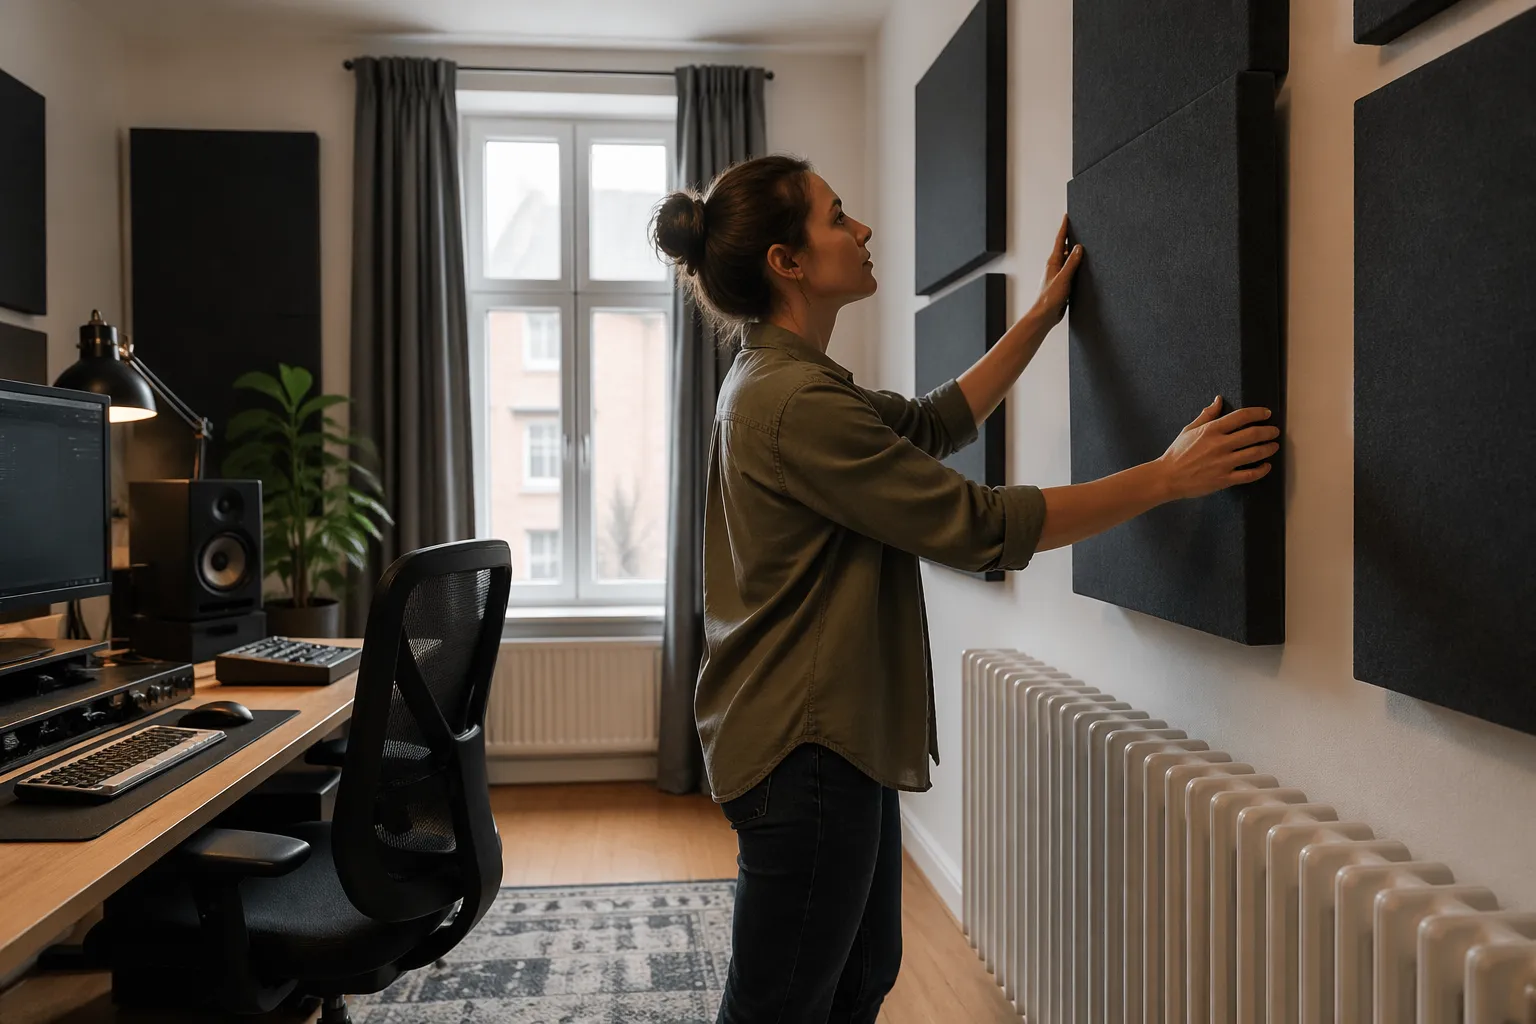
Acoustic treatment choices near heat sources
Heat and porous absorbers do not mix well when the absorber relies on glue, cheap fabric, or foam that degrades. I avoid polyurethane foam anywhere near a radiator, because it can dry out, crumble, and hold odors when it gets warm.
Rigid fiberglass or mineral wool in a wood frame with breathable fabric is usually safer, but you still need heat-safe placement distance so the panel does not bake. If you can smell “hot dust” near the radiator, you are too close for comfort and you will eventually regret it.
If the radiator is behind your chair, consider freestanding gobos or a thick absorber on a stand that you can pull forward during mixing and push away when the heat runs hard. That keeps the back wall response more controlled without turning the radiator into a fire drill.
For the radiator wall itself, a reflective shield can help protect nearby treatment, but do not seal the radiator in a tight box. Your room will get stuffy, and the system can get noisy as it fights restricted airflow.
Cable routing and desk placement that stay heat-safe
People obsess over speaker placement and then run a bundle of cables right across the hottest part of the radiator wall. Heat makes cable jackets stiff, and it can turn adhesive cable clips into sticky messes that drop wires behind the radiator.
Your desk should either clear the radiator zone completely or sit far enough away that the rear cable tray is not in the heat stream. If you must place a desk near that wall, route cables up and over, and keep power bricks off the floor behind the fins.
- Tape a 12 to 18 inch buffer line on the floor
- Route power strips above radiator height
- Use braided sleeving for cables near warmth
- Keep wall warts off the radiator-side floor
- Choose metal speaker stands over plastic bases
- Leave a clear vertical path for rising hot air
Layout examples for radiators under windows vs mid-wall
A radiator under a window is the easier case because the heat source is low and centered, and it often sits on the short wall. You can place the desk on that wall if the window does not force one monitor too close to a side boundary.
In that under-window setup, keep monitors on stands so the tweeters clear the sill and keep the rear ports away from the glass by a sensible speaker clearance distance. If the window has deep jambs, treat those side returns like mini side walls because they reflect hard.
A mid-wall radiator on a side wall is harder because it breaks the most important reflection area, the side wall near the speakers. In that case, I prefer the desk on the opposite short wall so both side walls near the speakers are uninterrupted and easier to treat evenly.
If the mid-wall radiator sits on the front wall where your speakers want to be, move the whole studio setup to the other short wall and accept that the radiator wall becomes the rear wall. That choice often improves side wall symmetry and makes the home office studio layout with radiator issues feel less like a compromise.
Handling side wall symmetry when the radiator forces asymmetry
Sometimes you cannot win, because the radiator is exactly where a panel should go and the other side wall is plain drywall. If you treat only the plain side, your room gets lopsided, and you will chase panning decisions forever.
One fix is to create a matching “fake” obstacle on the opposite side, like a freestanding panel at the same distance and height as the radiator cover. It sounds silly, but side wall symmetry is about matching reflection timing and level, not matching construction materials.
Another fix is to pull the entire listening position forward so the first reflection points land ahead of the radiator zone. This often means a smaller desk or a shallower top, but it can be the cleanest way to keep speaker clearance and reflection control in the same plan.
If you cannot move forward, treat the ceiling instead and use a thick cloud to reduce the dominance of side reflections. A good ceiling cloud does not care where the radiator sits, and it can stabilize imaging when side walls are uneven.
Practical listening triangle targets that survive real rooms
People repeat “equilateral triangle” like it is law, but home offices have doors, closets, and radiators that laugh at perfect geometry. I aim for equal speaker-to-ear distances first, then I adjust speaker spacing until the phantom center locks without sounding narrow.
Keep the tweeters at ear height, keep both speakers the same distance from the front wall, and keep toe-in matched by measuring, not eyeballing. If the radiator side makes you cheat one speaker forward, you will hear it as a low end mismatch and a center image that refuses to sit still.
For rear-ported monitors, give yourself more speaker clearance from the front wall than you think you need, especially if the radiator cover creates a shallow cavity that acts like a reflector. If you have sealed monitors, you get a little more flexibility, but symmetry still matters more than port type.
Once the triangle is stable, do a simple mono check with pink noise or a vocal track and listen for a centered image that does not wander when you move your head a few inches. If it shifts toward the non-radiator side, you probably have an early reflection imbalance, not a “bad speaker.”
Conclusion
A radiator does not ruin a studio, but it does punish lazy placement and sloppy measuring. If you define a heat buffer, protect airflow, and keep your geometry consistent, you can build a home office studio layout with radiator constraints that still mixes reliably.
Prioritize speaker clearance, heat-safe placement, and side wall symmetry before you buy more panels or blame your monitors. When the room stops fighting you, your work gets faster, and you spend less time fixing problems that were really just layout mistakes.


