Most home offices sound worse than people realize, because hard walls and right angles love to throw your voice back at you. If you are wondering how many acoustic panels do I need home office, you can get close with a simple measuring method and a little honesty about how you use the room.
I have seen people cover one random wall with foam and then wonder why Zoom still sounds boxy. I have also seen people over-treat a small office and end up with a weird, dull sound that makes speech feel lifeless.
The goal is not to make your room silent, it is to control reflections so your mic and your ears hear more direct sound and less room. You can get there without studio math, but you do need a plan that includes coverage percentage and some reverberation time basics.
Start with your goal: calls, recording, or accurate monitoring
Start by deciding what “better” means for you, because panel count depends on the job. A room that works for conference calls can still be a mess for mixing music.
For video calls, you mainly want your voice to stop bouncing between parallel walls and into the mic. That usually means treating early reflections near your desk and adding a bit of absorption behind you.
For voiceover or podcast recording, you want less room tone and fewer flutter echoes, especially in the 300 Hz to 2 kHz range where speech intelligibility lives. Panels help, but placement matters more than covering every surface.
For accurate monitoring, you are dealing with two problems at once, reflections and low frequency buildup. Panels alone will not fix bass, so your “how many” number should include some thicker panels or bass traps if mixing is the goal.
If you do all three in one room, pick the priority and accept tradeoffs. A home office that sounds great on calls can be slightly lively and still be fine, but a mixing room that is too live will lie to you every day.

A simple coverage method you can measure with a tape measure
You can estimate panels using a coverage percentage approach that starts with the room’s surface area you can realistically treat. This is not lab-grade acoustics, but it is consistent and it keeps you from buying panels based on vibes.
Measure room length and width, then calculate floor area and ceiling area, because those are easy and usually equal. Then measure wall area by taking perimeter times ceiling height, and subtract big openings you will not cover like a large window or a door.
Now pick a target coverage percentage based on your goal and your room’s hardness. For calls, 10 to 20 percent of the total wall plus ceiling area often makes a clear difference, while recording and monitoring often land closer to 20 to 35 percent when you include key ceiling spots.
Convert that target area into panel count by using the panel’s face size, not the advertised “covers up to” marketing. A common 24 inch by 48 inch panel is 8 square feet, so 64 square feet of coverage is eight of those panels.
This method gets better when you sanity-check it with reverberation time basics. If your room has long, obvious decay on speech, you usually need more coverage or thicker panels, and if it already sounds tight because of carpet and furniture, you can aim lower.
Room features that change the number (floors, windows, furniture)
The same panel count behaves very differently in two rooms that share the same dimensions. Materials and layout can swing your effective coverage percentage by a lot.
Hard floors, big glass, and bare drywall push you toward more absorption, because they reflect a lot of mid and high frequencies. Thick carpet, a stuffed couch, and full bookshelves already absorb and scatter, so you can often buy fewer panels and place them smarter.
| Room feature | What it does to reflections | Typical impact on panel estimate |
|---|---|---|
| Hardwood or tile floor | Strong early reflections, more slap and brightness | Increase target coverage by 5 to 10 percent |
| Large uncovered window | High frequency reflections, ringing near the glass | Add 1 to 2 panels near the window side |
| Thick area rug with pad | Absorbs some mids and highs, reduces floor bounce | Decrease target coverage by 2 to 5 percent |
| Full bookshelf or storage wall | Breaks up reflections, adds mild absorption | Decrease target coverage by 2 to 8 percent |
| Large desk and dual monitors | Creates strong reflections toward your mic and ears | Add 1 ceiling panel or reposition panels first |
How to prioritize surfaces when you’re on a budget
If money is tight, do not spread panels evenly like wallpaper. Put absorption where it blocks the reflections that reach your mic or your ears first.
For calls and voice recording at a desk, the most common mistake is ignoring what is behind you. Your mic hears your voice, then it hears the wall behind you, and that second arrival is what makes you sound like you are in a bathroom.
The ceiling above your desk is another high-return spot, because it creates a fast reflection path that is hard to notice until it is gone. One or two panels overhead often beat four panels placed randomly on side walls.
Side wall first reflection points matter more for accurate monitoring than for casual calls, but they still help speech clarity. If you sit centered, those points are usually a couple feet forward of your ears on both sides, and a mirror trick can help you find them.
If you can afford thicker panels, buy fewer but thicker for the first round. A 4 inch panel with an air gap tends to do more useful work than a thin panel covering the same square footage.
Signs you added too few (or too many) panels
Too few panels usually shows up as a papery echo, a zing on S sounds, or a hollow tone that makes you sound farther from the mic than you are. You might also notice that your voice changes a lot when you turn your head, which is a clue you still have strong nearby reflections.
Do not rely only on the clap test, because claps are sharp and can exaggerate problems in the top end. A better clap test alternative is to play pink noise from a small speaker at your desk and record it on your phone from your normal mic position.
Listen to the recording on decent headphones and focus on the decay after you stop the noise. If you hear a metallic flutter or a fast “boing” between two surfaces, you need targeted panels on those parallel planes.
Too many panels shows up as speech that sounds choked, dull, or oddly close, like you are talking under a blanket. If you have killed all the highs but the lows still hang around, the room can feel uncomfortable and your recordings can sound muddy.
Over-treatment is common when people cover every wall with thin foam that only absorbs treble. You end up with a room that has short high frequency decay but still has low frequency ringing, and that imbalance is not pleasant.
A step-by-step plan to add panels in phases
Phasing keeps you from buying twelve panels when six placed well would have done the job. It also helps you learn what your room is doing so your next purchase is based on results.
Phase one is the desk zone, with panels behind you and a ceiling panel above you if possible. Phase two is side wall first reflection control, and phase three is back wall or corner treatment if you still hear low end buildup or flutter.
- Measure wall and ceiling area with a tape measure
- Set a target coverage percentage based on your goal
- Start with 2 to 4 panels behind your chair and desk
- Add 1 to 2 ceiling panels above the desk zone
- Treat left and right first reflection points next
- Re-test with a pink-noise recording after each phase
- Add thicker panels or corner traps if bass stays boomy
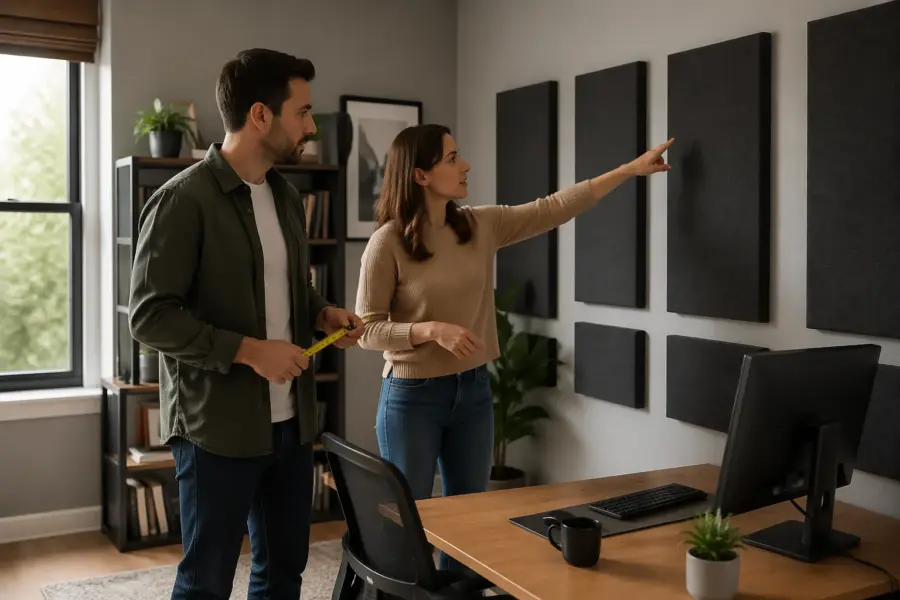
Where panels should go for calls at a desk
For calls, your mic position is the center of the universe, so place panels to protect what the mic hears. That usually means the wall behind you, the ceiling above you, and the closest side wall reflections.
If you use a USB mic on the desk, the desk itself is a reflector that shoots sound right back up. A boom arm that lifts the mic off the desk can reduce reflections as much as a panel purchase, so treat that as part of your plan.
If you use a headset mic, the room matters less, but it still leaks into the mic when you speak loudly or when noise suppression is off. Panels then become more about making you sound natural to others and less about perfect isolation.
In a typical 10 by 12 foot office with an 8 foot ceiling and hard floor, I usually start calls-focused setups with 4 to 6 standard 2×4 panels. If you already have carpet and a big fabric chair, you can often start with 3 to 5 and still hear a real change.
Do not waste your first panels on the wall you face, because your voice mostly projects away from it. If you have extra panels later, that front wall can help, but it is rarely the first problem.
Where panels should go for voice recording in a home office
Voice recording needs tighter control than calls because the mic is usually more sensitive and you listen back critically. The goal is a dry, clean capture that you can brighten later, rather than a roomy sound you cannot remove.
If you record at the desk, treat it like the calls setup but push coverage higher around the mic. A semi-circle of absorption behind and to the sides of the mic position often beats treating a far wall across the room.
If you can stand to record, stand about a third of the way into the room, then put absorption behind the mic and behind your head. That placement reduces the strongest axial modes compared to standing in the center or right against a wall.
For a small office, 6 to 10 standard 2×4 panels is a common range for voiceover that sounds controlled without being dead. If you use thinner panels, you may need more square footage to get the same perceived dryness.
Use your recordings as the judge, not your memory of what the room sounded like before. Record the same script each time, then compare waveforms and the tail after you stop speaking, because your ears adapt fast.
Where panels should go for accurate monitoring and mixing
Monitoring is the most demanding use case because your speakers excite the whole room, not just a small zone. You need absorption at first reflections, control at the front wall, and a plan for bass, or your decisions will drift.
Start with the classic triangle, speakers and head, and treat the side wall reflection points and the ceiling cloud above the listening position. Those placements reduce comb filtering that can make a snare sound thin one minute and chunky the next.
Front wall treatment behind the speakers is often underrated in home offices, especially when the speakers sit close to the wall. Even two thick panels behind the monitors can tighten imaging and reduce the “shout” in the upper bass.
For bass, thin panels do not do much below about 150 Hz, so you need thickness, air gaps, or corner traps. If your budget forces a choice, I would rather see four thick corner traps than twelve thin wall panels.
In a small rectangular office, a realistic starting point is 8 to 12 panels plus some form of bass trapping, and that is before you chase perfection. If that number sounds high, it is because accurate monitoring is hard in small rooms, and you cannot cheat physics with a couple squares of foam.
Using reverberation time basics without getting lost in math
Reverberation time basics sound intimidating, but you only need the concept, not the formulas. Long decay makes speech smear and makes music mixes sound bigger in the room than they really are.
Most home offices that sound “office-y” have too much mid and high frequency decay for close-mic speech. When you add panels, you are shortening that decay so the direct voice dominates sooner.
You can approximate decay changes with simple recordings, like a balloon pop, a hand clap, or the pink-noise method, as long as you compare before and after from the same spot. I prefer the pink-noise recording because it is repeatable and it does not punish your ears.
If you want a number, free phone apps can estimate RT60, but treat it as a trend meter, not truth. The mic on a phone is not calibrated, but it will still show you if your added coverage percentage is moving the room in the right direction.
When the room gets quieter in the tail, you will often notice you can speak more softly and still sound clear. That is the practical win, and it matters more than chasing a specific RT60 target meant for bigger studios.
Answering “how many acoustic panels do I need home office” with real examples
Here is how I answer the question how many acoustic panels do I need home office when someone gives me basic dimensions and a goal. I start with a coverage percentage target, then I adjust for room hardness and how close they sit to boundaries.
Example one is a 9 by 11 foot room with an 8 foot ceiling, carpet, and a bookcase, used mostly for Zoom. I would start at about 12 to 15 percent of wall plus ceiling area, which often lands around 4 to 6 standard 2×4 panels placed behind the chair and overhead.
Example two is a 10 by 12 foot room with hardwood, a big window, and a bare back wall, used for calls and occasional voice recording. I would aim closer to 18 to 25 percent, which usually means 7 to 10 panels, because the surfaces are doing you no favors.
Example three is an 11 by 14 foot room used for mixing with speakers on stands and a desk, with minimal furniture. I would start around 25 to 35 percent coverage in the right places, then add bass trapping, because the low end is where small rooms get ugly fast.
If you rent and cannot mount much, you can still hit your target by using free-standing panels and thick curtains, but you will need more square footage. Portable solutions rarely sit with an air gap in the best spots, so they are less efficient per panel.
Conclusion
You do not need a perfect acoustic model to estimate panel count, you need a measurable target and a sensible placement order. Use a tape measure, pick a coverage percentage that matches your goal, and treat the desk zone first.
Use reverberation time basics and a clap test alternative like a repeatable pink-noise recording to confirm each phase. If you keep your changes incremental, you will land on the right number of panels without turning your home office into a padded closet.


