If your home office sounds harsh on Zoom or your voice recordings have that hollow “bathroom” ring, you are hearing reflections bouncing between hard surfaces. DIY acoustic panels for home office setups fix that problem fast, and you do not need a contractor to get real results.
I built my first panels after realizing my mic sounded worse in a small carpeted room than it did in my living room. The issue was bare drywall and a big desk, not a lack of expensive gear.
This guide sticks to practical choices that work for typical home offices, like bedrooms, spare rooms, and dining room conversions. You will learn what panels do, how to choose safe insulation, what panel thickness makes sense, and how to mount them without wrecking your walls.
Most people try to fix bad audio by buying a new microphone, but the room is usually the real problem. Once you control reflections, even a basic USB mic can sound surprisingly professional.
Acoustic treatment also makes your own voice feel less tiring, because you are not subconsciously pushing to sound clear. That matters if you do back-to-back calls or record long tutorials.
What Acoustic Panels Actually Do in a Home Office
Acoustic panels reduce early reflections, the quick echoes that bounce off nearby walls and smear your voice at the microphone. When those reflections drop, speech sounds clearer and less “boxy” even before you touch EQ.
They do not block sound from leaving the room, so they will not stop your neighbor from hearing you during a meeting. Soundproofing needs mass and airtight construction, while panels are about controlling the sound inside the room.
In a home office, the biggest wins usually come from treating the wall behind your monitor, the wall behind your chair, and the first reflection points to your left and right. If you clap and hear a sharp ring, panels shorten that ring into a quick, dull thud.
Panels also help your speakers behave, because fewer reflections means better stereo imaging and less fatigue during long workdays. If you edit podcasts or do client calls all day, that comfort matters more than people admit.
Think of your room like a pinball machine for sound, where your voice bounces off the desk, the monitor, and the side walls before it reaches the mic again. Panels remove some of those bounce points so the mic hears more direct voice and less room.
That is why panels can make you sound closer to the mic even when you do not change your distance. They are not boosting volume, they are lowering the reflected clutter that makes speech feel far away.
Early reflections are especially nasty for video calls because conferencing apps already compress audio and try to suppress noise. When the room adds extra reflections, those algorithms can pump, gate, or make your voice sound phasey.
A treated room also makes automatic gain control behave more predictably, because it is not reacting to random room spikes. You end up with a steadier level and fewer moments where your voice suddenly gets thin.
Panels are most effective in the mid and high frequencies, which is where consonants and intelligibility live. That is why even a few panels can make meetings feel less stressful, because people stop asking you to repeat yourself.
They can also reduce the “flutter echo” that happens between parallel walls, like in a narrow office or hallway-style spare room. Flutter echo is that fast, metallic ping you hear when you clap, and it is one of the easiest problems to fix with panels.
Do not expect panels to fix everything if your mic is pointed at a bare wall two feet away. You still need reasonable mic technique, like aiming the mic away from reflective surfaces and keeping a consistent speaking position.
In practical terms, panels are a way to make your room less audible in your recordings. The goal is not silence, it is a controlled, boring acoustic that lets your voice be the main event.
If you do any kind of music work, panels can make your monitoring decisions more reliable because you are hearing more of the speakers and less of the room. Even if you are not mixing, that clarity makes background listening more enjoyable during work.
One more benefit is that panels can slightly reduce perceived loudness in the room, because less energy is bouncing back at you. It is not soundproofing, but it can make the space feel calmer.
Choosing Safe, Effective Core Material (Rockwool vs Fiberglass)
The core of a panel is usually mineral wool (often called Rockwool) or fiberglass, and both can work well when you pick the right density and thickness. The rockwool vs fiberglass debate gets heated online, but the truth is that either material can absorb mids and highs very effectively.
Rockwool is stiffer, easier to cut into clean rectangles, and it tends to sag less over time in a simple frame. Fiberglass boards like Owens Corning 703 or Johns Manville 814 are classic studio choices, but they can cost more and may be harder to find locally.
For safety, treat both like you would any insulation product and keep fibers contained inside the frame and fabric. Wear gloves, long sleeves, eye protection, and a decent mask while cutting, then vacuum the work area and wash your hands.
Look for rigid or semi-rigid boards, not fluffy attic batts, because batts slump and leave gaps that hurt performance. Common picks are Rockwool Safe’n’Sound (batts, usable with support) or Rockwool Comfortboard 80 (rigid boards), plus OC 703 or 705 if you can source them.
Density is where people get confused, because higher density is not automatically better for every thickness. For typical 2 to 4 inch panels, medium densities tend to be a sweet spot for broadband absorption without turning the panel into a reflective brick.
If you are shopping in person, bring a tape measure and actually check the thickness, because some products are slightly under their nominal size. That matters when you are building frames that need a snug fit.
Rockwool Safe’n’Sound is technically a batt, but it can still work fine if your frame supports it and you do not leave big voids. If you want the cleanest build with minimal fuss, rigid boards are easier to handle and look more uniform behind fabric.
Fiberglass boards like 703 are consistent and predictable, which is why they show up in so many classic DIY guides. The downside is that they can be pricier per panel once you factor in shipping, especially if you cannot pick them up locally.
From a health standpoint, the main risk is loose fibers during cutting and handling, not a finished panel that is properly wrapped. Once the core is sealed behind fabric and optional backing, the day-to-day exposure is extremely low.
I still prefer to add a thin, breathable backing layer because it keeps the inside tidy when you move panels around. It also prevents small fibers from drifting out if the panel gets bumped or scraped.
Do not use spray foam, egg crate mattress foam, or thin craft foam as a core and expect real results. Those materials can reduce a little high-frequency zing, but they do almost nothing for the frequencies that make voices sound muddy and rooms sound small.
If you are sensitive to itchiness, mineral wool can feel more comfortable to work with than fiberglass, but both can irritate skin. The key is to treat the build like a quick insulation job, not like a casual arts-and-crafts project.
Check local fire ratings and avoid unknown upholstery foams if you are placing panels near outlets, power strips, or warm equipment. Mineral wool and many rigid fiberglass products have good fire performance, which is one reason they are so common in studios.
If you want a more eco-minded option, some manufacturers sell recycled-content fiberglass boards and low-binder products. They can work well, but availability varies, so do not let the perfect material delay a build that would help you right now.
Whatever you choose, buy a little extra because you will waste some material on imperfect cuts or slightly off frames. Having one spare board also makes it easier to build an extra panel later when you realize you want more coverage.
Picking Panel Thickness and Size for Your Room
Panel thickness is where most DIY builds either shine or disappoint, because thin panels only tame the top end. For voice and video calls, 2 inch panels already help a lot, but 4 inch panels sound more natural and handle lower mids that make rooms sound “small.”
Size matters too, and the common 24 by 48 inch format is popular because insulation boards are often sold in that size. If your room is tiny, fewer bigger panels usually beat many small ones, because you cover more reflection area with fewer seams.
Thickness is also tied to how close you sit to the treated surfaces, because reflections get stronger the closer the wall is to your mic. If your desk is pushed against a wall, treating that wall with thicker panels can make a bigger difference than treating a far wall with thin ones.
A good rule is to treat the surfaces that are within a few feet of your microphone first, because those reflections arrive quickly and sound the most obvious. The back wall can matter too, but the near-field reflections are usually the first thing to fix.
Two-inch panels are a great starting point when you need something light and easy to mount. They are also easier to make look sleek, which matters if your office doubles as a guest room.
Four-inch panels are the workhorse choice for home offices because they handle more of the lower midrange that makes voices sound chesty or boomy. They are bulkier, but you get a more “dry” sound that is easier to polish in post.
Six-inch panels are usually overkill for a casual setup, but they can be amazing on a back wall in a small room. They can also work well if you are trying to tame a room that has a lot of hard surfaces and very little furniture.
Air gaps are the cheat code that many people skip, because they think panels must sit flat on the wall. A small air gap effectively makes the panel behave thicker, especially at lower frequencies, without adding much cost.
If you are limited to 2 inch panels for weight or budget reasons, plan on using a 1 to 2 inch air gap whenever you can. That one decision can make a thin panel feel much more like a serious treatment.
Panel size is also about visual balance, because a couple of large rectangles can look cleaner than a patchwork of small squares. If you want the panels to blend in, larger panels spaced evenly often look more intentional.
In a very small office, one big panel behind your monitor and one behind your chair can be a dramatic upgrade. You can then add side panels later if you still hear reflections when you turn your head or move around.
Ceiling treatment is underrated because the ceiling is often a giant bare reflector right above your mic. A single ceiling cloud over the desk can reduce that overhead slap that makes voices sound brittle.
If you are using a boom arm and a dynamic mic, you might get away with fewer panels, but you still benefit from treating the closest walls. If you are using a condenser mic, the room matters even more because it hears everything.
Do not stress about perfect coverage percentages, because you can get great results with a small number of well-placed panels. The goal is to break up the most direct reflection paths, not to cover every inch of drywall.
| Panel thickness | Best use in a home office | Notes on placement |
|---|---|---|
| 2 inch | Speech clarity, taming slap echo | First reflection points, behind monitor |
| 4 inch | More natural voice, better lower mid control | Behind chair, side walls, ceiling cloud |
| 6 inch | Stronger broadband absorption in small rooms | Back wall, corners with air gap |
| 2 inch + 2 inch air gap | Similar to thicker panels without extra weight | Mount with spacers, keep gap consistent |
If you are unsure, build one 4 inch panel first and move it around the room while doing test recordings. You will quickly hear where a thicker panel makes the biggest impact.
For most home offices, the 24 by 48 inch format is a sweet spot for performance, cost, and ease of building. It is also easy to mount in a way that does not look like you are turning your office into a recording booth.
Panels can also be stacked vertically for more coverage behind your chair if you have tall ceilings. Two panels stacked with a small gap between them often look clean and absorb a lot of energy.
If you have a big window, consider placing a panel near it rather than trying to cover the glass itself. Curtains help a little, but a panel on the adjacent wall can reduce the reflections that make the window area sound bright.
Building the Frame and Backing (Simple, Sturdy Options)
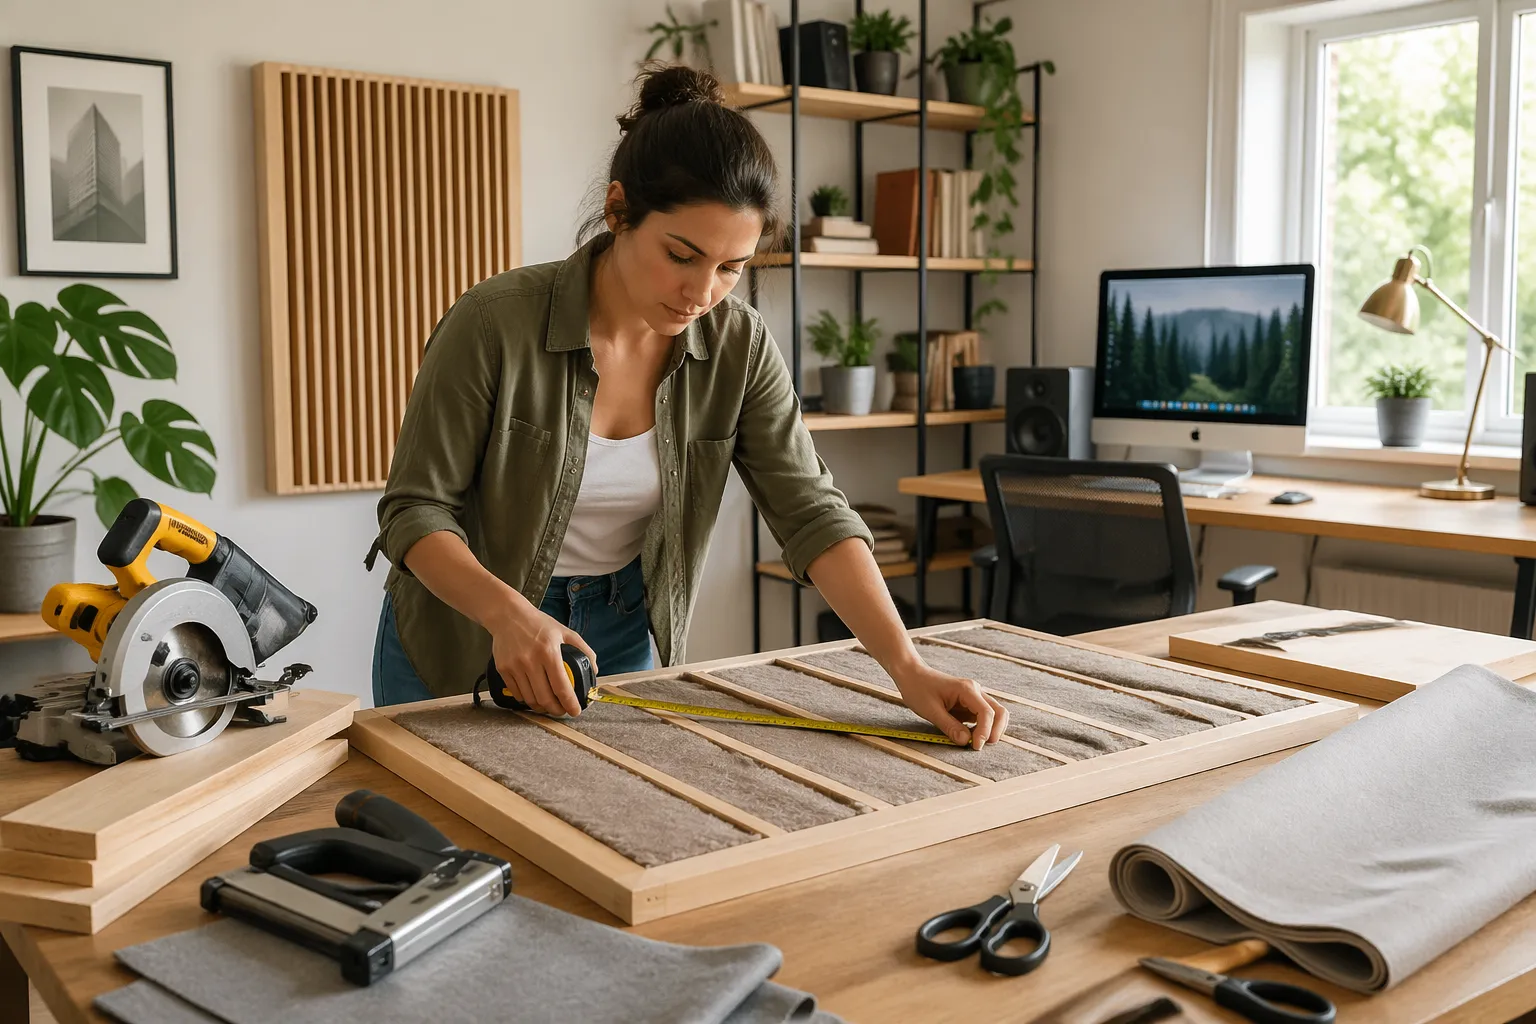
A basic wood frame keeps the insulation square, protects edges, and gives you something solid to staple fabric to. I like 1×4 pine for 3.5 inch deep frames when I build 4 inch panels, because the depth feels right and the lumber is easy to find.
If you build 2 inch panels, 1×3 lumber is lighter and cheaper, and it still looks clean on the wall. Use wood glue plus screws or brad nails, and check for square by measuring diagonals before the glue sets.
Backing is optional, and the choice depends on how you plan to mount and how much fiber containment you want. A breathable backing like weed barrier fabric or thin muslin keeps fibers in while still letting sound pass into the core.
A hard backing like plywood can reduce absorption, so I avoid it unless I need a very rugged panel for a shared space. If you want a cleaner look from the side, add corner braces inside the frame instead of a solid back.
Before you cut wood, decide whether you want the insulation to sit flush with the front of the frame or recessed slightly. A flush face is easier to wrap neatly, while a slight recess can protect the fabric from getting bumped.
Pre-drilling screw holes helps keep cheap pine from splitting, especially near the ends. If you do not have clamps, you can still build square frames by working on a flat floor and using a carpenter’s square or a book with a true corner.
If you want a cleaner look, mitered corners are nice, but butt joints are totally fine for acoustic performance. The panel does not care if your corners are fancy, it only cares that the insulation is held in place and the fabric is breathable.
For strength, I like to run screws through the long sides into the end grain of the short sides, with glue on the joint. If you are using brad nails, add glue and consider a small L-bracket inside each corner.
Sand the front edges lightly so the fabric does not snag on sharp corners. That tiny step makes wrapping easier and helps the panel look more professional once it is on the wall.
Some people skip wood and use simple metal corner brackets with no full frame, but a real frame protects the insulation and makes mounting easier. It also makes the panel feel like furniture instead of a temporary DIY hack.
If you want a very slim panel, you can use 1×2 lumber and build a 2 inch panel with the insulation slightly compressed. Compression is not automatically bad, but do not crush it so much that it becomes overly dense and less effective.
For a 4 inch panel, you can also build a 3.5 inch frame and let the insulation bulge slightly, then smooth it with a thin batting layer. That approach is common because 1×4 lumber is easy to buy and still looks proportional on a wall.
Breathable backing can be stapled on after the insulation goes in, which keeps everything tidy during wrapping. If you plan to hang the panel with a French cleat, backing also keeps the cleat from rubbing against the insulation.
If you are building panels for a space where people might touch them, consider adding a simple internal cross brace. It prevents twisting and keeps the panel from feeling flimsy when you move it.
Paint or stain is optional, but finishing the frame edges can make the panel look intentional if the sides are visible. If you do finish the wood, let it fully dry before wrapping so you do not trap odors behind fabric.
When you insert the insulation, aim for a snug fit without forcing it, because gaps around the edges reduce effective surface area. If you have small gaps, you can fill them with thin strips of the same insulation rather than leaving air channels.
Try to keep the build consistent across panels so they hang level and line up nicely. A set of panels that looks uniform is more likely to stay on the wall long term, which is the real secret to getting lasting results.
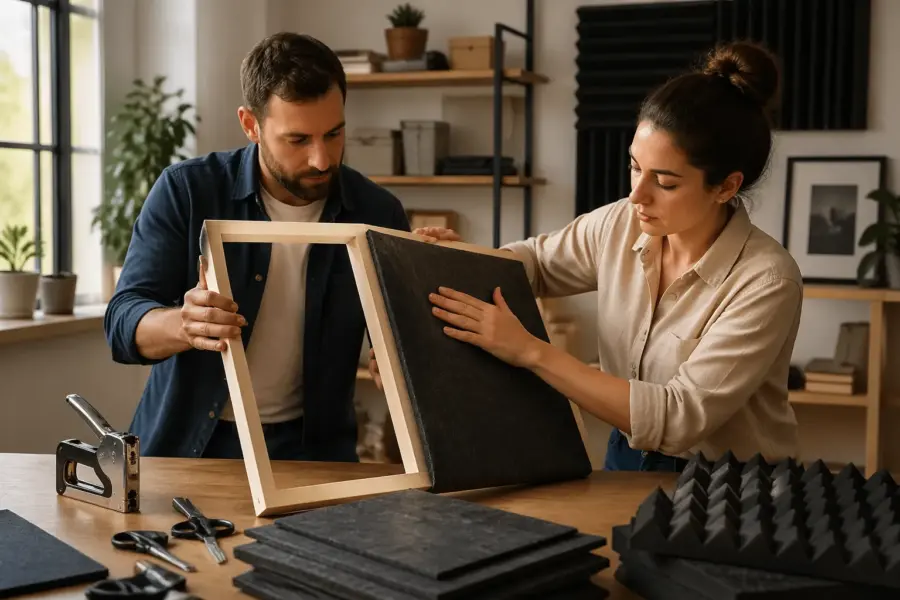
Wrapping With Breathable Fabric That Looks Good
Fabric for acoustic panels must be breathable, because sound needs to reach the insulation to get absorbed. If you can hold the fabric to your mouth and blow through it easily, it is usually a safe bet.
Guilford of Maine is the premium choice and it looks great, but it can cost more than the rest of the panel. Budget options like burlap, cotton duck, or IKEA curtain fabric can work, but avoid anything with a plastic backing or tight vinyl-like weave.
Wrap the fabric like you are upholstering a chair seat, pulling it taut and stapling on the back side of the frame. Start staples at the center of each side, then work toward the corners so you do not chase wrinkles.
If you care about looks, choose a fabric color that matches your office lighting, because panels can read darker than you expect once they are up. I also like adding a thin layer of polyester batting on the face to soften the outline of the insulation, but keep it light so you do not block airflow.
Before you commit to a fabric, test it against the wall color and the camera angle you use for calls. A fabric that looks great in person can look muddy or overly textured on a webcam.
Patterns can work, but small repeating patterns sometimes create weird moiré on video. Solid colors or subtle weaves tend to look cleaner on screen, especially with typical home office lighting.
Burlap is breathable and cheap, but it can shed fibers and it can smell like a feed store at first. If you use burlap, air it out and consider adding a thin inner layer like muslin to keep things neat.
Cotton duck is a nice middle ground because it is durable, easy to staple, and usually breathable enough. It also comes in a lot of colors, which makes it easier to match your office decor.
If you are ordering fabric online, buy a little more than you think you need because mistakes happen. Extra fabric also lets you redo a panel later if you change your office layout or want a different color.
Ironing the fabric before wrapping is not glamorous, but it saves time and makes the final result look sharper. Wrinkles that seem minor on the floor can become very obvious once the panel is hanging at eye level.
When you staple, keep tension even so you do not warp the frame or create diagonal ripples. If you see a wrinkle forming, pull the fabric back out and redo a few staples rather than trying to stretch it in place.
Corners are where panels look either clean or homemade, so take your time there. A simple hospital corner fold works well and keeps bulk down so the panel sits flat against the wall.
Staple spacing matters less than people think, but do not be stingy because loose fabric can sag over time. I usually place staples every couple of inches, with extra staples near corners where tension is highest.
If you add a face layer of batting, keep it thin and fluffy rather than dense felt. The goal is to smooth the surface, not to create a second barrier that reflects sound.
You can also add a decorative trim strip on the back edge to hide staples if you want a cleaner finish. It does not change performance, but it can make the panel feel like a finished product instead of a workshop project.
Breathability is still the priority, so do not use fabric that is coated to resist stains unless you have tested it. Many stain-resistant treatments reduce airflow enough to shave off absorption in the highs.
If you want to be extra careful, you can do a quick listening test by holding the fabric over your mouth and speaking through it. If your voice sounds noticeably muffled, the fabric is probably too tight or too thick.
Once the fabric is on, tap the face of the panel and make sure it feels soft, not drum-tight like a stretched canvas. A little give is normal and it usually means sound can get through to the insulation.
Mounting Methods That Won’t Damage Your Walls
Mounting is where DIY acoustic panels for home office builds often get messy, because renters and drywall do not mix well. The safest approach is to use picture hanging hardware that spreads weight, then patch tiny holes later with spackle.
If you want near zero damage, use freestanding stands, lean panels against the wall behind your desk, or hang them from a ceiling grid or curtain rod system. For light panels, heavy duty hook-and-loop strips can work, but I do not trust them long term in warm rooms.
- D-ring hangers plus picture wire
- French cleat strip for level mounting
- Two drywall hooks rated above panel weight
- Spacers or rubber bumpers for a 1 to 2 inch air gap
- Floor stands for renter friendly placement
- Ceiling eye hooks for a desk “cloud” panel
Before you mount anything, weigh one finished panel so you know what your hardware needs to handle. A 4 inch panel can be heavier than you expect, especially with a solid wood frame.
D-rings and picture wire are flexible because you can level the panel by adjusting the wire position on the hook. The downside is that the panel can tilt forward unless you add bumpers at the bottom.
French cleats are my favorite for a clean, secure mount because the panel locks into place and stays level. They also make it easy to remove panels if you need to access a closet, a cable run, or a wall outlet.
If you are using drywall anchors, pick ones that match your wall type and do not rely on the cheapest plastic sleeves. A good anchor and a small screw hole are usually less risky than a big adhesive strip that fails and rips paint off.
For renter-friendly setups, floor stands can be surprisingly effective, especially behind your chair. You can also place panels on a bookshelf or cabinet so they sit at head height without any wall holes.
Leaning panels against the wall works better than people think if you can keep them from sliding. A couple of rubber feet or a small wedge at the bottom can keep the panel stable and maintain a small air gap.
Ceiling clouds sound intimidating, but they are just panels hung horizontally above the desk. If you do it, find joists or use appropriate anchors, because you do not want a heavy panel coming down mid-call.
Spacing the panel off the wall with bumpers is a simple upgrade that improves absorption and protects paint. It also keeps the panel from buzzing against the wall if there is bass in the room.
If you want an air gap but do not want the panel to look like it is floating awkwardly, use consistent spacers on all corners. Even a 1 inch gap can be worth it, and it still looks tidy if the panel is mounted straight.
Think about cable management and outlets before you mount, because panels can accidentally block access to things you use daily. It is frustrating to build a great setup and then realize you cannot reach the surge protector.
If you are placing panels near a door, make sure the door swing will not hit them. A panel that gets bumped repeatedly will eventually loosen its mounting hardware.
When in doubt, mount one panel first and live with it for a week before committing to a full layout. That small pause can save you from filling a bunch of unnecessary holes later.
If you are trying to keep the room looking professional on camera, mount panels symmetrically or keep them out of frame. A clean background plus better audio is a strong combo for client calls.
Testing Results and Making Small Improvements
You can hear progress without fancy tools, but a simple test keeps you honest. Record your voice in the same spot before and after, then listen for reduced room ring on words with hard consonants like “t” and “k.”
If you want numbers, use Room EQ Wizard with a cheap measurement mic like the miniDSP UMIK-1. Even a phone app that shows decay time can reveal whether your panels shortened the tail of the room.
Small improvements often beat rebuilding, like adding an air gap behind panels or moving one panel from a random wall to a first reflection point. If your room still sounds boomy, you probably need thicker treatment on the back wall or some corner bass trapping, not more 2 inch panels.
Do not ignore the desk, because a big flat surface throws sound straight back into the mic. A laptop stand, a desk mat, or a slight mic reposition can clean up reflections more than you would expect.
When you do your before-and-after recordings, keep the same mic gain and the same distance to the mic. If you change settings between takes, you can fool yourself into thinking the room improved more than it did.
Listen on headphones as well as speakers, because headphones make room reflections easier to spot. On speakers, your room adds its own reflections on top of the recording, which can blur the difference.
A quick clap test is useful, but speech is the real target, so always do a spoken test too. Read the same paragraph twice and pay attention to how long the room hangs on to your voice after you stop.
If you use conferencing software daily, do a real call with a friend and ask them what changed. People on the other end often notice clarity improvements immediately, even if you are still hearing some room in your own monitor.
Room EQ Wizard can feel like a rabbit hole, but you only need a few basic views to learn something. The waterfall and decay plots can show whether your panels are reducing ringing, especially in the midrange.
Do not obsess over getting a perfectly flat frequency response in a home office, because that is not the goal for voice. You are aiming for controlled decay and fewer obvious reflection artifacts, not a laboratory chart.
If your voice still sounds harsh, check whether you treated only one side of the room. Asymmetry can leave one strong reflection path intact, which can still smear the sound.
Try moving your mic a few inches closer and lowering gain, because that increases the direct-to-room ratio. Panels help, but mic technique is still a powerful lever you can pull for free.
If you have a reflective closet door or a big whiteboard, treat the nearby wall or add a panel that can be moved into place when recording. Portable panels are underrated because they let you adapt the room to the task.
Sometimes the best improvement is simply relocating your desk so you are not firing your voice into a corner. Corners can amplify low mids and make your voice feel thicker than it should.
If you hear a low, lingering boom that panels do not seem to touch, that is normal for thin treatment. That is where thicker panels, bigger air gaps, and corner traps start to matter.
Once you have a decent baseline, change one thing at a time and retest. It is easy to move three panels, change mic position, and add a rug, then have no idea what actually fixed the problem.
Keep your expectations realistic, because a home office will never sound like a fully treated studio. The win is getting to a clean, controlled sound that makes calls and recordings easy, not chasing perfection.
Conclusion
Good DIY acoustic panels for home office use come down to three choices, a solid core, sensible panel thickness, and breathable fabric for acoustic panels that does not choke airflow. Once you get those right, the rest is basic carpentry and careful placement.
If you are stuck between rockwool vs fiberglass, pick what you can buy locally in rigid form and focus on building clean, well-sealed panels. Put them where reflections hit first, listen again, then adjust one panel at a time until the room stops fighting your voice.
The best part of DIY panels is that you can build them in stages and improve your setup as you go. Even two panels in the right spots can change how professional you sound to other people.
If you care about aesthetics, treat the panels like decor instead of utility, because you will be more likely to keep them up. A room that looks good and sounds good is easier to work in every day.
Once your room is under control, you can make smarter gear decisions because you are not compensating for bad acoustics. That is when upgrades like a better mic or interface actually pay off instead of just revealing more room sound.
Start with the simplest plan, build one or two panels, and let your ears guide the next steps. The moment your recordings stop sounding like your room and start sounding like you, you will know it was worth the effort.


