Most home office acoustic problems start with geometry, not gear. If you skip the room layout step, you can spend real money on panels and still end up with a sharp, splashy top end and muddy bass.
The good news is you can plan treatment like you plan furniture, with tape, a pencil, and a few simple measurements. Once you understand how sound bounces off your specific walls, you can decide where absorption, bass trapping, and diffusion belong.
This guide shows how to plan acoustic treatment placement using room geometry, step by step, in a way that fits a normal workday setup. You will map first reflection points, choose smart corner placement, and size a ceiling cloud without turning your office into a lab.
I am opinionated about this because I have watched too many people treat the wrong surfaces first. A room with a clean layout can sound controlled with fewer panels than a room treated randomly.
Why geometry comes before buying panels
Acoustic panels do not fix a room in the abstract, they fix specific paths that sound takes from speakers to your ears. Room geometry decides those paths, so you need the map before you buy the material.
Think of your room like a set of mirrors for sound, because hard surfaces reflect energy in predictable directions. If you do not know where those reflections land, you cannot aim absorption where it will matter.
In a typical home office, the desk ends up against a wall because it is convenient. That single choice changes the early reflections, bass buildup, and how big your treatment needs to be.
When the desk is jammed into a corner, you also create a cluster of boundaries right next to the speakers. That boundary cluster can exaggerate low end and make the midrange feel boxy even at low volume.
Geometry also tells you what kind of problems you are likely to have. A near-square room tends to stack modes, while a long narrow room often has strong front-to-back ringing that shows up as one-note bass.
Ceiling height is part of geometry too, and it can be the hidden reason a room feels harsh. A low ceiling shortens the reflection path and pushes more energy into the early reflection window where your brain is most sensitive.
Windows and doors are geometry in practice, because they break symmetry and change what reflects versus what leaks out. A glass window behaves like a hard wall for highs, while a hollow door can behave like a weak bass trap at certain frequencies.
If you start by buying “a pack of six panels,” you are guessing at coverage. When you plan acoustic treatment placement using room geometry, you can aim each panel at a job and avoid paying for dead zones that do nothing.
Random placement can also create weird tonal shifts as you move your head, because you damp one reflection path but leave another intact. The result is a room that sounds different at the keyboard than it does when you lean back for a call.
Geometry-based planning helps you choose thickness intelligently instead of emotionally. A thin panel can be perfect for a flutter echo problem, but it will not touch the bass issues that geometry predicts in corners and along boundaries.
There is also a comfort angle that matters in an office. A room that is overdamped in the wrong places can feel tiring for calls, because the voice sounds small and weird even if the speakers measure flatter.
Overdamping can happen when you cover every visible wall area at head height and ignore the ceiling and corners. The room ends up dull in the highs while still lumpy in the lows, which is the worst of both worlds.
Geometry keeps you honest about priorities, because it forces you to ask what reflection is actually reaching you first. Once you answer that, the shopping list becomes smaller and more specific.
Marking your listening position and speaker layout
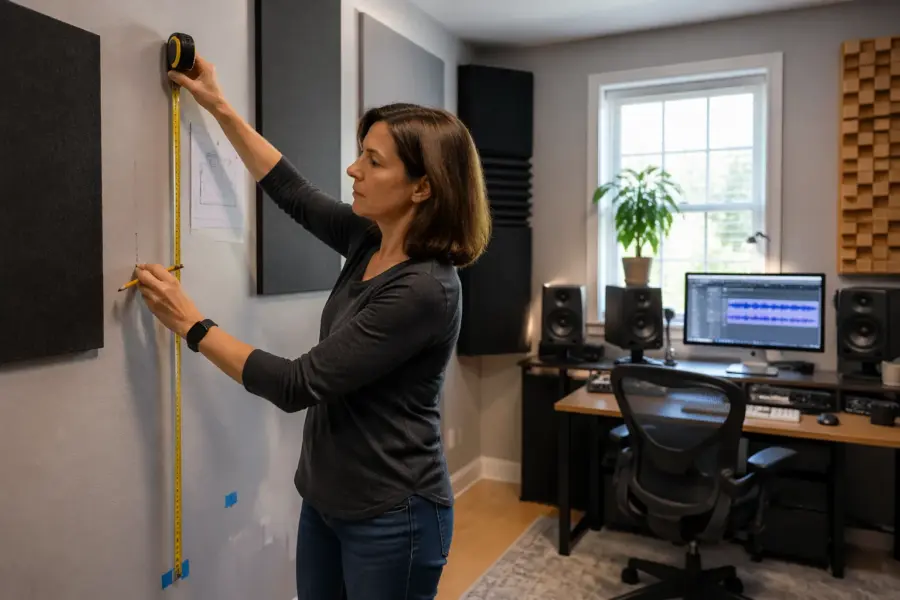
Start by deciding where your head is when you do the work that needs accuracy, like mixing, editing, or critical listening. Mark that spot on the floor with painter’s tape, because you will keep coming back to it.
Make the mark based on your actual chair position, not where you wish you sat. If you slide forward during focused work, mark that forward position and treat for the reality of your posture.
In most home offices, you want your speakers firing down the long dimension of the room. That layout usually spreads room modes and gives you more distance before the rear wall reflection hits your ears.
Firing down the long dimension also gives you more space to manage the rear wall, which is often the hardest surface to fix later. Even an extra foot behind you can change whether the rear wall needs thick absorption or can tolerate diffusion.
Place the speakers so the tweeters are at ear height and form an equilateral triangle with your listening position. If your desk forces you closer than about three feet, keep the triangle tight and focus more on early reflection control.
Nearfield listening is your friend in a small office, because it raises the direct sound compared to the room sound. The closer you are, the more the room becomes a secondary influence instead of the main event.
Angle the speakers so they aim at your ears, not at the wall behind you. Small toe-in changes can shift the balance between direct treble and side-wall reflections, which changes how aggressive the room feels.
Keep both speakers the same distance from the side walls if you can, because symmetry matters for imaging. If symmetry is impossible, you can still treat the closer side wall more aggressively to reduce the imbalance.
Symmetry is not just a vibe, it is how you keep the left and right reflection timing similar. When one side wall is closer, the early reflection arrives sooner and your phantom center can pull to one side.
Try to keep the speakers the same distance from the front wall as well, because mismatched front-wall distances can tilt the low end. If one speaker is closer to a boundary, it can get extra bass reinforcement that the other one does not.
Do not park your listening position dead center in the room, because that often lands you in a null for low frequencies. A practical starting point is about 38 percent of the room length from the front wall, then you fine-tune by ear or measurement.
The 38 percent idea is not magic, it is just a way to avoid the most obvious modal hotspots. Once you are in the ballpark, you can move the chair a few inches at a time and listen for tighter bass notes.
Keep your monitors off the desk if you can, because the desk is a giant reflector right under the speakers. Stands or isolation risers reduce the bounce that smears the upper mids and makes vocals harder to judge.
If stands are not possible, at least pull the speakers forward so the front baffle is close to the desk edge. That reduces the size of the reflective surface in front of the speaker and can clean up the response more than you would expect.
Finally, take a quick measurement of the distances you chose and write them down. When you start adding treatment, you want to keep the layout stable so you can tell what change caused what improvement.
Finding first reflection points with simple methods
First reflection points are the spots where sound from a speaker hits a surface once and then reaches your ears. If you control those reflections, stereo imaging snaps into place and harshness drops fast.
Early reflections are not automatically bad, but they are often too loud and too fast in small rooms. The goal is not silence, it is reducing the strongest early bounces so the direct sound leads.
The mirror method works because it turns geometry into something you can see. Sit at the listening position, have a friend slide a mirror along the side wall, and mark where you can see the speaker tweeter in the mirror.
Mark the center point and also note the rough area around it, because a panel needs coverage, not a pinprick. A good rule is to treat a rectangle that comfortably covers the mirror point with some margin above and below.
Repeat the mirror method for both speakers on both side walls, because the left speaker reflects to the right wall and vice versa depending on angles. In practice, most people treat the left wall point and the right wall point at the listening position height.
Do not forget that your monitor screens can act like small reflective surfaces too. If a screen sits between you and a speaker, it can create a bright little reflection that makes sibilance feel sharper.
The ceiling reflection is often the loudest reflection you are not thinking about, because it is out of sight. If you have a hard ceiling, the ceiling bounce can be as strong as the side-wall bounce in the upper mids.
You can find the ceiling reflection point with a mirror held flat against the ceiling, but it is easier with a helper and a flashlight. Another simple method is to run a string from the tweeter to your ear position and see where it intersects the ceiling plane.
Desk reflections are sneaky because they arrive extremely fast and can cause comb filtering in the vocal range. If you hear a papery or phasey quality, the desk is a prime suspect even if the walls are treated.
A quick clap test can reveal flutter between parallel surfaces, but it will not tell you everything about first reflections. Still, if you clap and hear a zingy ring, you almost certainly need absorption at the first reflection points.
Front-wall reflections depend on how close the speakers are to the wall behind them. If the speakers are very close to the front wall, the reflection is earlier and can interfere with low mids and bass definition.
If you have the flexibility, try moving the speakers a few inches forward and listen for changes in punch. Small moves can shift cancellations enough to make kick drums and bass notes feel more consistent.
Once you have the reflection points marked, you have a treatment map that is specific to your layout. That map is the reason you can buy fewer panels and still get a bigger improvement.
| Surface | Simple way to locate the first reflection point | Typical treatment choice |
|---|---|---|
| Left side wall | Mirror method, mark where tweeter appears | 2 to 4 inch absorber panel |
| Right side wall | Mirror method, match height to tweeter | 2 to 4 inch absorber panel |
| Ceiling | Mirror held flat, or string line from speaker to ear | Ceiling cloud, 2 to 4 inch with air gap |
| Desk surface | Clap test, then cover reflective area near keyboard | Desk mat, monitor stand, or small absorber |
| Front wall | Measure speaker distance to wall, note early bounce risk | Thin absorber or speaker pull-out |
When you place panels at these points, you are not trying to absorb the whole room, just the strongest early paths. That is why two side panels and a cloud can feel like a bigger upgrade than covering random wall space.
If you want to double-check your work, play pink noise and move your head slightly while listening for tonal shifts. Strong reflection problems often show up as a swishy change in brightness as you move a few inches.
It also helps to take a photo of the marked points before you start mounting anything. If you later move the desk, you can compare and see how much the geometry changed.
Identifying the most important corners in your room
Corner placement matters because low frequency pressure builds where surfaces meet. When you trap corners first, you usually get a bigger bass improvement than you get from adding more wall panels.
Bass is long wavelength energy, so it does not behave like a laser beam that you can easily block with a thin panel. It piles up where it has nowhere else to go, which is why corners and boundary lines are so important.
Start with the two vertical corners behind your speakers, because that area often has the strongest bass loading. If your desk is on the short wall, those front corners are the first place I would put serious traps.
Those front corners also influence what you hear directly, because the speakers energize them immediately. When the front corners are controlled, bass notes tend to stop faster and the low end feels less like a fog.
Then look at the rear corners, because the back of the room often stores energy and sends it forward late. If you sit close to the rear wall, rear corner traps become even more valuable than front ones.
Rear corners are where you can get that stubborn boom that never seems to go away, especially if the room is short. Treating the rear corners can reduce the sense that bass is coming from behind your head instead of from the speakers.
Do not ignore wall to ceiling corners, especially in small rooms with low ceilings. A continuous trap along the ceiling line can do more than a couple of random panels at head height.
Wall-ceiling corners are also easier to treat without sacrificing floor space, which matters in an office. If you are trying to keep the room functional, high placement is often the least intrusive way to add real low-frequency control.
If you can only afford two traps, choose the corners that are closest to the speakers and most symmetrical. Symmetry keeps the left and right bass response closer, which helps your mix decisions translate.
When symmetry is impossible, prioritize the corner that is most strongly excited, which is usually the one nearest a speaker. You can also compensate by placing a thicker trap on the louder side and a thinner one on the other.
Not all corners are equal if the room has openings, alcoves, or a big closet. An open doorway can act like a pressure release, so the corner near it may behave differently than a fully sealed corner.
Closets can be a secret weapon if you can leave the door open, because they add volume and reduce pressure buildup. If your room has a closet behind you, opening it during critical listening can change bass behavior in a useful way.
Corner traps also help with overall decay time, not just frequency response. A room with controlled decay feels calmer and makes it easier to judge reverb tails and compression moves.
If you are building traps, remember that thicker and larger generally wins for bass. A small decorative corner wedge can help a little, but it will not do the heavy lifting that a deep trap can do.
Even if you are using pre-made traps, think in terms of coverage area and depth, not brand names. Geometry tells you where the energy is, and volume tells you how much of that energy you can realistically absorb.
Planning ceiling and rear-wall zones without guesswork
A ceiling cloud is the cleanest way to handle the ceiling first reflection points without killing the whole room. You want it centered over the listening position and wide enough to cover the mirror marks for both speakers.
Think of the cloud as a target over the listening triangle, not as a decorative tile in the middle of the room. If it is too small or shifted forward, you will still hear the ceiling slap even though you technically have a cloud installed.
Thickness matters more than fancy fabric, so do not buy a one inch “decor panel” and expect it to act like a real cloud. A 2 to 4 inch cloud with a 2 to 4 inch air gap tends to work well in offices with eight foot ceilings.
The air gap is not a gimmick, it effectively increases low-frequency absorption by moving the panel away from the boundary. If you have to choose between thicker material and a bigger gap, thicker material usually wins, but both help.
Mounting matters because a cloud that rattles is worse than no cloud at all. Use hardware that is rated for the weight and check that the ceiling anchors match your ceiling type.
Rear-wall planning depends on distance, and the number is simple, measure from your ears to the rear wall. If that distance is short, the rear wall reflection arrives quickly and you should lean toward absorption over diffusion.
A short rear-wall distance also means your head is sitting in a pressure zone for some bass frequencies. Thick absorption behind you can reduce that pressure and make the low end feel less like it is pressing on your ears.
If you have six feet or more behind you, diffusion can make sense because the return is late enough to feel spacious instead of smeary. In that case, I still like some absorption low down and diffusion higher, because bass piles up near boundaries.
Diffusion is often misunderstood as a replacement for absorption, but it is really a way to keep energy while breaking up obvious echoes. If the room is already too live, diffusion alone will not fix the harshness you are hearing.
For a desk setup that sits close to the back wall, a thick absorber panel behind your head is a practical fix. Treating that zone often reduces the “hollow” sound on calls and makes nearfield monitors easier to judge.
In an office, that rear-wall absorber can also double as a pinboard or visual backdrop if you choose the right fabric. The best treatment is the one you can live with every day without resenting it.
If your rear wall has a big bookshelf, you already have a form of rough diffusion, but it is not automatically enough. Books help in the mids and highs, yet the low end still needs depth and mass to be controlled.
Ceiling and rear-wall zones interact, because the ceiling bounce can reflect off the rear wall and come back again. When both areas are untreated, you can get a layered echo effect that makes transients feel smeared.
If you are trying to keep the room from feeling dead, avoid covering the entire rear wall with thin foam. A smaller number of thicker panels, placed deliberately, usually sounds more natural than full coverage with weak material.
Also pay attention to the floor, because a hard floor plus a hard ceiling creates a vertical ping-pong. A rug can help with comfort and a bit of high-frequency control, but it is not a substitute for a cloud.
Once the ceiling and rear wall are planned, the room tends to feel more stable at different volumes. That stability is what makes long work sessions easier, because your ears are not constantly adapting to reflections.
Creating a phased plan you can build over time
A phased plan keeps you from buying too much of the wrong thing early. It also lets you listen after each change, which is how you learn what your room actually needed.
It is tempting to do everything at once, but that makes it hard to know what worked. If you add ten panels in a weekend, you might like the result, but you will not know which two panels did most of the heavy lifting.
Phase one is always placement, because moving the desk and speakers costs nothing and can fix big response dips. Phase two is early reflections, because first reflection points affect clarity and imaging right away.
After early reflections, the next phase is bass control, because bass issues are usually the slowest to fix and the most expensive if you do it inefficiently. Corner traps and boundary traps are where you get the most predictable bass improvements.
Give yourself a few days between phases if you can, because your ears need time to adjust. What sounds “too dry” on day one often sounds “finally clear” on day three.
Take notes as you go, even if it is just a few words about what changed. Write down things like tighter kick, clearer center image, less fatigue, or fewer harsh consonants on calls.
If you can do basic measurements, do them at the start and after each phase, but do not let measurement become procrastination. The point is to make decisions, not to collect graphs forever.
Budgeting is easier with phases because you can buy the next item based on the biggest remaining problem. If the bass is still wild after early reflection treatment, you know the next dollars should go to traps, not more side panels.
Phases also help you keep the room usable, which matters if you work in it daily. You can mount side panels one evening, then plan the cloud on a weekend when you have time to do it safely.
- Tape-mark listening position and speaker stands
- Side-wall first reflection panels at mirror marks
- Ceiling cloud centered over the listening triangle
- Front vertical corner traps behind the speakers
- Rear-wall absorber if you sit close to the back wall
- Extra corner placement along wall-ceiling lines
- Optional diffusion if rear distance is long enough
Notice that the list starts with tape and ends with diffusion, because that order matches how most rooms behave. The early steps fix obvious clarity problems, and the later steps refine the feel of the room.
When you add a new piece, keep the rest of the room constant for a day or two. If you move the desk, change speaker angle, and add panels all at once, you will not know which change improved the imaging.
If you share the office with other needs, like a treadmill or a guest bed, plan around what cannot move. Geometry-based planning is flexible, but it still depends on knowing what the stable constraints are.
Do not be afraid to stop early if the room already meets your needs. A home office does not have to sound like a mastering suite, it just has to be controlled enough that you can trust what you hear.
Also remember that acoustic treatment is not only for music work, it helps video calls and voice recordings too. A controlled room makes your mic sound closer and more professional without any plugin magic.
By the time you reach the optional steps, you should have a room that is predictable, not perfect. Predictable is the real win, because it lets you make decisions faster and second-guess yourself less.
Conclusion
If you want predictable results, start with the room, not the shopping cart. When you plan acoustic treatment placement using room geometry, each panel has a reason to exist and the room improves in a steady, noticeable way.
Mark the listening position, map first reflection points, then prioritize corner placement and a ceiling cloud based on what the geometry tells you. Build it in phases and you end up with a home office that sounds controlled without feeling dead.
The main takeaway is that you are not treating “sound,” you are treating routes that sound travels. Once you see those routes, you stop guessing and start placing treatment where it will actually change what you hear.
If you only do three things, make them a sensible layout, side-wall reflection control, and a real ceiling cloud. Those steps usually deliver the biggest clarity improvement per dollar in a normal-sized office.
After that, invest in corners and rear-wall decisions based on distance, because bass and late reflections are where small rooms get stubborn. The room will feel calmer, your speakers will feel more honest, and your work will get easier.


