Most home offices end up in rectangular rooms, and that shape can make your speakers sound weird even when the gear is solid. The best desk position in a rectangular room is usually less about taste and more about physics you can hear.
If your low end is boomy, hollow, or missing, your desk and chair are probably parked in a bad spot for room modes. Fixing placement first saves you from buying more foam, swapping monitors, or blaming your interface.
I like to treat desk placement like a quick layout problem, then use acoustic treatment to lock it in. Once you get the front wall setup and center line placement right, reflection control becomes simpler and cheaper.
Why desk placement changes bass and clarity
In a rectangular room, bass piles up and cancels out in predictable stripes, and your chair is either in a stripe or it is not. When you sit in a cancellation zone, kick drums vanish and you start over-EQing the low end.
Those stripes are basically standing waves, and they do not care that your desk is expensive or your monitors are popular. A few inches of movement can change a 60 Hz note from huge to gone, which is why placement beats guessing.
Desk placement also changes the timing of early reflections, which are the first bounces off nearby surfaces that smear your stereo image. If the desk is too close to a boundary, those reflections arrive so fast that your brain blends them with the direct sound.
That blending is why a mix can feel wide but unfocused, like everything has a halo around it. You might think you need more high end, but what you really need is fewer competing arrivals in the first 10 to 20 milliseconds.
Clarity is often a midrange problem, not a treble problem, and the desk is a big midrange reflector. A wide desktop can throw a strong bounce straight into your ears, so reflection control starts with how you angle and position the desk.
Even the stuff on the desk matters, because screens and rack gear create little reflective planes at different heights. When those reflections are uneven left to right, the stereo image can tilt even if the speakers are perfectly matched.
The goal is boring and practical: even bass at the listening position and clean left-right symmetry. That is why the best desk position in a rectangular room usually looks like a standard studio layout, even when the room is just a spare bedroom.
Once you hear a centered vocal that stays centered as you turn the volume up, you stop caring about trendy layouts. The room gets out of the way, and you can trust your decisions instead of constantly second-guessing them.
Start with the room’s long axis (and when to break that rule)
Most of the time you want the speakers firing down the long dimension of the room, because it spreads modal problems out and gives bass more distance to develop. This long-axis orientation also buys you more space behind you for absorption or diffusion later.
It also tends to make the front wall feel more stable, because both speakers see the same boundary at the same distance. When the front wall is consistent, you get a more predictable low end and less weirdness in the low mids.
A front wall setup on the short wall is the common move, with the desk facing the short wall and the room stretching behind you. That tends to make sidewall reflections easier to control because the left and right walls are farther away.
It also makes your listening triangle easier to fit without pushing the speakers into corners. You can keep the speakers a reasonable distance apart while still sitting close enough for nearfield monitoring to work.
Another upside is that you can usually place thicker treatment on the back wall without it being right in your face. A little extra space behind the chair is where bass traps and back-wall absorption actually start to matter.
You break the long-axis rule when the room forces a terrible symmetry problem, like a closet door on one side and an open hallway on the other. In that case, a long-wall setup can sometimes create more equal side boundaries, even if the bass math is less friendly.
Symmetry is not an aesthetic preference, it is an imaging requirement. If the left speaker is reflecting off a hard wall and the right speaker is reflecting off a curtain into a doorway, you will mix to compensate and your mixes will not travel.
You also break the rule when the only workable desk location puts your ears right in the center of the room, which is often a deep null for certain bass frequencies. If the long-axis option pins you to that spot, rotate the layout and re-check with quick measurements.
Sometimes the room length is not the real issue, because the ceiling height mode is the one punching you in the face. If your ceiling is low, a different orientation can change how the desk and speakers interact with that vertical mode.
Furniture can also force the decision, and that is fine as long as you treat it like a compromise you can manage. The mistake is assuming the “normal” orientation will work in every room, then never testing the alternative.
If you do try a long-wall setup, keep the speakers and chair pulled away from the wall behind the speakers as much as you can. Long-wall layouts can work, but they usually need more attention to early reflections and a tighter nearfield triangle.
How far to sit from the front wall for a balanced response
Distance from the front wall controls two things at once: boundary bass boost and speaker-boundary interference. If you push the desk tight to the wall, you often get more upper-bass thickness but also deeper dips in the low mids.
That dip is the classic “where did the punch go” problem, where bass notes are loud but the body of the kick and bass guitar feels scooped. People often try to fix that with EQ, but it is usually a geometry issue first.
A solid starting point is the 38 percent guideline, where your ears land about 38 percent of the room length from the front wall. It is not magic, but it often lands you away from the worst length-mode peaks and nulls.
The point of a guideline is speed, not perfection. You pick a reasonable starting location, then you nudge forward or back until the low end stops doing obviously dumb things.
When you move the listening position, you are changing which parts of the standing wave you are sitting in. If you only ever test one spot, you never learn whether the room is the problem or your placement is the problem.
Keep in mind that the 38 percent number is based on the room length, not the distance from your chair to the back wall. If you have a deep desk, your ears might be farther back than you think, so measure from the wall to your head position.
If you are forced to sit closer than 38 percent because the room is short, you can still make it work by tightening the speaker distance and treating the front wall. Nearfield monitoring helps because the direct sound dominates more of what you hear.
If you sit too far back, the back wall becomes a bigger player and you can get strong reflections and bass buildup behind your head. That is why “more space” is not automatically better if it puts you close to the rear boundary.
A practical way to think about it is this: you want some space behind the speakers, some space behind your head, and a listening position that is not parked on a modal bullseye. The best spot is usually a compromise that keeps the response smooth enough to mix.
| Room length (front to back) | Ear position from front wall (38%) | Practical desk note |
|---|---|---|
| 10 ft | 3.8 ft | Small desk, keep speakers close to wall if needed |
| 12 ft | 4.6 ft | Good baseline, leaves space for a chair and a back-wall panel |
| 14 ft | 5.3 ft | Often easiest for symmetry and a deep listening triangle |
| 16 ft | 6.1 ft | Room for thicker bass trapping behind the listening spot |
Use the table as a first pass, then treat it like a range rather than a single coordinate. In most rooms, moving your ears 4 to 10 inches can be the difference between “I can work” and “why is everything lying to me.”
If you want a sanity check without getting deep into acoustics, listen to a bassline that walks across notes and see if certain notes jump out or disappear. A balanced position makes the line feel consistent, not like a random volume automation.
Also pay attention to the low-mid chest area around 120 to 250 Hz, because that is where rooms often get lumpy. If that band is uneven, vocals and guitars will feel like they change size when you move your head.
Keeping your desk centered without overthinking it
Center line placement matters because your brain expects the left and right speaker to hit similar boundaries at similar times. If one sidewall is closer, your phantom center drifts and panning decisions get sketchy fast.
This is why you can sit down, hit play, and immediately feel like the vocal is leaning to one side even when the meters say it is centered. Your ears are reacting to timing and reflection level differences, not just volume.
Centering does not mean measuring to the drywall with laboratory precision, it means keeping the listening position symmetric to the main left and right boundaries. In a typical home office, that is the two side walls, not your bookshelf on one side and your plant on the other.
It also means the speakers should be symmetric, because the speakers define the acoustic “front end” of the room. If the speakers are not symmetric, the desk being centered is basically irrelevant.
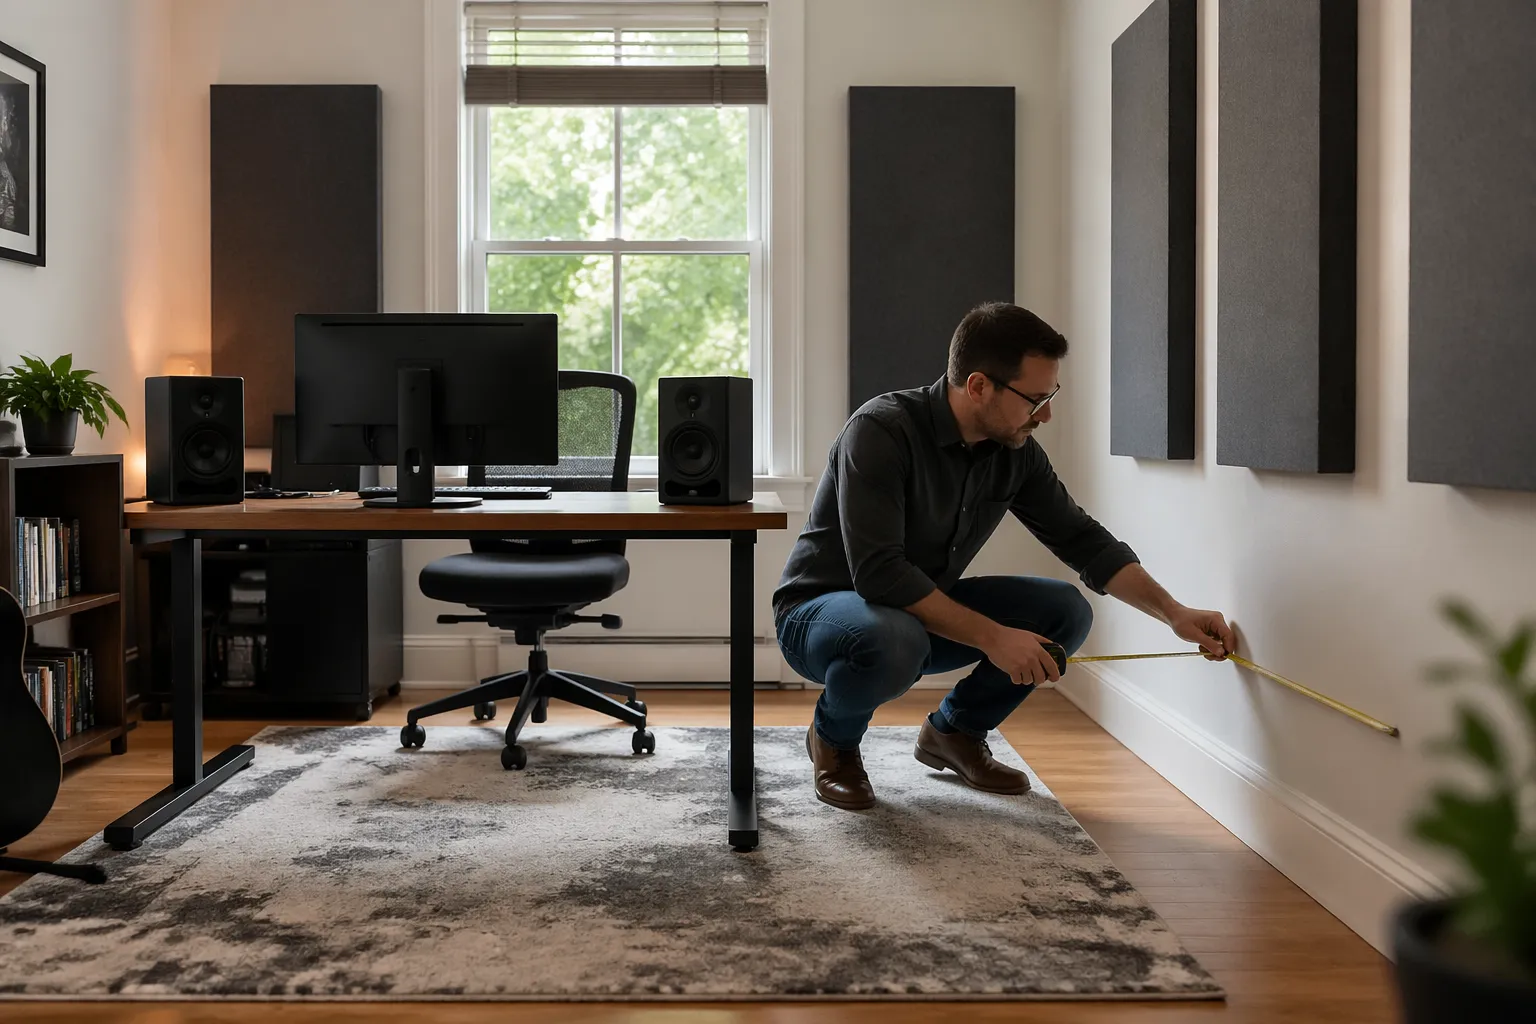
Start by finding the room’s center line with a tape measure and a bit of painter’s tape on the floor. Then center the chair and speakers on that line, and move the desk as needed to make the speaker positions symmetric.
If you have a rolling chair, mark the front legs or casters so you can return to the same spot. Repeatability is underrated, because you cannot evaluate changes if your position shifts every time you sit down.
When you place the speakers, think in terms of an equilateral triangle between your head and the tweeters. You can cheat that triangle a bit, but you want both speakers the same distance to your ears so the center image locks.
If you have to choose between a perfectly centered desk and perfectly centered speakers, pick the speakers. You can sit slightly off the desk’s physical center and still keep the acoustic center line placement where it counts.
Another practical trick is to keep the desk itself simple and symmetric, even if the room is not. A big L-shaped desk can work, but it is easier to get predictable results with a straight desk that does not wrap around one side.
If you use a side return for a keyboard or extra gear, try to keep it low and off to the side rather than directly between the speakers and your ears. The more stuff you put in the direct path, the more you create little reflection surprises.
Do not obsess over tiny asymmetries that are far from the speakers, because the early reflections are the ones that matter most. Get the big geometry right first, then treat the room so the remaining differences are less audible.
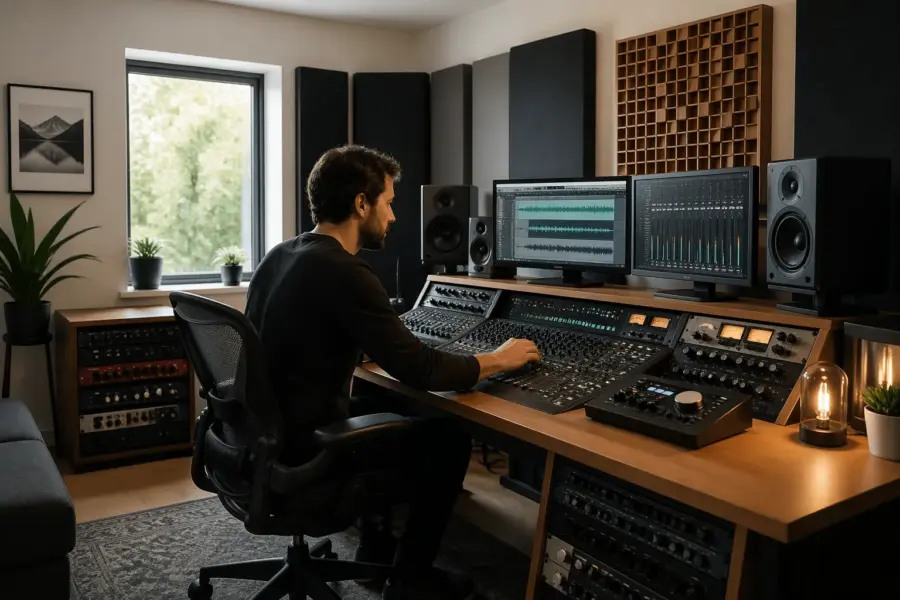
Front wall setup details that make monitors behave
The front wall setup is where small changes can flip your bass from tight to tubby. The main knobs are speaker distance from the front wall, speaker height, and how much the desk blocks the direct path to your ears.
It is also where you decide whether you are building a nearfield setup that minimizes the room, or a midfield setup that invites more room sound into the mix. Most home offices do better with nearfield, because it reduces the room’s influence without needing heroic treatment.
If you can, put monitors on stands that straddle the desk, because it reduces desktop reflections and keeps the tweeters at ear height. Desk-mounted monitor stands can work, but they often increase reflection control needs because the desk becomes a bigger acoustic mirror.
Stands also help you decouple the speakers from the desk, which can reduce rattles and weird resonances. If stands are not possible, isolation pads are not magic, but they can keep the desk from acting like a soundboard.
Keep the speakers the same distance from the front wall and the same distance from the side walls, because symmetry beats cleverness. Toe-in so the tweeters aim at your ears, then adjust in small steps until the center image snaps into place.
Toe-in is not just about brightness, it is about controlling how much sidewall energy you throw into the room. A little more toe-in can reduce sidewall reflections, while too much toe-in can make the sweet spot narrow and unforgiving.
Height matters because you want the tweeters at ear level, but you also want the speakers to be stable and not perched on a wobbly platform. If your chair height changes during the day, set the speaker height for your most common working posture.
If the room is short, you may end up with the speakers closer to the front wall than you want, and that is fine if you treat it consistently. What you cannot do is put one speaker near the wall and the other pulled out, because that breaks the whole stereo picture.
When speakers are close to the front wall, the front wall reflection can combine with the direct sound and create a notch at a frequency tied to that distance. The fix is usually either moving the speakers a bit or adding absorption on the front wall behind them.
Avoid placing the speakers at dramatically different distances from the front corners, because corners exaggerate bass and can make one side feel heavier. If you must be near a corner, plan on bass trapping there, because that is where it will pay off most.
Try to keep the area between the speakers relatively clean, because a tall screen can act like a reflector right in the center. If you use a big display, pulling it slightly back or lowering it a bit can reduce the strongest bounce into your ears.
Finally, do not ignore the front wall itself, because it is part of the speaker system once the room is involved. A bare front wall can sound hard and splashy, while a treated front wall can make the whole setup feel calmer and more controlled.
Dealing with windows, doors, and closets on one side
Real rooms have windows, doors, and closets, and they rarely land symmetrically. The trick is to decide what boundary the speakers “see” first, then make the other side behave similarly with treatment or layout.
The first boundary is usually the closest big surface that can reflect mid and high frequencies back to your ears. If one side is a hard wall and the other side is broken up by openings, you have to manage that imbalance on purpose.
A window is a hard reflector in the mids and highs, even with blinds, so it often creates a strong early reflection. A closet opening can act like a bass leak, which changes low-end balance between left and right.
That bass leak can feel like the bass is “pulling” to the open side, even if the stereo image seems centered. You might also notice that certain bass notes feel less controlled on one side of the room than the other.
If one side has a window, hang a thick curtain that reaches past the window frame and has real folds, not a tight flat sheet. That single move can make reflection control easier than sticking thin foam squares all over the glass area.
For the curtain to help, it needs mass and depth, because thin fabric mostly just looks nice. If you can create an air gap behind the curtain, it will absorb a bit lower in frequency and behave more like a real treatment layer.
If one side is a door you need to use, put a movable absorber on a stand or a hook-mounted panel you can remove. You can keep center line placement and still live in the room, but you have to treat the room like a workspace, not a showroom.
A door also tends to rattle, especially hollow-core doors, and that can trick you into thinking the speakers are distorting. A simple weather strip or door sweep can reduce buzzes and make low-end playback feel cleaner.
Closets are weird because a closed closet door is a reflective surface, while an open closet is a deep cavity that can change the room’s decay. If you mix with the closet open one day and closed the next, you are changing the room without realizing it.
If you can, pick a “default” state for doors and closets and keep it consistent when you work. Consistency matters because you are training your ears to a reference, and the room is part of that reference.
When the asymmetry is extreme, sometimes the best move is to shift the whole setup slightly so both speakers see similar stuff. This is not the same as randomly offsetting the desk, because you are still keeping symmetry around the listening axis.
If you are stuck with a window on one side and a wall on the other, treat the wall side too so the reflection strength is closer. The goal is not “dead,” it is “matched,” so your brain stops fighting the room.
Quick tests you can do with tape and a chair
You do not need a full measurement rig to find a better starting point, you need a repeatable way to compare positions. A chair, painter’s tape, and a few tracks you know well can expose bad bass spots fast.
The key word is repeatable, because your memory of bass is unreliable when you are guessing. Marking positions turns the room into a simple experiment instead of a vibe-based furniture shuffle.
Mark a center line placement on the floor and mark a few listening positions along that line, spaced about 6 to 8 inches apart. Then move only the chair first, because moving the desk and speakers too early makes the test messy.
When you move the chair, keep your head height consistent and sit the same way each time. If you lean forward in one position and recline in another, you are changing the test without realizing it.
Start at a moderate volume and do not change it between positions, because louder always sounds better for a minute. You are listening for smoothness and consistency, not for which spot hits the hardest.
Use a track with a steady bass part and a clear vocal, because that exposes both low-end issues and imaging problems. If the vocal shifts left or right as you move, you are hearing reflection imbalance, not just bass modes.
A slow sine sweep is useful because it shows you where the room is exaggerating or killing notes. If the sweep suddenly drops out around a certain frequency, that is a null you cannot EQ away at the listening position.
- Painter’s tape center line down the room
- Three chair marks at 32%, 38%, and 44% of room length
- One bass-heavy reference track you trust
- Slow sine sweep from 30 Hz to 200 Hz
- Clap test for flutter between side walls
- Phone RTA app for rough peak and null spotting
If you use a phone RTA app, treat it like a compass, not a microscope. You are looking for big trends, like a 10 dB hole or a huge hump, not tiny wiggles that change every time you breathe.
The clap test is crude, but it can reveal obvious flutter echo between untreated parallel walls. If you hear a sharp “zing” after a clap, sidewall treatment will probably improve fatigue and imaging.
After you pick the best chair mark, move the speakers and desk together to match that listening position, then re-test. The chair-first approach helps you avoid moving heavy furniture until you have a direction.
Once the desk is in place, do a small forward-back adjustment in 2 to 3 inch steps if the bass still feels uneven. Those micro-moves are where you often find the sweet spot that the 38 percent guideline gets you close to but not exactly on.
If you want to be extra practical, take notes on each position with a few words like “60 Hz loud,” “kick thin,” or “vocal drifts right.” That keeps you from looping back to the same bad spot because it felt good for ten seconds.
Reflection control at the desk, the cheap wins first
Once the best desk position in a rectangular room is close, reflections become the next problem you can actually solve. I start with the “first reflection points” on the side walls and the ceiling, because those hits mess with imaging and fatigue.
First reflections are loud because they are close, and they are damaging because they arrive quickly. If you reduce them, the direct sound becomes more dominant and the speakers start sounding more like themselves.
You can find sidewall reflection points with the mirror trick, where a friend slides a mirror along the wall until you can see the speaker from the listening position. Put a 2 to 4 inch thick panel there, and you usually hear the stereo image tighten immediately.
Panels work best when they are actually thick enough to absorb, not just decorate. A thin panel can tame some high end, but it will not do much for the midrange where a lot of harshness and confusion lives.
The desktop reflection is sneaky, especially with big screens, a laptop, and a hard laminated surface. A smaller desk, a desk mat, or raising the monitors so the tweeters clear the desk edge can reduce that bounce more than you would expect.
Even changing the monitor height by an inch or two can change the reflection path enough to make the midrange feel less comb-filtered. If you hear a “phasey” quality on vocals, the desk is often part of the problem.
Ceiling reflections are common in home offices because the ceiling is low and flat, so a cloud panel over the listening spot is often worth the effort. If you cannot hang anything, a thick rug does nothing for the ceiling, so focus on sidewalls and desk geometry instead.
If you can hang a cloud, keep it centered over the listening position and wide enough to cover the area between you and the speakers. A small cloud that misses the reflection point is basically a decorative ceiling tile.
After first reflections, the next cheap win is usually the back wall behind your head. A thick absorber there can reduce slapback and help the room feel less “small,” especially when you are sitting closer to the center than you want.
Bass trapping is not as cheap, but corner traps are where money turns into results the fastest. If your bass is uneven across notes, trapping the front corners and back corners can smooth things out more than adding random panels.
Do not overdo absorption right at the desk and ignore the rest of the room, because that can make the room feel dead up top but still messy down low. The best results usually come from a balanced approach: control reflections, then address bass buildup.
Also keep your desk surface in mind when you buy or build panels, because placement matters as much as thickness. A great panel in the wrong spot is still the wrong panel.
Common mistakes that ruin an otherwise good layout
The biggest mistake is putting the desk against the long wall because it looks “balanced” with the furniture, then wondering why panning is hard. In many rectangular rooms that layout puts the speakers too close to side walls, so early reflections arrive too loud and too soon.
It also tends to force a wider speaker spacing than you can really use in nearfield. When the speakers are too far apart, the center image weakens and you start mixing the sides too hot to compensate.
Another mistake is sitting exactly halfway between the front and back walls, which is the center of the room length. That spot often lines up with a big null for the first axial mode, and you end up chasing bass with EQ that never translates.
The scary part is that the halfway spot can sound “clean” at first because the missing bass feels like clarity. Then you take the mix to the car and realize you built a sub-heavy monster because you were mixing in a bass hole.
People also cram speakers into corners to save desk space, then complain that the low end is thick and uneven. Corners are where bass pressure builds, so you get extra boom plus bigger modal swings across just a few inches of movement.
Corner placement also increases boundary interactions, which can create dips and peaks that feel like the speaker is “one-note.” You might blame the monitors, but the room is basically EQing them with geometry.
One more that drives me nuts is offsetting the desk “a little” to make room for a chair or a filing cabinet. That tiny offset breaks center line placement, and your mix decisions start compensating for a room problem you created with furniture.
Another common one is placing one speaker on the desk and the other on a stand, because it was convenient. Even if the heights match, the reflection environment is different, so the tonal balance and imaging will not match.
People also forget to level-match when testing changes, and that makes the louder position feel “better” even if it is worse. If you move the speakers closer and it gets louder, turn it down and judge the balance, not the volume.
Finally, a lot of home setups fail because the desk becomes a storage shelf that grows over time. A pile of gear between the speakers can create reflections and diffraction that you will hear as a vague, cloudy center image.
If you keep the layout clean and symmetric, you can make small improvements and actually hear them. If the layout is chaotic, every change is masked by five other problems and you never get a clear win.
Conclusion
The best desk position in a rectangular room usually comes from a simple recipe: face the short wall, keep a clean front wall setup, and sit around 38 percent of the room length. Then lock in center line placement so left and right boundaries behave the same.
That recipe is not about being “pro,” it is about giving your ears a stable reference. When the room stops fighting you, your mixes get faster and your revisions get smaller.
After that, spend your effort on reflection control where it pays off, especially sidewall first reflections and the desktop bounce. If the room has a window or door on one side, treat or manage that side so the stereo image stays honest.
Do not treat the room like a one-time project you finish and forget, because your setup changes as your workflow changes. Every time you add a screen, a shelf, or a new desk, re-check symmetry and reflection points.
If you take one practical step today, put tape on the floor and test three chair positions before you move anything heavy. The room will tell you where it wants the desk, and you will hear it in the bass and the center image.
Once you find that spot, commit to it and make the rest of the room support it instead of undermining it. A simple, consistent layout beats a complicated one that changes every time you clean the room.


